Category Archives: Sluggy’s and Gabby’s Trikes

Adventures on Three Wheels

Sponge Bob Break

Sadly, this is a pun. Not only does this post represent a break in the current storyline, it is also a lament that Sponge Bob is broken.

I swear, I’m not taking that trike to Arlington anymore. We took it Oklahoma and to the Hill Country twice and all over the metroplex. The clutch broke once in Oklahoma on it’s first journey, but regardless of all the other traffic, it has broken down three times in Arlington.

Good or bad, at least I’ve gotten good enough at riding it without the clutch that at least I wasn’t stranded in Arlington. This time.

So, I need to figure out what’s wrong this time. I suspect that the throwout bearing has jumped off the rails. There seems to be a delicate balance on exactly where the clutch arm needs to stop. Which is, of course, me saying that I’m sure it’s actually my fault, but I still suspect an Arlington connection.

Checking the throwout bearing is a fairly simple affair. Remove four wires, one fuel line and the four nuts holding the engine on and check it out.

To remove the engine, however, I need to remove the baja bumper. To remove the baja bumper, I need to remove the shocks. The new shocks are coilovers, which complicates their removal and installation because they need to be compressed to fit.

They make a tool to compress these sorts of springs. I have search for one locally to no avail and just have never gotten around to ordering one. So I was trying to figure out a way to compress the shocks since I will need to do this occasionally.

I first tried a ubolt extended with all thread, but there isn’t room on both sides of the shock for the all thread. I figured a way to do it with a couple of hand fabricated hooks. It took about 30 minutes to fashion the hooks and try it out to remove one shock. It worked pretty well, but one hook straightened out and failed while the shock was sitting on the bench. I knew the concept was good and just needed stronger hooks, so I made another with braces.


The hook on the left is designed to clear the spring. Were I to remake the hook on the right, I might offset the hole for the all thread so it would be parallel to the body of the shock, but I’m not sure that would really be necessary.

I might also add a brace at the far right and use a longer all thread so the wrenching surface would be easier to reach. That hook is on the bottom of the shock and moving the nut closer to the end would let it be reached more easily from below the trike.

As it stands, it works well enough to install and remove at least the one shock.

Once I was finished with that, decided I was too tired to tear into the trike and cleaned up the shop before things get out of hand. A few days of cutting and grinding makes a mess.

Maybe I wasn’t so tired after all because I also *finally* assembled a storage cabinet that I have had for enough months to wonder if it could be counted in years. It’s a nice big cabinet, and as expected, it doesn’t have enough shelves, but I can fix that.

It looks twisted in the pic, but it isn’t. I put a few things that have been sitting on the floor in it, as well as all the power tools that have been in a functional but ugly cabinet that I will be taking down. I think I have a place for the old cabinet. Where it is will go my band saw and drill press, which have also been sitting around on the floor a while.

Footpegs Continued

The #2 tip is enough bigger to get the job done, but I still had a LOT of trouble getting the inside corner of the 3 way intersection properly bonded.

Still, I think it will plenty strong. Nearly 50% of the gusset’s entire edge is secured.

I ran a sanding disk over it everywhere I could reach.

Perhaps I can use my little abrasive blaster to further clean the crevices.

Tomorrow, I pick up the ubolts and try it on for size. Assuming it works, on Monday I will drop it off for powder coating (which is preceded by a rather aggressive shot peening by a massive machine called the Wheelabrator, so I’m not sure why I am worried about sanding it) and that will nearly be that.

Picking it up and handling it reminds me of a crossbow….

Footpegs

I got started on the footpegs for the Dragon Trike. I’m making a simple T-bar that will be u-bolted to the frame. The u-bolt mount will allow it to be adjusted and removed for eventual powder coating or other modification. For a ride of any appreciable distance, I would like it to eventually be a bar with footboards on it.

I have a 4 foot long piece of 1-1/2″ square tubing and I picked up a 3 foot piece of 1″ round tubing.

I sawed a hole through one end of the square tubing and centered a 32″ length of the round tubing and welded it in place.

I placed the hole slightly off center so it would be simpler to give a chamfered look to the end. The chamfer will be about parallel to the ground.

I cut wedges out of the “wide” side:

 And folded the side down to meet them:

I then cut a rectangle to fit the opening and welded it in.

The front edge weld in the pic above is possibly the best looking weld I’ve ever done. It’s almost a shame to grind the smooth.

I cut the square tubing to length, 16 inches from the crossbar to the end.

To make the saddle, I used a 3″ x 8″ black steel pipe nipple. I cut the threaded ends off then split the remaining tube.

I had a steadier hand for the other cut 🙂

After cleaning up the edges, used a magnet, barely visible here, to hold it temporarily in place so I could tack it on the end of the square tube.

I welded to two curved straight sides. The curved sides will be carrying the most weight in service, so I cut a couple of gussets to weld in along this side.

My #0 tip just couldn’t throw enough BTUs to do a good job the the intersection of all three pieces, but I’m pretty happy with the long weld along the gusset.

I also ran out of welding rods small enough for the selfsame #0 tip, so this is how it sits at the moment. I will swing by the welding supply joint tomorrow and get a little bigger welding tip and a bunch of the smaller rods. With a bigger tip, I should be able to clean up that mess and avoid a similar mess on the other side pf this brace and the other brace.

This is the nearly completed thingy:

Quick Update on Sponge Bob Square Trike

A couple of weekends ago, Sponge Bob started to experience some odd clutch-centric symptoms. During the course of the day, the clutch became less and less responsive to the pedal. Go ahead, push the pedal… the gears are going to grind anyway. At one stop, it the starter even ground a few times before it kicked off. It was beginning to look like something major was wrong. I rode the rest of the way home shifting without the clutch, shutting of the engine at each stop and starting up in gear on the green light… it was not particularly fun.

So, since I doubt the Dragon trike will be ready to take to the IMS tomorrow, I tore into Sponge Bob last night to see what the matter was.

The plan was to pull the engine out and see what was going on with the throwout bearing, my first suspect. I figured while I had it apart, I would also change out the old leaky airshocks with the nifty coilovers I ordered long enough ago for the box to be dusty. Also, when we went to look at a particular trike for sale recently, it was at the owner’s mechanic’s house. He runs a VW repair and restoration shop out of his house. Cool guy and I envy his situation. Anyway, he had some chrome pipes of the same style that are on Sponge Bob except that they still have chrome on them and Gabby bought them for $50. I’d put those on, too.

I had the bumper off and the jack under the engine when I started removing the four nuts that hold the engine and transaxle together.

Hello, there is a missing nut on the bolt that also holds the top of the starter. And the other top nut was backed almost off it’s stud. There was a 1/4″ gap between the engine and transaxle.

Well, that would certainly explain it. This would let the engine and transaxle intersect at an angle and explains all the symptoms.. The input shaft of the transaxle runs inside a roller bearing in the end of the crankshaft. This misalignment would put that in a bind, so it would seem that the clutch is not disengaging. The starter was not only farther from the flywheel than expected, it would also be flexing away from it on the bottom bolt.

I found a replacement for the missing nut and tightened everything up and verified that the clutch would disengage. I then went ahead with the shocks (which required a run to two parts stores to find bolts to fit the lowers) and the pipes. There are no baffles in them, so they are significantly louder than the old ones. Gabby is pleased.

Another Long Overdue Update on the Dragon Trike

The clutch issue was resolved by continuing to swap out pressure plates until I found one that worked.

The one that finally worked is one that was on the free parts shelf at the BTW clubhouse. It was coated with a fine layer of rust, but it cleaned up perfectly and more importantly, it works. I neglected to get a picture of it, but it was one similar to this.

It is still an absolute mystery why the one I bought didn’t work, but my instincts indicate that it has something to do with the mix-n-match nature of the engine and transaxle combination.

In any case, it’s streetable, though the shifter is a pain to deal with. I plan to install one of these, or one like it

I have dedicated a number of hours tuning on the EFI system. At first, I was fighting a bad O2 sensor and now I’m fighting what I can only conclude is erroneous injector specifications. All indications are that they are 245 cc/min injectors. Using that number, every iteration through the basic fuel equation returns a ReqFuel number of 22 or so, which it then divides amongst two injectors. Trouble is, the engine will hardly even idle if the number is below 30 and it doesn’t run with a decent AFR until about 44. The astute observer will note that the number that works is exactly double the number given. This leads me to wonder if I should  keep thinking that I should be able to trick it into by telling it my injectors are half the flow they are, hoping for it to come back with a 44. It apparently doesn’t work that way, for telling it 125 cc/min comes back with, like 28.

So, ignoring the set up and using 44 as the ReqFuel number gets the thing running.

I’ve been using TunerStudio instead of MegaTune. I like it better overall. The dashboard configuration is very easy to customize.

With MegaTune, I would have to swap out one gauge or another when I was working on various pieces of the tune, but with TunerStudio’s dashboard, I have all the gauges showing at once. I need to play with their layout a bit, but they are all there!

TunerStudio’s VE Analyze Live! feature is a pretty cool autotune facility, however in my case, it seems to want to lean out mixtures that are already lean, where I would expect it to richen them. Perhaps I have some settings wrong. In any case, it’s still cool to watch it change the numbers and to see the engine respond to the changes.

With continued vigilance, I hope to have this thing reliably on the street in the next few weeks.

Denied!

Rule One: Test before you put it ALL back together.

Monday night, I got the rest of the engine wiring and hoses on, the exhaust, the bumper… Started the engine up (it cranked for about one second and lit off without touching the throttle… I love EFI)…. All looked good.

I knew I would probably need to adjust the clutch cable before taking it for a spin. That’s when I noticed that the clutch arm does not budge. At all. Well, it wiggles with the minimal play that the shaft has naturally, but otherwise, it was completely immobile.

Long story short, on Tuesday, I called AMS to consult with Steve again. He recommended that I remove all the new parts and bring them in, along with the old parts and as much other information as I could gather. Tuesday night, I fooled with it for a while, still looking for something, but pulled the parts out and got them ready to go.

This afternoon, I took everything in to AMS and we determined that everything should be all the right components. He suggested a couple of things to check concerning cable adjustment and clearances. I also consulted a couple of BTW folk. At this point, it’s a mystery to all, but my mission is to measure and test to see if I can find what’s not making up.

So, when I got home and got started, about 8PM, I first checked that the throwout bearing, fork, cable and pedal were all moving freely.

 Reassembled, same thing.

I pulled it apart again. I did some measuring. I put a straight edge across the mounting face of the transaxle and measured to the face of the throwout bearing. It was 2.68 inches. I also put the straightedge on the face of the pressure plate collar thingy and measured to the engine block face that mates with the transaxle. It was 2.81 inches. These two together should mean that, once assembled, the throwout bearing should be resting about 1/8″ from the pressure plate. This corresponds with the expected range of motion for the assembled clutch.

I verified that the clutch arm has it’s full range of motion while disassembled.

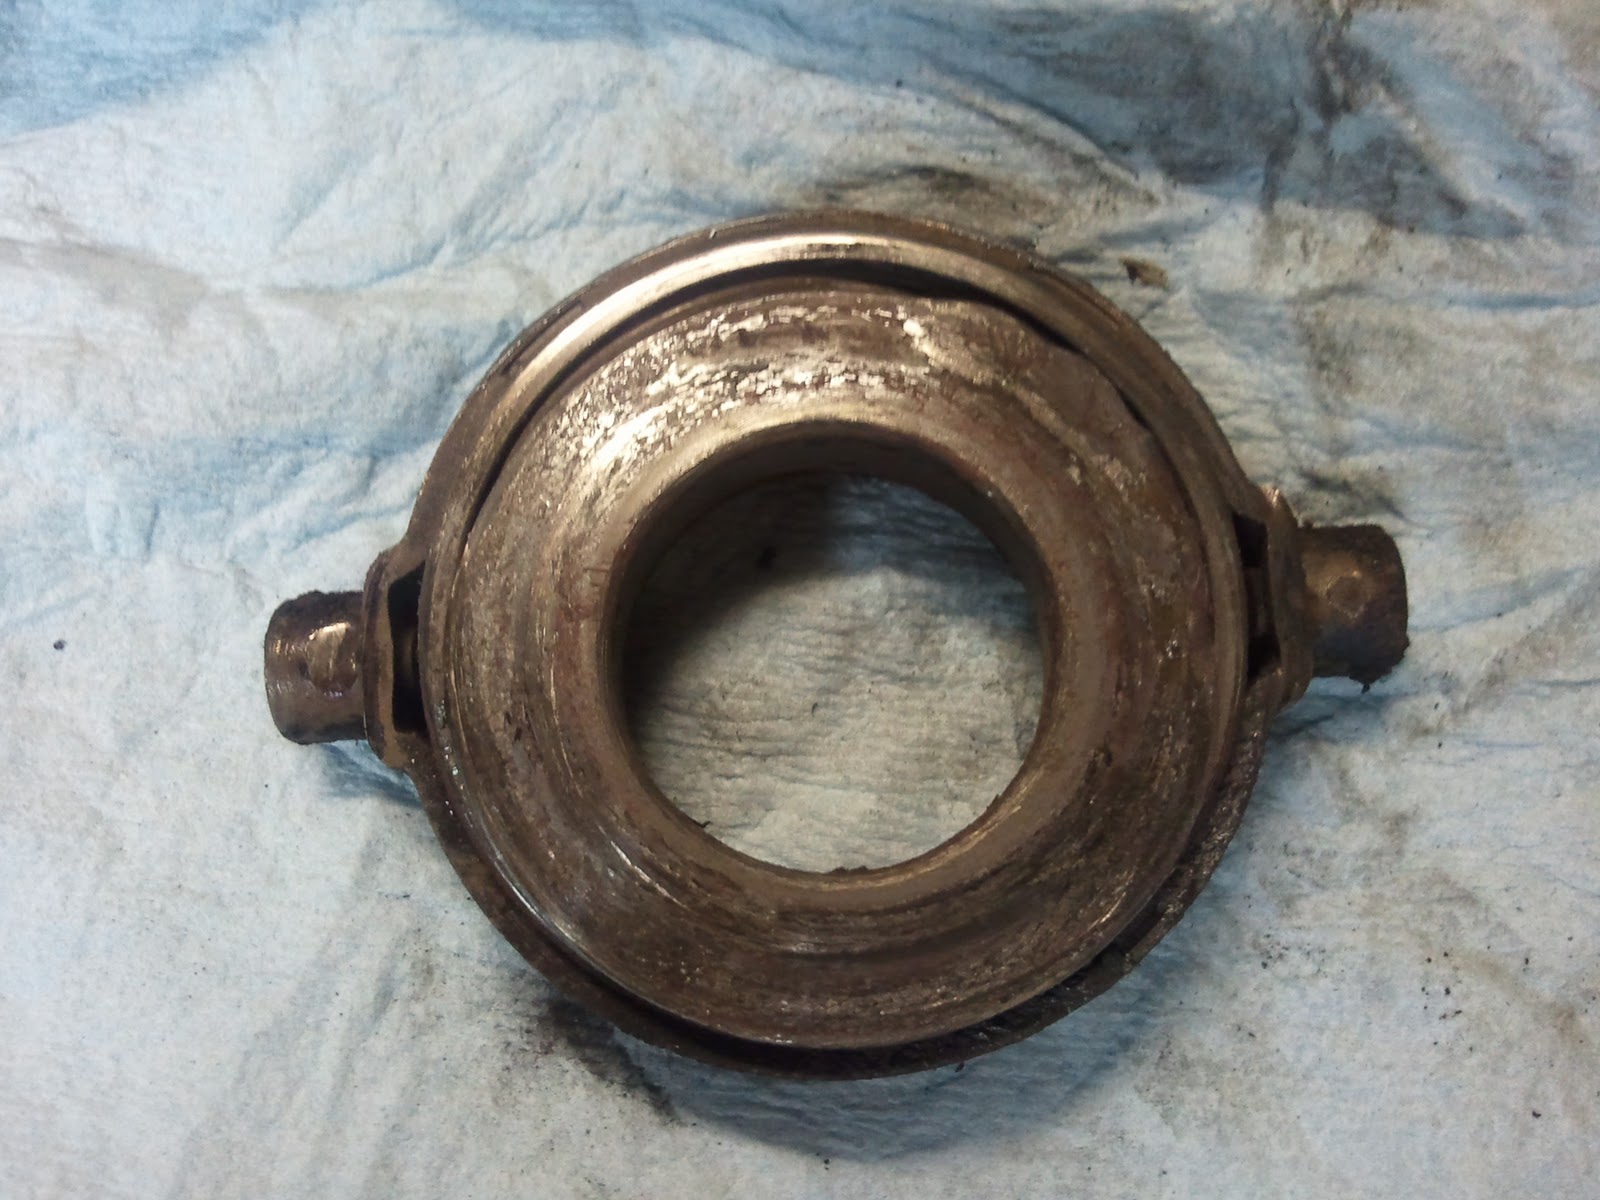
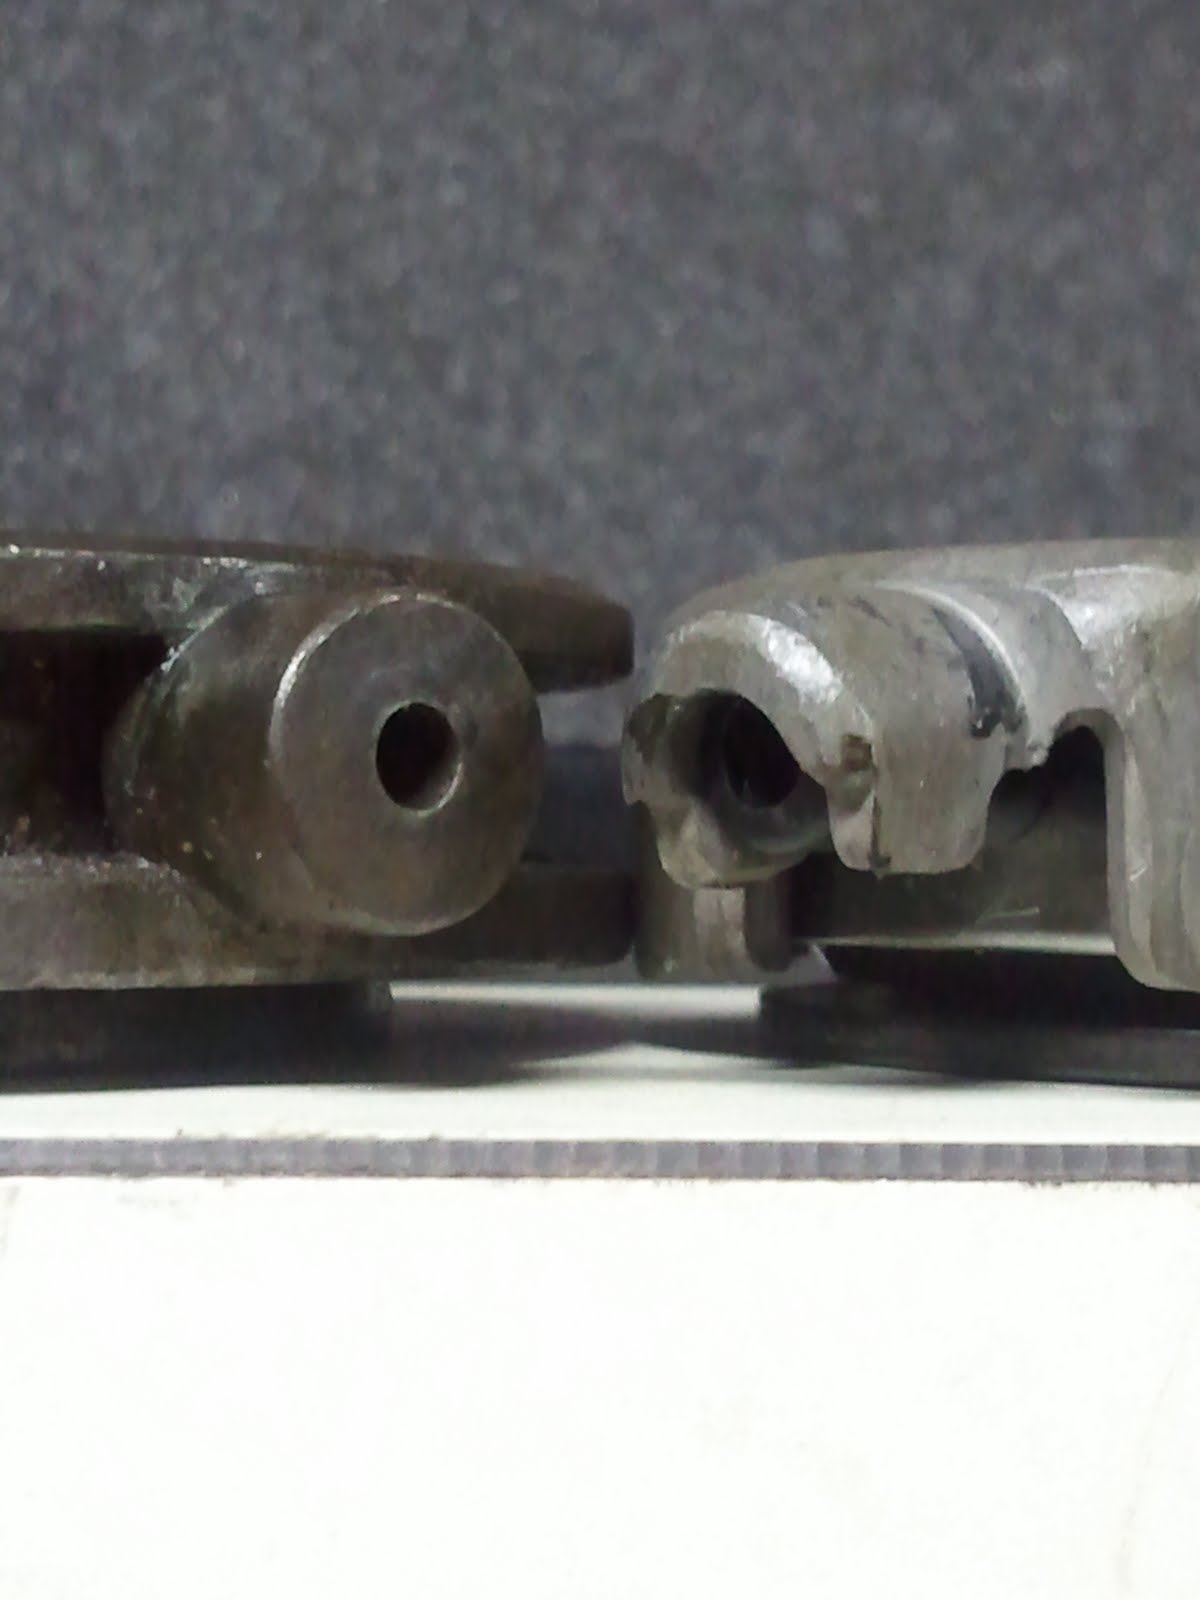
I also compared the old and new throwout bearings:

Though they are constructed in rather different ways, all the dimensions that matter appear to be identical, or at least compatible.

While I had it apart, I attempted to use a steel plate and some clamps to verify that the pressure plate can indeed move when pressed. It does. There was not a reasonable way to press the clutch and verify that the clutch disk is released when it is pressed. I have in mind a custom tool that could test that, but I was not prepared to fabricate such a tool just then. I put it all back together again, with the old throwout bearing, and verified that nothing had changed.

“Insanity: doing the same thing over and over again and expecting different results.” – Albert Einstein

While I had the camera ready, I documented the free play in the clutch arm while assembled and it corresponds with what I would expect.

So, I have decided that unless some radical new information comes to light before bedtime Thursday, I am not going to be able to drive the trike to the benefit/show this weekend.

I will, however, tow it in to the show. We are auctioning off a donated paint job and this trike has the paint from a previous auction and we hope to drum up lots of interest in the auction!

Clutch Reassembled

I dropped by Automotive Machine and Supply after work to procure parts and consult the oracle. Steve verified my concerns that there was supposed to be a collar on the pressure plate for the throwout bearing to contact and further that it’s absence is the real reason the throwout bearing jumped the tracks. He also verified that the play in the input shaft is normal, though he agrees that I should change out the seal.

So, $86 dollars later, I have a new clutch cover and pressure plate, as well as the clutch fork and such.

Besides, the old pressure plate and fingers were more damaged than they first appeared:

Note the bent fingers at the lower right. They were not really apparent with the cover installed.

The installation of clutch fork included the usual minor trauma. Installation of the clutch cover gave me a new problem that make me chuckle.

My clutch pilot tool has a ring for a handle and it was too big to fit through the collar on the pressure plate. I applied a bit of heat and a bit of sculpting and now it fits.

Otherwise there were no particular difficulties with the physical installation, other than the usual big hands in a small space issues…

After the delays, I got the engine bolted on and decided that it was late enough that I didn’t want to tear in to the wiring, fuel, exhaust and bumper. They will have to wait for Friday or Saturday…

Transaxle Work

I got all but the four bolts pulled off Tuesday night, then finished pulling the engine out last night.

It looks like there was no really serious damage done by the rogue throwout bearing. The fork was pushed too far and the throwout bearing jumped off it.

You can see the broken finger and a piece of a chewed up spring clip laying on the bottom of the bell housing. The remaining clip holding the throwout bearing has been ground against something as well. At the time of the event, the engine was still running, but in the process of towing it home, the broken finger apparently jammed between the flywheel and the bell housing, preventing me from starting the engine.

Once off the fork, it appears that the bearing landed such that the fingers on the clutch pressure plate rubbed against the bearing carrier. You can see the galling on the bearing carrier in this picture:

 It remains to be seen whether the damage to the pressure plate fingers is significant:

Some pressure plates have some kind of disc attached to the fingers, like this:

… but this one never has, at least not while I’ve had it. I’m not sure whether or not it’s missing, but since clutch operation seems reasonably normal without it, I’m going to assume it’s ok without it.

Speaking of assumptions, I took a guess that some fairly severe looking play in the input shaft of the transaxle might have been a factor in the damage done. Upon clearer thinking, I now realize that this shaft is not left hanging out there, but is rather supported by the pilot bearing in the end of the engine crankshaft. Duh! I am going to replace that seal while I’m in there anyway…

Picking up parts on the way home tonight; it’s entirely possible that I may have this thing mobile tomorrow…

Long, Hot Summer

It’s been a long, hot, busy summer. Now that it’s cooling off enough to be able to work outside without medical intervention, I have a lot of projects to get caught up on!

Another delay, though a welcome one, was our friend John visiting. Besides being a fascinating conversationalist with a number of truly interesting stories from each of the 44 countries he’s visited, he is a tireless and skilled worker who would have to be tied down to *not* work around the house. He did what is basically 4 projects, but also myriad related and unrelated work, the whole of which is that our driveway and garage are cleared out and ready to use! As in, the first time since moving here, including the time Gabby was here before I was. My tools are all indoors! I wont know how to act…

As for projects, I have three MAJOR projects… four, really…

First, and only because it’s probably the easiest, I am replacing the airshocks on Sponge Bob Square Trike with coilovers. The ride is expected to be rough, but then so is it with 100 lbs of air in the shocks. The trouble is, that 100 lbs of air is 20 pounds in about 30 minutes and down that low, it rides goofy. It has a shimmy or shuffle or whatever you want to call a side to side motion.

Second and third is to get the clutch/transaxle issue on the Dragon trike (possibly named Puff at this point; I like the irony, but the word doesn’t scan well… needs a couple of sylables) solved and tune the EFI system. It only had about 10 miles on the engine when the transaxle trauma occurred. It’s in basically default running tune.

Fourth is to get Buzz running. I have a new Motion Pro carburetor sync tool that needs breaking in. I’d like to get him running and put him up for sale. I’d like to do EFI on another bike, but I think it needs to be a bigger one. It’s hard to match a modern motorcycle throttle body to a older small displacement engine. I could probably fabricate an intake manifold for a single TB from an ATV or personal watercraft, but it’s so much easier to just bolt on one that will work. I think I’d like to tackle a Yamaha XS750 or XS850 triple, using Triumph intakes…