The Dragon trike has footpegs!

The Dragon trike has footpegs!
With my apologies to Steve Martin…
I had to skip an evening, but we were released from work a couple hours early, so I have had time to get a bite to eat (skipped lunch today), get home, change clothes, finishe assembling the trike, test ride and adjust the clutch, all by about the time I would normally be getting home.
The new clutch works very well. Everything is very smooth. This throwout bearing may have been going out for longer than I had thought.
I used my fancy new tool and removed the remaining shock absorber. It worked perfectly. 🙂
I pulled the engine and saw that the throwout bearing had not, as I had suspected, jumped off the fork. Instead, I saw that the collar on the pressure plate had been ground off.

Some pieces of metal were recoverable, but mostly, there was a lot of shiny dust and a funky “burned barbecue” smell. The inside of the bell housing was coated with oil. My first thought was that the seal on either the engine or the transaxle was leaking.
None of the oil looks fresh, however. I recall that when the oil cooler event occurred, the top of the engine and transaxle were pretty much drenched in oil and I think that’s where it came from.
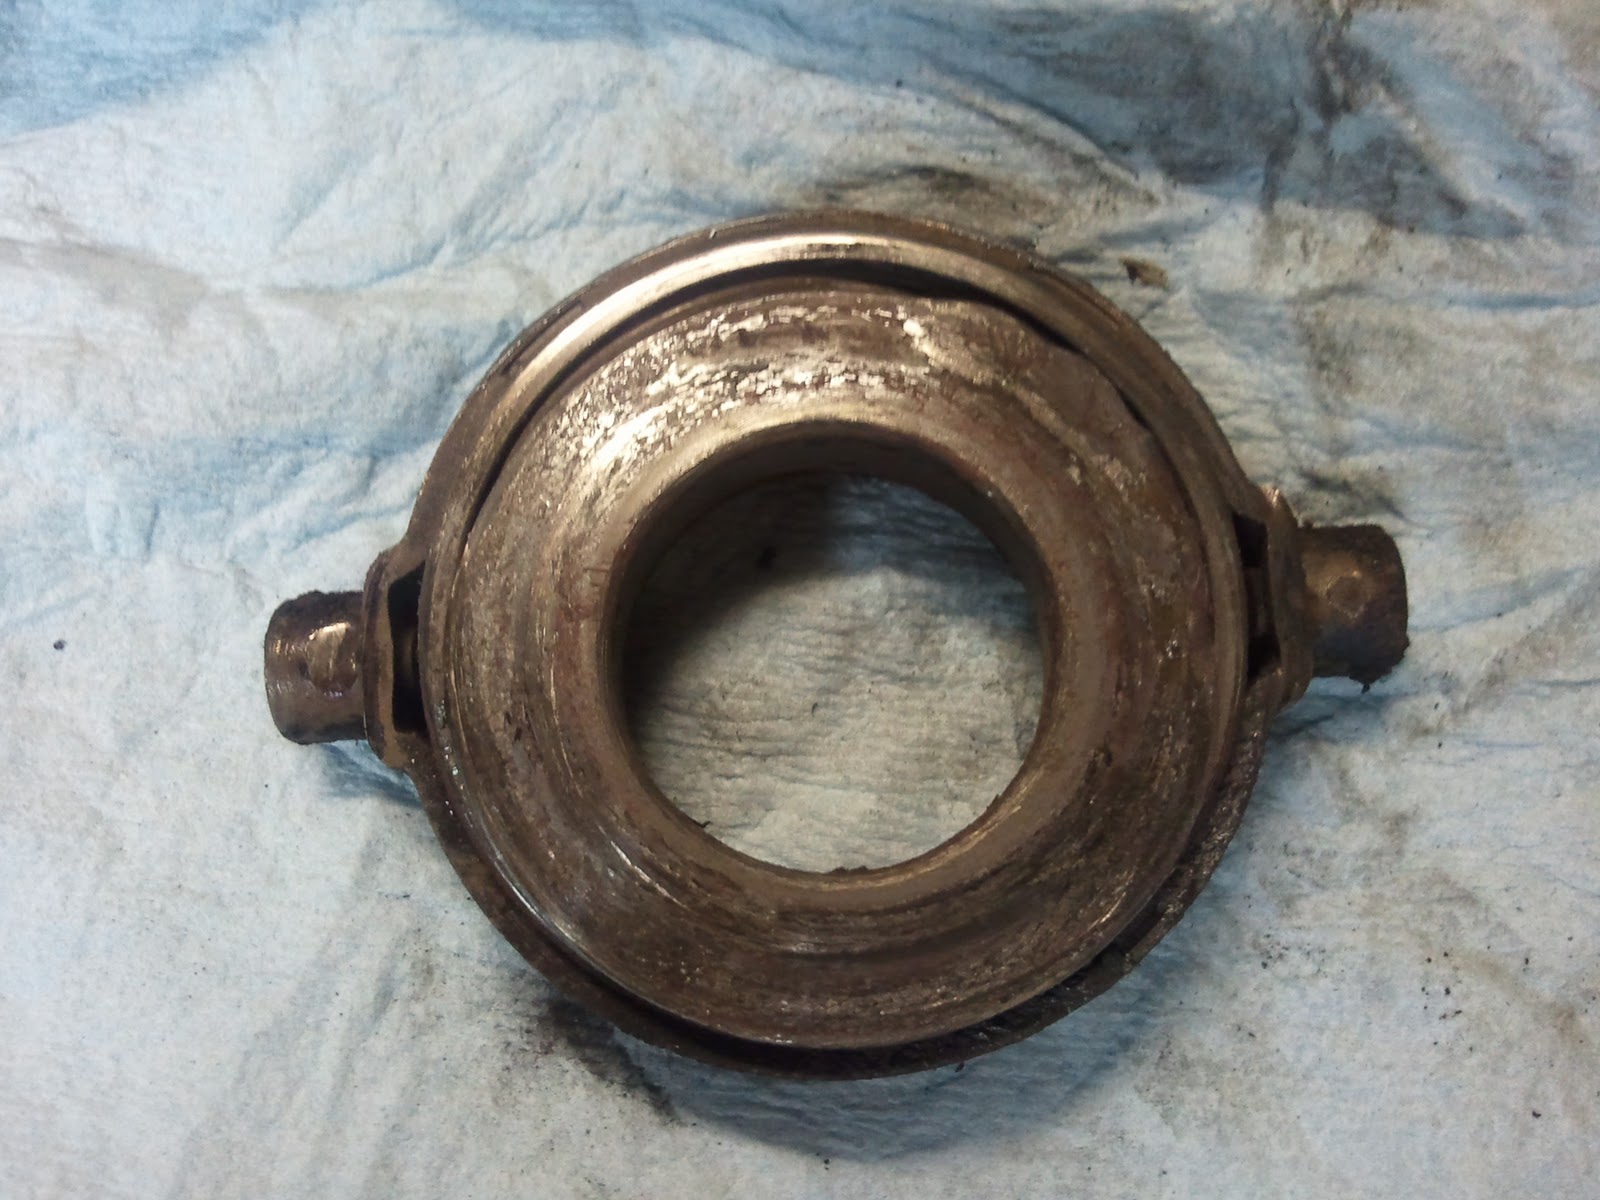
The throwout bearing itself had not jumped the rails, but you could tell that the surface didn’t look right.
Turns out that the bearing was not turning and the collar from the pressure plate had friction welded to the bearing race!


You can see the bearing race is completely hidden. For the entertainment value, I will see what forensic data I can gather and report back.
It’s no wonder the bearing failed, what with the inner race being off center and the balls scrambled inside the bearing.
I found that AutoZone carries the throwout bearing, for $37. They are about $15-18 at most places. AutoZone isn’t usually that high on any given item.
More importantly, while I have a new pressure plate leftover from the other trike, it looked like replacing the disk would be a good idea, what with all that oil. The disk also had a slightly strange wear pattern on it, seeming to wear most in a circle that would describe the center of the friction material. The contact side of the otherwise ruined pressure plate looked fine, but obviously it had to go.
AutoZone has a clutch kit which contains the clutch disk, pressure plate, throwout bearing, pilot bearing and a (redundant) pilot alignment tool. This whole assembly is $102 *and* carries a lifetime warranty. So I got one.
Nothing very magical about the installation from this point forward. I scraped as much of the slightly sticky dust off the flywheel as I could and vacuumed it away. Then I used a bunch of brake cleaner to ensure that the flywheel was clean and oil-free. After the brake cleaner, the pilot bearing needed grease.
Then I put the disk and pressure plate on and snapped a picture of it:

Looks like pretty much every other clutch, huh? 🙂
It took pretty much a whole can of brake cleaner to get the bell housing clean. I found a few recognizeable bits of metal from the old pressure plate in there. I installed the new throwout bearing. Now that I’ve done it a few dozen times, I can remove and install the spring clips with minimal bloodletting.

Bolted the engine and transaxle back together and before I continued, I verified that the clutch will disengage. That was a problem with the Dragon trike’s clutch and I wanted to make sure the same thing didn’t happen here before I finished bolting up everything else and had to pull it out again!
I ran out of time and will need to finish the rest of it tonight.
This was unusual for me. Rather than the typical problem of it being something I did, this time the throwout bearing had simply gone bad enough to freeze up, which in turn took out the collar on the pressure plate.

AutoZone appears to have the bearing. I’m headed up there to see.
Sadly, this is a pun. Not only does this post represent a break in the current storyline, it is also a lament that Sponge Bob is broken.
I swear, I’m not taking that trike to Arlington anymore. We took it Oklahoma and to the Hill Country twice and all over the metroplex. The clutch broke once in Oklahoma on it’s first journey, but regardless of all the other traffic, it has broken down three times in Arlington.
Good or bad, at least I’ve gotten good enough at riding it without the clutch that at least I wasn’t stranded in Arlington. This time.
So, I need to figure out what’s wrong this time. I suspect that the throwout bearing has jumped off the rails. There seems to be a delicate balance on exactly where the clutch arm needs to stop. Which is, of course, me saying that I’m sure it’s actually my fault, but I still suspect an Arlington connection.
Checking the throwout bearing is a fairly simple affair. Remove four wires, one fuel line and the four nuts holding the engine on and check it out.
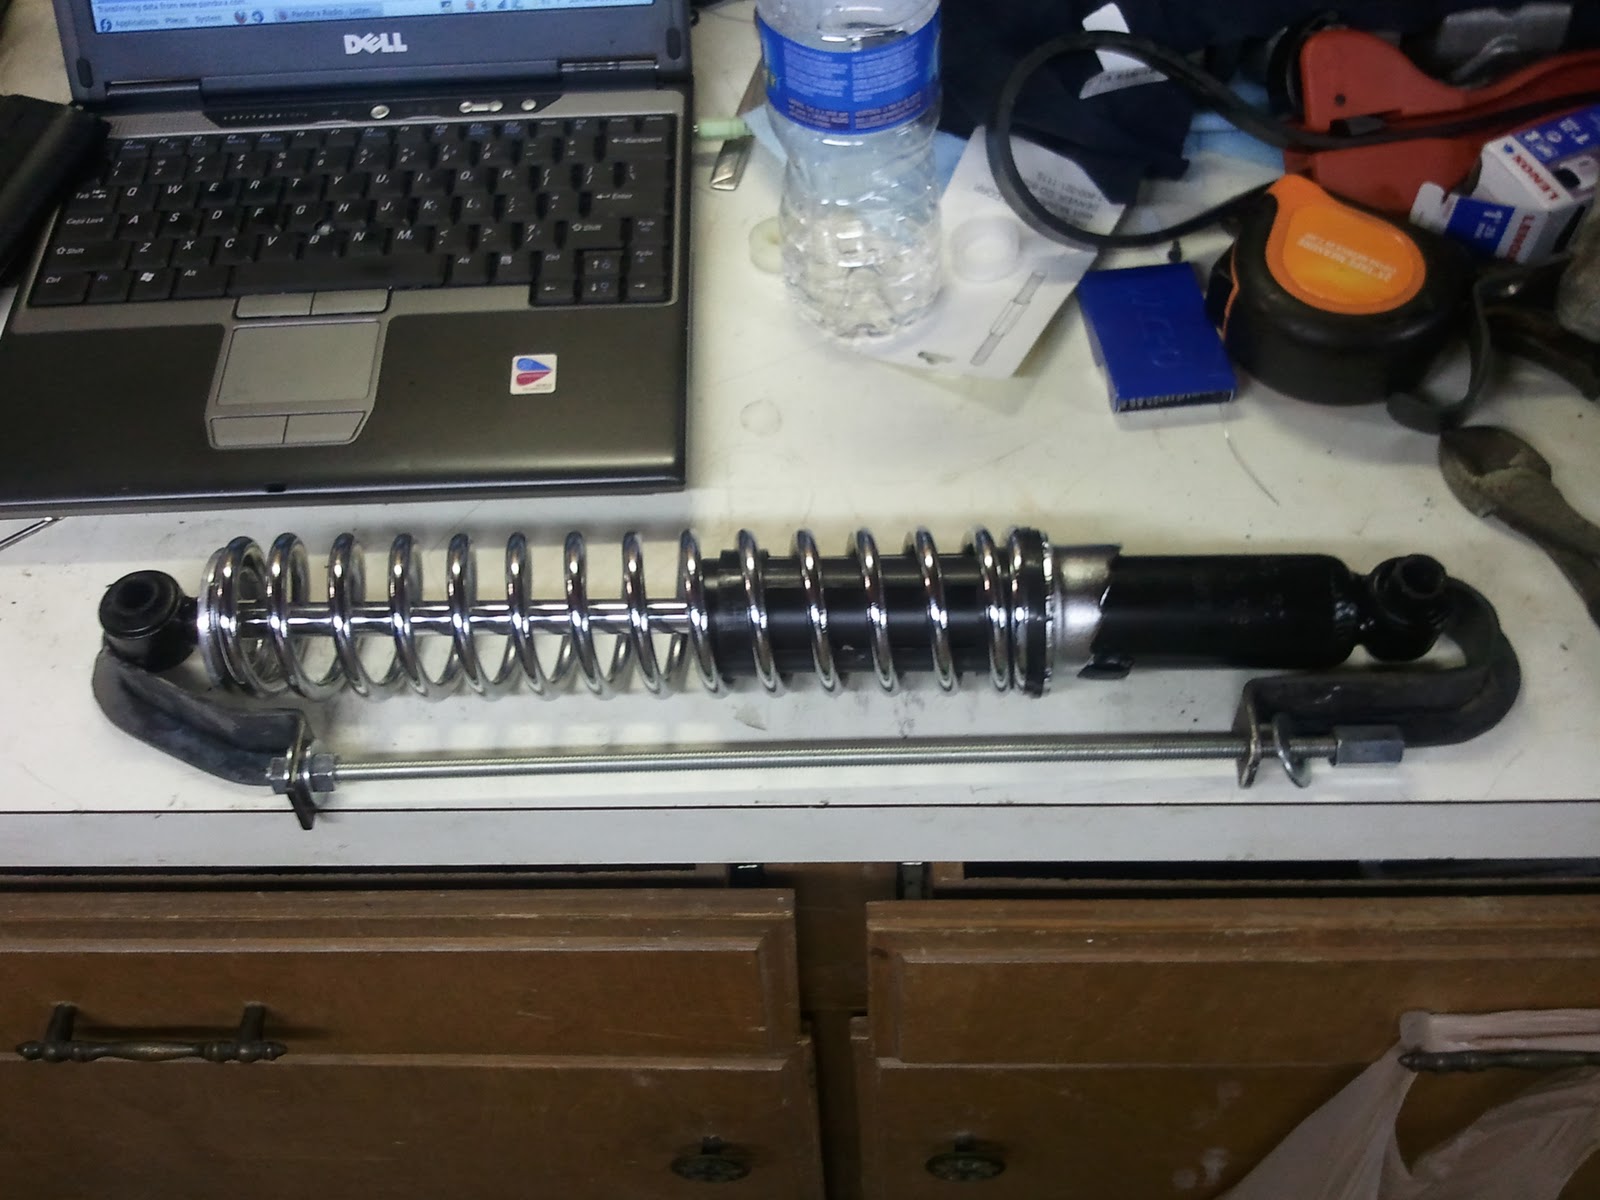
To remove the engine, however, I need to remove the baja bumper. To remove the baja bumper, I need to remove the shocks. The new shocks are coilovers, which complicates their removal and installation because they need to be compressed to fit.
They make a tool to compress these sorts of springs. I have search for one locally to no avail and just have never gotten around to ordering one. So I was trying to figure out a way to compress the shocks since I will need to do this occasionally.
I first tried a ubolt extended with all thread, but there isn’t room on both sides of the shock for the all thread. I figured a way to do it with a couple of hand fabricated hooks. It took about 30 minutes to fashion the hooks and try it out to remove one shock. It worked pretty well, but one hook straightened out and failed while the shock was sitting on the bench. I knew the concept was good and just needed stronger hooks, so I made another with braces.
The hook on the left is designed to clear the spring. Were I to remake the hook on the right, I might offset the hole for the all thread so it would be parallel to the body of the shock, but I’m not sure that would really be necessary.
I might also add a brace at the far right and use a longer all thread so the wrenching surface would be easier to reach. That hook is on the bottom of the shock and moving the nut closer to the end would let it be reached more easily from below the trike.
As it stands, it works well enough to install and remove at least the one shock.
Once I was finished with that, decided I was too tired to tear into the trike and cleaned up the shop before things get out of hand. A few days of cutting and grinding makes a mess.
Maybe I wasn’t so tired after all because I also *finally* assembled a storage cabinet that I have had for enough months to wonder if it could be counted in years. It’s a nice big cabinet, and as expected, it doesn’t have enough shelves, but I can fix that.

It looks twisted in the pic, but it isn’t. I put a few things that have been sitting on the floor in it, as well as all the power tools that have been in a functional but ugly cabinet that I will be taking down. I think I have a place for the old cabinet. Where it is will go my band saw and drill press, which have also been sitting around on the floor a while.
The #2 tip is enough bigger to get the job done, but I still had a LOT of trouble getting the inside corner of the 3 way intersection properly bonded.

Still, I think it will plenty strong. Nearly 50% of the gusset’s entire edge is secured.
I ran a sanding disk over it everywhere I could reach.

Perhaps I can use my little abrasive blaster to further clean the crevices.
Tomorrow, I pick up the ubolts and try it on for size. Assuming it works, on Monday I will drop it off for powder coating (which is preceded by a rather aggressive shot peening by a massive machine called the Wheelabrator, so I’m not sure why I am worried about sanding it) and that will nearly be that.
Picking it up and handling it reminds me of a crossbow….

I got started on the footpegs for the Dragon Trike. I’m making a simple T-bar that will be u-bolted to the frame. The u-bolt mount will allow it to be adjusted and removed for eventual powder coating or other modification. For a ride of any appreciable distance, I would like it to eventually be a bar with footboards on it.
I have a 4 foot long piece of 1-1/2″ square tubing and I picked up a 3 foot piece of 1″ round tubing.
I sawed a hole through one end of the square tubing and centered a 32″ length of the round tubing and welded it in place.

I placed the hole slightly off center so it would be simpler to give a chamfered look to the end. The chamfer will be about parallel to the ground.
I cut wedges out of the “wide” side:

And folded the side down to meet them:

I then cut a rectangle to fit the opening and welded it in.

The front edge weld in the pic above is possibly the best looking weld I’ve ever done. It’s almost a shame to grind the smooth.

I cut the square tubing to length, 16 inches from the crossbar to the end.

To make the saddle, I used a 3″ x 8″ black steel pipe nipple. I cut the threaded ends off then split the remaining tube.

I had a steadier hand for the other cut 🙂
After cleaning up the edges, used a magnet, barely visible here, to hold it temporarily in place so I could tack it on the end of the square tube.

I welded to two curved straight sides. The curved sides will be carrying the most weight in service, so I cut a couple of gussets to weld in along this side.

My #0 tip just couldn’t throw enough BTUs to do a good job the the intersection of all three pieces, but I’m pretty happy with the long weld along the gusset.
I also ran out of welding rods small enough for the selfsame #0 tip, so this is how it sits at the moment. I will swing by the welding supply joint tomorrow and get a little bigger welding tip and a bunch of the smaller rods. With a bigger tip, I should be able to clean up that mess and avoid a similar mess on the other side pf this brace and the other brace.
This is the nearly completed thingy:

I’ve started restoring a 1982 Yamaha Seca Turbo and what with the fun of bloggin my VW trike projects, I thought I should start one on the Seca.
I wanted one of these bikes the first time I saw it, which was probably in Cycle Guide magazine, to which I was subscribed in and about 1981-82. All the factory turbo bikes were cool. Probably my absolute favorite in styling is the Honda, and having had a CX500 Custom from the era, I was slightly biased. The Kawasaki was arguably the fastest of the bunch, but really didn’t look all that different from the standard GPz. However, by most accounts, the Yamaha is the more stable and reliable of the three and it’s angular look is still appealing nearly 30 years later.
I found a Craigslist ad that originally listed it for $1500, which is about the retail price on kbb.com for a nice example. This one was described as low miles (5,600) but not running, though the pic seemed to indicate all was together. The price in the ad dropped and I honestly kept busy elsewhere until the guy called me with an offer I couldn’t avoid. He was moving and needed it gone.
When I went to see it, I found it to be somewhat less assembled than the ad and our conversations seemed to indicate. The carb rack and pretty much everything else between the turbocharger and the engine was either in a box or sitting, unattached, in it’s approximate normal position on the bike. There were maybe two or three hand tight screws holding most of the body in place. My apparent reluctance, which I was not even trying to show, resulted in yet another price drop, so I happily loaded it on my trailer for $300.
As soon as I got home, I put my *other* XJ, Buzz, a 1982 Maxim 550 (with it’s own hopefully fascinating tale) on Craigslist to recover the cash outlay for the Turbo.
Had I done the degree of carburetor cleaning I have done to the Turbo’s carbs, I could probably have gotten more for Buzz than $500, and my wife has ceased pointing this out, but I think only because she doesn’t like to nag. However, the first person to actually come see Buzz bought him without quibbling over the price and I immediately had $200 in pocket for parts.
Sadly, the carburetor kits, at $42 apiece times four, ate through that pretty quickly, but look at the results:
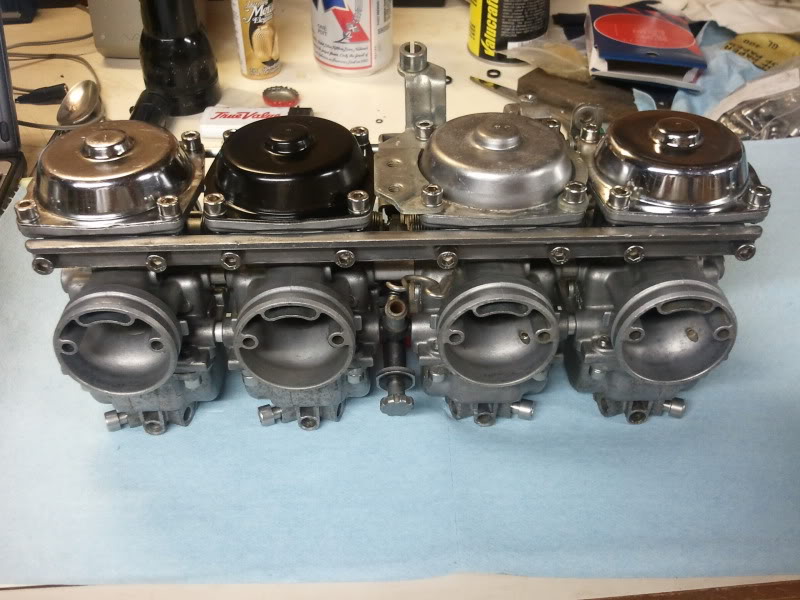
Pay no attention to the unpainted top on carb #3; that one was in the cleaner bucket the night I was painting and I didn’t want to wait for paint to dry when I was assembling #3 last night. It will get paint, probably black. If not black, I will paint them all some color that goes with whatever color the bike is eventually painted. I’m leaning towards the period Kenny Roberts color scheme.
There was plenty of evidence that some person or persons had started a carb rebuild job and abandoned it, perhaps multiple times. Considering the problems with carb #1 described below, I’m not entirely surprised. However, as I looked at more and more on the bike, I’m beginning to think that someone had a very minor spill, maybe even just dropped it in their driveway, and just parked the bike, probably without any storage procedures.
Little things like a float in the bowl with pin in place, but not through the float hinge. Note the lovely verdigris on the brass parts. Nice for antiques, but not particularly nice for antique carburetors.
Likewise, see the emulsion tubes. This one came out of a carburetor that had been soaking in the parts dip for 6 days. That’s how much crud was *left*.

This is an emulsion tube on a carb that had not been soaked…
Once removed from the carb body and soaked directly in parts dip, the emulsion tubes came serviceably clean, and if not abused in removal, most all the brass parts can be reused. However, the carburetor kits came with almost all new brass stuff, so there was no need to preserve them.
The two biggest hiccups were the idle mixture screw on carb #1 and the bowl drain screw on carb #3.
The simpler of the two, the bowl drain screw on #3, had been chewed up long enough ago to have seriously rusted since the damage was done…

After attempting all the usual techniques with penetrating oil and my impact driver, I decided it was going to take some cutting. I did not have a handy Dremel-like tool, so I used a flat needle file and cut a deep slot into the screw. The motion required cutting a notch in the surround, but the new screws don’t fit the same way, so there will be no penalty for the notch.
As I had put this step off until just last night, I was in enough of a hurry to forget to photograph it, but the new slot and the impact driver was the magic combo.
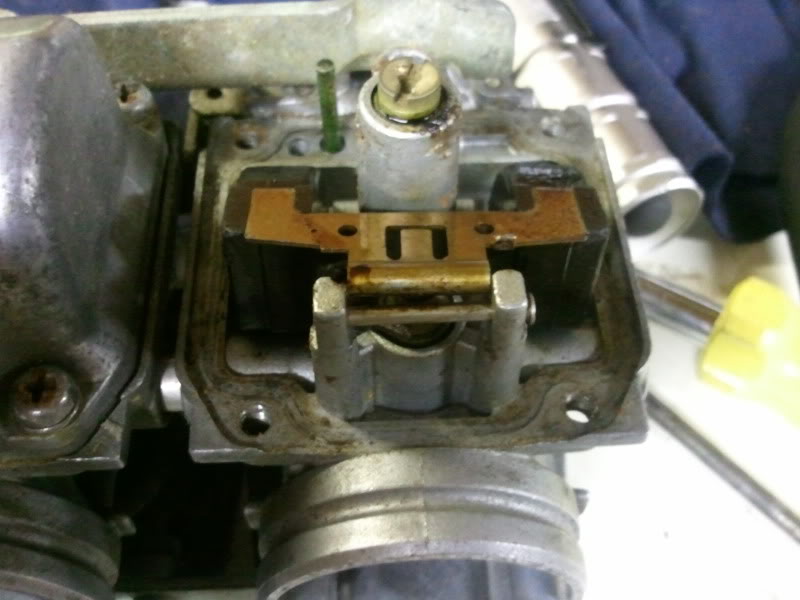
The #1 idle mixture screw was a bigger issue.
One of the recommended steps in refurbing such carburetors is to use the proper sized tap and chase the threads for the idle mixture screw. These threads are almost universally corroded and cleaning them up will make assembly much easier and extend the life of the carb. I was having trouble getting the tap to go and, long story short (too late) I found that the old screw had been so severely seized that someone had drilled it out. The remains of the screw can be seen here as the brass “sleeve” lining the hole:
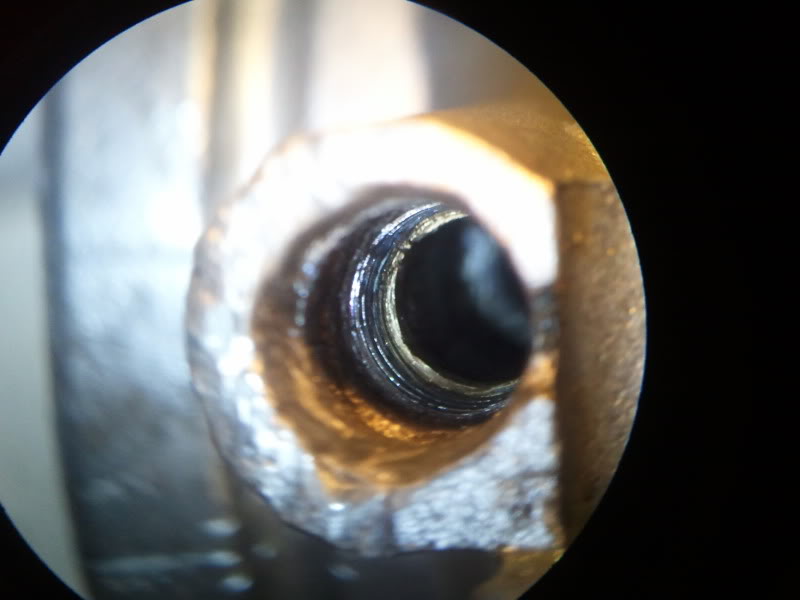
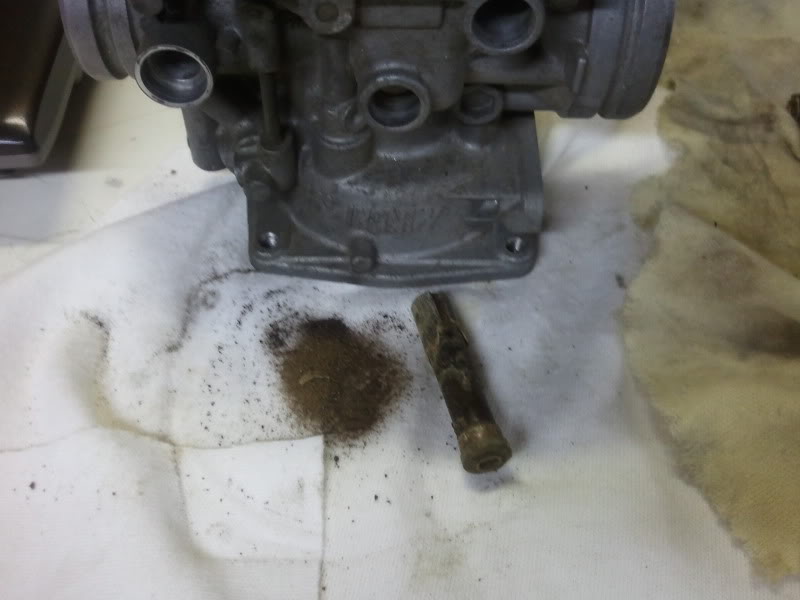
The hole is too larger for a screw extractor to work without damaging the threads and the hole would need to be reamed out a little for the tap to fit. If it were tapped that way and the new threads didn’t follow the old threads pretty exactly, it would be equally useless.
After much consideration, I thought it would be wise to shop for a replacement before I started, just in case I destroyed it. Found a #3, New-Old Stock, on eBay for $250. Ouch. A #3 has the fuel and vent passages drilled on both sides, whereas a #1 only has them drilled on one, so using a #3 would mean plugging the outside holes.
I found an incredibly dirty full rack for $170, which is definitely better, but might mean the inheritance of the same problem, perhaps times four.
Finally, I asked Len Chacal at XJ4Ever and sure enough, he had a couple in stock. The bare carb body with no other parts was $69. I was happy enough with that to just order it and not bother (at this time) with my old #1. It arrived in need of cleaning (as described) but in much better condition than mine, or perhaps any of mine.
So, with #1 and #3 left to finish assembling last night, I tore into the project and finished about 1:15AM.
I still need to align the carbs with a plate, check/set the float levels and bench synchronize them, but they are essentially finished.
A couple of weekends ago, Sponge Bob started to experience some odd clutch-centric symptoms. During the course of the day, the clutch became less and less responsive to the pedal. Go ahead, push the pedal… the gears are going to grind anyway. At one stop, it the starter even ground a few times before it kicked off. It was beginning to look like something major was wrong. I rode the rest of the way home shifting without the clutch, shutting of the engine at each stop and starting up in gear on the green light… it was not particularly fun.
So, since I doubt the Dragon trike will be ready to take to the IMS tomorrow, I tore into Sponge Bob last night to see what the matter was.
The plan was to pull the engine out and see what was going on with the throwout bearing, my first suspect. I figured while I had it apart, I would also change out the old leaky airshocks with the nifty coilovers I ordered long enough ago for the box to be dusty. Also, when we went to look at a particular trike for sale recently, it was at the owner’s mechanic’s house. He runs a VW repair and restoration shop out of his house. Cool guy and I envy his situation. Anyway, he had some chrome pipes of the same style that are on Sponge Bob except that they still have chrome on them and Gabby bought them for $50. I’d put those on, too.
I had the bumper off and the jack under the engine when I started removing the four nuts that hold the engine and transaxle together.
Hello, there is a missing nut on the bolt that also holds the top of the starter. And the other top nut was backed almost off it’s stud. There was a 1/4″ gap between the engine and transaxle.
Well, that would certainly explain it. This would let the engine and transaxle intersect at an angle and explains all the symptoms.. The input shaft of the transaxle runs inside a roller bearing in the end of the crankshaft. This misalignment would put that in a bind, so it would seem that the clutch is not disengaging. The starter was not only farther from the flywheel than expected, it would also be flexing away from it on the bottom bolt.
I found a replacement for the missing nut and tightened everything up and verified that the clutch would disengage. I then went ahead with the shocks (which required a run to two parts stores to find bolts to fit the lowers) and the pipes. There are no baffles in them, so they are significantly louder than the old ones. Gabby is pleased.
The clutch issue was resolved by continuing to swap out pressure plates until I found one that worked.
The one that finally worked is one that was on the free parts shelf at the BTW clubhouse. It was coated with a fine layer of rust, but it cleaned up perfectly and more importantly, it works. I neglected to get a picture of it, but it was one similar to this.

It is still an absolute mystery why the one I bought didn’t work, but my instincts indicate that it has something to do with the mix-n-match nature of the engine and transaxle combination.
In any case, it’s streetable, though the shifter is a pain to deal with. I plan to install one of these, or one like it

I have dedicated a number of hours tuning on the EFI system. At first, I was fighting a bad O2 sensor and now I’m fighting what I can only conclude is erroneous injector specifications. All indications are that they are 245 cc/min injectors. Using that number, every iteration through the basic fuel equation returns a ReqFuel number of 22 or so, which it then divides amongst two injectors. Trouble is, the engine will hardly even idle if the number is below 30 and it doesn’t run with a decent AFR until about 44. The astute observer will note that the number that works is exactly double the number given. This leads me to wonder if I should keep thinking that I should be able to trick it into by telling it my injectors are half the flow they are, hoping for it to come back with a 44. It apparently doesn’t work that way, for telling it 125 cc/min comes back with, like 28.
So, ignoring the set up and using 44 as the ReqFuel number gets the thing running.
I’ve been using TunerStudio instead of MegaTune. I like it better overall. The dashboard configuration is very easy to customize.
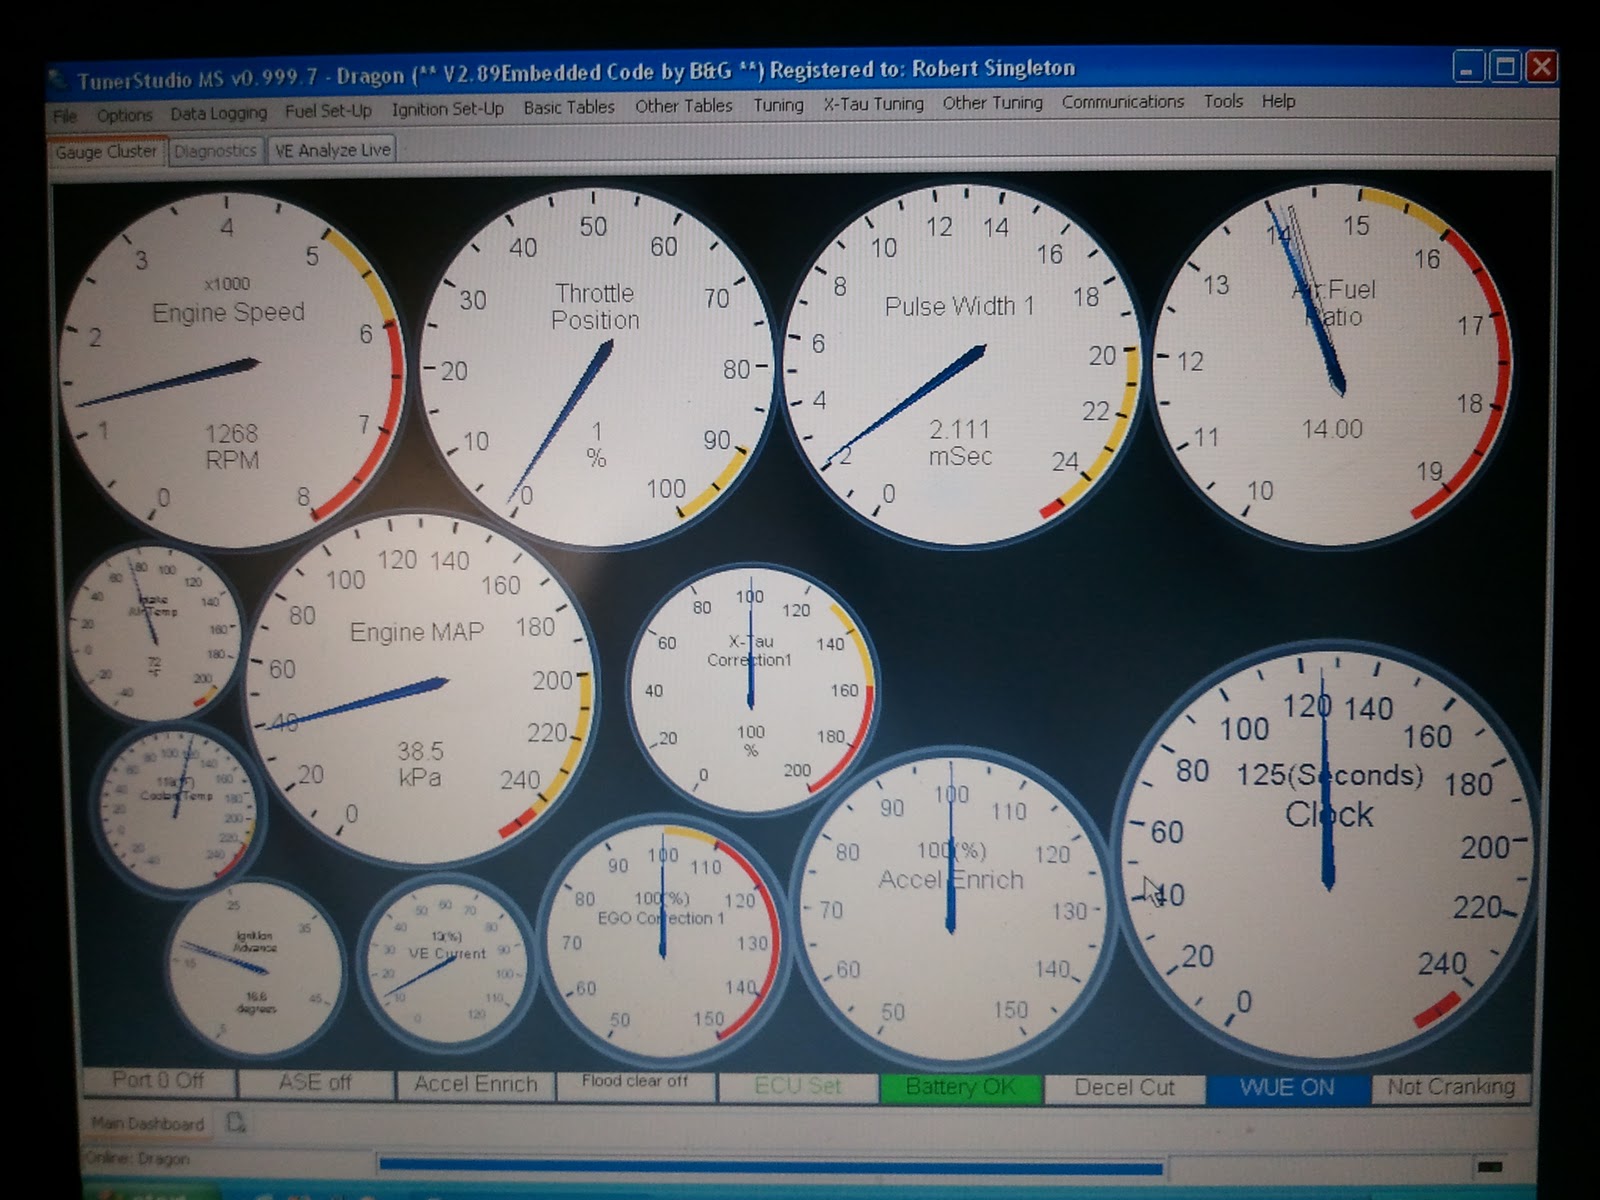
With MegaTune, I would have to swap out one gauge or another when I was working on various pieces of the tune, but with TunerStudio’s dashboard, I have all the gauges showing at once. I need to play with their layout a bit, but they are all there!
TunerStudio’s VE Analyze Live! feature is a pretty cool autotune facility, however in my case, it seems to want to lean out mixtures that are already lean, where I would expect it to richen them. Perhaps I have some settings wrong. In any case, it’s still cool to watch it change the numbers and to see the engine respond to the changes.
With continued vigilance, I hope to have this thing reliably on the street in the next few weeks.
