Checklist

In no particular order, here is a checklist of things that must be accomplished to run this engine on MegaSquirt EFI.

1. Intake fabrication
a. mount intake boots to plate
b. mount intake manifold to engine
c. mount IAT to TB
d. mount TB to intake manifold
e. adapt throttle cable to TB

2. mount trigger wheel on crank pulley and install
a. clean, mark and drill stock crank pulley
b. bolt trigger wheel to pulley.

3. mount trigger wheel sensor on block
a. Bracket fabrication

4. mount fuel pump in tank
a. Sand bottom of tank clean
b. Cut interface ring and drill/tap it
c. Cut big hole in bottom of tank
d. Weld or braze ring to tank
e. Cut gasket and bolt in pump

5. Cylinder head temp sensor
a. May just use standard GM sensor

6. Mount controller

7. Lots of wiring

8. Tune

Intake Work

I finally got started on the throttle body adapter!

Using the gasket that came with the intake as a pattern, I cut a piece of 3/16″ plate to shape and cut the holes in it.

I struggled for a couple of hours trying to fit existing tubing and a couple different O-rings to the base of the throttle body. I tried using exhaust reducers. They came the closest to fitting and I guess it was worth trying, but the only combination that seems likely to work will be to gently stretch a 2″ fitting so that the smaller diameter end is very slightly larger than it is now. It will not be easy to do that and keep it round and O-ring-sealing smooth.

Luckily, I may not need to. After noticing that my hatless short sleeve work uniform was inadequately warm for the falling temperatures in the carport, I came inside and found that a best offer I’d submitted on a pair of actual EX650 intake boots was accepted.

There is a slim chance that I may have to remake the plate for these intakes, but it will be worth it to not have to deal with the precision required to seal and attach the throttle bodies to the intake manifold!

Since I’m waiting for parts now, I thought this might be a good time to apply some thinking out loud time to X-Tau acceleration enrichment.

In short, this is an enrichment that compensates for how much of the injected fuel sticks to the walls of the manifold. This is another one of those things that I’m so very glad that someone else had to figure out. As astonishingly brilliant as I am, I’m not sure it would have occurred to me. Anyway, the problem is that a percentage of the fuel going into the manifold sticks to the walls. This fuel eventually evaporates and makes it to the cylinder, only to be replaced by more injected fuel. In a steady state load, the sticking and evaporating fuel reach an equilibrium, but it can become a significant factor with changing loads, making the mixture unexpectedly lean during acceleration and unexpectedly rich during deceleration.

It would seem to me that intake tract length could be a large factor in this phenomenon, and in my configuration will in fact have a relatively long intake tract.

On Buzz, the intake tract was about 5 inches between the injector and the intake valve and there just isn’t much manifold wall to stick to. That doesn’t mean that it’s completely not a factor, only that its a small factor.

On the VW, in my configuration at least, there is a good couple of feet of intake tract between the injector and the intake valves. Additionally, the intake tends to be cooler near the injector and warmer near the valve. This temperature differential is why most VW manifolds have tubes to circulate hot exhaust gases through the manifold, so that the temperatures along the intake tract will be more consistent. A cold manifold will condense vaporized fuel, exacerbating the manifold wall wetting problem.

Honestly, getting the engine running will not require much attention to X-tau compensation, but tuning it for best performance will.

The Usual Delays and the IMS

Sometimes, it sucks to work.

I have spent most of what would otherwise have been a great week to work on the dragon trike in New Mexico working. I enjoy New Mexico and I like our people there, but I wanted to stay home.

Even after spending the week out of town, I wasn’t going to forsake the Dallas appearance of the International Motorcycle Show to work on the trike. Overall, the show was pretty good. Enjoyed seeing the Ducati stunt team. Nothing sounds quite like a Duck. Found that for all the hype, the Honda Fury is unridable for the same reason most other choppers are. Long bike, long seat, long pegs, short bars. Who want’s to ride when folded into a cramped “C”?

The bigger problem with the show was with what was missing. This is my third year attending. The first year it was held at the Fort Worth Convention Center. Besides being my home town and essentially walking distance from work, the Ft Worth show seemed much…. I don’t know, “fuller”. More vendors, more manufacturers, more.. stuff. Last year in Dallas, there were fewer bike vendors than the previous year in Fort Worth. Absent in Dallas last year were names such as Moto Guzzi and Vespa and Kymco that were prominent in Fort Worth the year before. Similarly, some notables were missing this year, like Victory, KTM, Triumph, and of course, Buell.

We still managed to have fun and shop a lot.

One thing that occurred to me suddenly whilst I was in the Kawasaki pod was that my plan to use the throttle bodies that were apparently from a Ninja 650 might be simplified by the acquisition of some stock parts.

One of the part fabs I will need to do is some kind of adapter between the TB and the manifold. The Ninja (or the Versys; they use the same engine) has to connect the TB to the engine, so maybe their connector can be adapted to my manifold easier than building something from scratch. According to Kawasaki Parts House, they are only about $20 apiece. Unless i can get RIGHT on fabricating something, I will probably order a couple of them.

Degrees of Extraneosity

After a rocky start from sniffles and sneezes and other such symptoms on Friday, we hit the road for Oklahoma, namely the Turner Falls area.

It’s very nice up there, nice riding, yada yada…

Sunday morning, I noticed a bit of oil on the ground under the yellow trike. This oil was in a rather irregular patch, as opposed to a nice round spot. I found some fresh oily wetness near the oil cooler hoses, so I presumed that was where the problem was. It wasn’t a whole lot of oil and the dipstick reported plenty of oil, so I decided we’d just keep an eye on it for now.

We took off down the meandering path to home. Twenty some-odd miles into the trek, we had cause to stop. It was a little chillier than expected when we left, but not quite so chilly once we were underway, so Gabby needed to shed a layer of clothing. Whilst we were stopped, I checked the leak.

Ummm, there was a LOT of oil all over the engine and exhaust and everything back there.

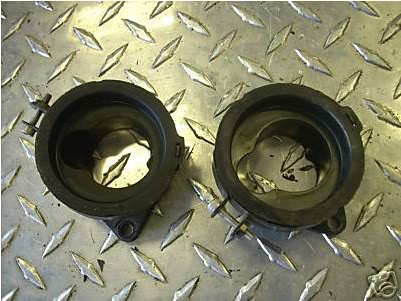
With a little testing and looking and revving the engine, etc, I determined that the lower tubing on the oil cooler was leaking. I first thought it was leaking from the hose, but then I saw that the cooler tubing itself was bent and leaking from a crack in the tubing.

It was a simple enough matter to remove the cooler and bypass it with one of the hoses. The weather was mild and these engines tend to run cooler in trikes than cars anyway. I didn’t even get very dirty doing it.

Fast forward a bit to our late lunch in Ardmore. I noticed as we were approaching Ardmore than there was as strange kind of “flex” feeling to the seat. I knew that it is mounted on 2″ X 1/4″ flat steel rails and thus had some springiness to it, but this sensation was different and had developed recently just during the ride. When we stopped at a restaurant, I discovered that the “body” of the trike, the blocky structure covering the engine and surrounding the rear seat, would bounce independent of the suspension. I started bouncing it gently and observing where the flex was, fearing that some bump in the road had broken a weld or something equally nasty. I also observed that an existing crack in the left fender had worsened and during this bouncing, I could see why. Once I saw what the problem was, I got that sinking feeling, the one you get when you know what’s wrong and that it’s your own fault.

Remember back on October 7th, when I was working on replacing the throwout bearing, I said “Then there was the extraneous piece of metal that used to hold up something long gone by bolting it to the engine, but now served only to keep the engine and transaxle loosely connected to one another once all the bolts were removed”?

It turns out that a sloppy weld on a piece that *looks* like its supported elsewhere doesn’t necessarily mean the piece is unused. Turns out that it was an only slightly extraneous piece of metal supporting much of the weight of the body of the trike. Add to that a full gas tank, fill up the side boxes and strap on some luggage, and the now-known-to-be-cantilevered body puts too much stress on the 3/4″ square tubing frame that is welded here and there somewhat randomly.

Also now apparent was that the bottom of the oil cooler, having been mounted on said bouncy body, was damaged by slamming down on to the relatively immovable engine. Ah, I see said the truly blind man….

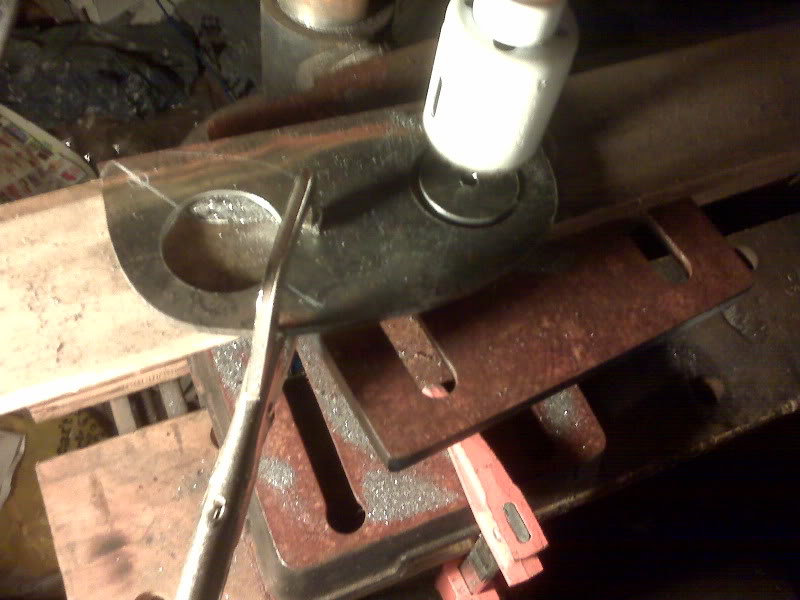
So, while munching and playing with Gabby’s new Nuvi, I formed a plan to brace the thing up so that the trip home would not result in any permanent damage. It took less than $8 worth of hardware from Lowes and the borrowing of cordless drill services from a Lowes employee who had been putting on some kind of cabinetry demonstration.

I took two 12″ long perforated angle pieces and braced between the top engine-transaxle bolts and the cross piece in the body. It’s probably more solid now than it’s ever been, and these are removable.

We got home without further incident, at least if you don’t count our headset batteries going dead and timing that took us by Texas Motor Speedway shortly after the races let out. We lost about an hour in that traffic.

Some parts arrive

Today, I received my manifold and my throttle cable parts from Flanders.

A lunch, I mocked up the TB and manifold and measured the combined height. I think I have 10 inches clearance under the fiberglass, as measured from the top of stock manifold cross tube.

Allowing for a little more than 0.25″ for the adapter plate and gasket, I only have about 2.25″ for an air filter. I think I can use a K&N RC-2380, which is a single filter with two flanges 75mm apart or RU-1822, which is a set of two filters identical to Buzz’s four. Obviously, I can rob two of these filters from Buzz for the time being. In fact, I’ve had one as a carb cover on this engine already.

To adapt the TB to the manifold, I will make a plate (or two joined plates) from 1/4″ stock, using the gasket as a guide. Atop that plate will be two cylindrical rings large enough for the base of the TB and an O-ring to slip into. It will have a bracket of some sort to secure the TB to.

The throttle cable is pretty normal throttle cable stuff. I had originally ordered parts for this trike, but used them on the Yellow Trike. These that arrived today are pretty much just replacements for those. Of course, now I need to connect it to the TB eccentric instead of the carburetor.

Finally, while this is not particularly EFI related, the guy at Mid Cities Cycle called, announcing the arrival of the switch pod. This will allow me to wire all switches except for the key switch to the left handlebar, just like the Yellow Trike, except that I won’t fry the start switch on this one. The solenoid on a VW starter pulls way more current than the little switch could handle. The simple addition of a relay addresses the issue nicely.

Dragon Trike work to get underway tonight

I haven’t done an update in a while. Several things to report…

Intermittent rain and other issues kept me from picking up the body until last Thursday. I used a purpose built trailer (the trike itself) to tow the body home. We took some pictures of it before I left Joe’s. Since it was still threatening more rain and possible hail, I took it directly to the BTW clubhouse.

There was a BTW Halloween party Saturday night at the clubhouse and everyone was just gushing over the trike. Not without plenty of suggestions, but nobody hated the paint 🙂

Before I continue with the Dragon Trike, I have a brief Yellow Trike update.

I have mounted (uglyly [… is that a word?]) the VDO speedometer sensor and the speedo works wonderfully now.
It does only one thing that is slightly odd, and I fully understand why it does this. As you are rolling slowly up to a traffic light or other such stop, then suddenly stop, for about a second, it continues to indicate that you’re moving at 3mph or whatever. With only 5 magnets to count at 3mph, it expects 0.32 seconds between pulses and after you stop, it has to make sure you’re not still rolling before it recalculates your speed to zero.

In any case, speed and distance correlate very well with GPS measurements and I pronounce it done. Well, I will probably make a nice bracket for the sensor and the instrument itself has a springy mount that makes it move a lot on the road, but those are minor issues.

Back to the Dragon…. There are basically 3 things that need to happen for it to be on the road by my short term goal of December 12th.

1. The engine, which hasn’t run since I put all the bling on it, needs to run. That includes building and installing the throttle cable. It may also include troubleshooting an air leak, for it had symptoms that I now recognize before I took the engine apart for the afore mentioned blinging.

2. The wiring, which includes all lighting and the new “everything” speedo, needs to be done. Lighting includes finding some way have front signals without drilling the body.

3. The front wheel and especially the front tire are not very safe. The tire is aged and cracked, though it does seem to hold air pretty well. The rim is nearly rusted through in a couple of spots.

4. Yeah, I said three, but I forgot that it needs an inspection, too.

That’s what’s needed to merely get it ON the road. I really want to see if I can get it running EFI by then. Um, that’s 39 days. It’s not impossible. What it changes, however, is that EFI adds more engine and wiring work. See the EFI blog for more details on that.

There is a cubic buttload of stuff that also has to be done, preferably before December 12, but I doubt I can get it all that soon. Stuff like upholstery, fenders, footpegs or floorboard, baja cage and hitch, torpedos, navigational deflectors and other such goodies. A few more decorative bits like paint the inside of the wheel spokes and rechrome the handlebars. I suspect wheelie bars will be more of a requirement than an option at some point in the future.

The body is on; so is the rush!

This blog is about the MegaSquirt conversion of the engine in my VW powered trike. There is another blog about other parts of the reconditioning of this trike and another at my trike blog. The trike referred to here is currently known only as either The Purple Trike or The Dragon Trike.

With the trike in place at the BTW clubhouse, I took the body off and set about trying to start the thing up. It hasn’t run since I took all the intake, ignition and charging components off to install motor bling.

Before and after:

Even before it came apart, it wasn’t running right and with the benefit of the experience troubleshooting the Yellow Trike, I now realize that I probably have some form of intake leak. On The Yellow Trike, it was around the throttle shaft of the carburetor. This one appears to have about as much play as that one did. If it turns out to be that, I will borrow the new carburetor off the Yellow Trike to get this one running enough to know that there are no other intake issues, then I will crank up the EFI project into overtime because I see no reason to spend $160 on a new carburetor to use temporarily.

Of course, in the attempt to test fire the engine, it appears that fuel is not getting *to* the carburetor and that even if it were, the battery is too low to crank it, so while the charger tops off the battery, I am here typing away. Which give me some time to organize my efforts.

I have elected to rob the MSII and Innovate O2 sensor off Buzz to get the trike running. That will save me about $500 in parts and shipping and waiting. I will need to get a DB37 connector for the wiring harness and find some kind of weatherproof box to put all the guts in, primarily the MSII controller, relays and fuse block. It should be big enough to put the trike’s other fuses and relays in as well.

A suitable intake manifold has been ordered and has in fact been shipped and is scheduled to be delivered this Thursday (11/05/09). Once I have it in hand, I can make the adapter plate to attach the motorcycle throttle bodies to it.

After that, comes lots of little bits that need to be done. In no particular order (and subject to change):

Attach trigger wheel to crank pulley and install (change belt)
Mount trigger wheel sensor
Mount EDIS module
Mount EDIS coil and wires
Wire EDIS system
Pull distributor and plug hole
Put fuel pump in tank
Put fuel gauge sender in tank (not really EFI, but should pull tank only once)
Plumb fuel to TB
Cylinder head temp sender for CLT?
IAT on/in TB
Lots of tuning.