I wired and tested my CWJR last night. I found it to be solid and fairly well designed, but not particularly well fitted and assembled.
It was indeed ready to use as supplied, adjusted reasonably well. However, in order to connect my wiring to it, I had to remove the screw that holds down each contact block and that revealed a lot of loose tolerances.
I got it back together and fooled with it for a while. It’s been many years, so it will take a little time to get my iambic fist back. Or any fist, really.
I got online to see if there were any mods people have done to address the issues I found with it. There are a few, mostly within the text of reviews on eham.net. Wow. Some people have had bad troubles with theirs. Most cite simple but numerous QC issues out of the box:
“Looks deceptively well built until you attempt to adjust it.”
“You basically need to take the whole thing apart, guess at a setting, then put it back together to test it.”
“The instructions say that most people will not need to adjust anything. My foot!”
Once I effect the tweaks and repairs that I feel I must do, I will offer my review as well. Overall, I would say that it is a bit like the Hubble telescope mirror was originally, a precise machine built to the sloppy specs.
The worst problem I was dealing with is that the contact blocks are secured thusly:
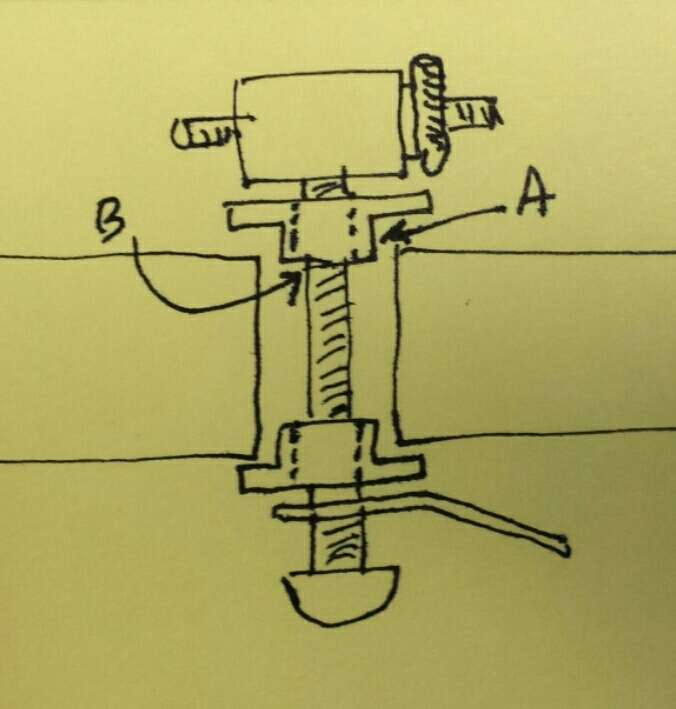
The drawing is not to any scale, but should illustrate. The assembly has two likely cost-cutting measures that hurt the quality of the design while helping to make it inexpensive to purchase.
The nylon shoulder washers are not sized well to either the holes in the device’s base nor the screws that pass through them. If the outside diameter indicated by “A” were larger (or the hole in the base smaller) and the inside diameter indicated by “B” were smaller, the fit would be much better.
The second issue is more of a preference item, but I would prefer if instead of a screw, there was a threaded rod of the proper length. First, the supplied screw is really only barely long enough and I presume the next longer one would probably be too long. However, with a longer piece of threaded rod, the contact could be secured tightly with a nut, then a second nut could be used to secure the wiring lug and the entire assembly trimmed to the perfect length. As it is, tightening the screw to hold down the contact block rotates the wire lug under it because it turns so easily against the slippery nylon and the screw is too short to add the washer that might prevent that. It’s hard to get the screw tight enough to firmly secure the block without turning the wire lug too far.
These changes may also necessitate mounting taller feet on the base but I will cross that bridge when I come to it.
Solid and consistently mounted contact blocks will reduce the remaining problems to nitpicking. I like the feel of the magnetic return and it is certainly compact. However, with the generally loose tolerances, I found that on my unit, the tension on the dit paddle (righthand paddle) cannot be reduced because the adjustment screw is as far into the arm as it can go. In fact, out of the box, the adjuster screw was touching the magnet at rest, making it quite stiff. The center block, which holds the magnets and the resting stops, is secured with two screws, one of which is shared with the common wire connector and is thus subject to moving around whenever the wiring is changed. This seems to be what caused the dit paddle to stick to the magnet. I was able to scoot the block over and adjust the screw enough to stop the sticking, but I can’t get it far enough away to lighten the tension as much as I’d prefer.
The tension adjustment screw has a countersink head, but the threaded hole in the paddle arm is not drilled with a countersink. By the design, it may not really be necessary, but with the fit of my unit, I think it would solve the problem to countersink that hole at least a little bit. This will allow the screw head to be adjusted farther from the magnet, thus decreasing the tension on that arm. As I do a bit of unrelated metal work that involves countersink drilled holes, I have the tools and this will be a trivial fix.
While we’re on the subject of the paddle arms, a common reviewer complaint is vertical play on the pivots. While the reviewers say the issue is vertical play, what it really looks like to me is slightly loose tolerances on pivots, which gives some radial play. This manifests itself as the contact end of the paddle having a lot of vertical play. Maybe that’s a distinction without a difference, but it does affect what needs to be done to address it.
Again, you should not be too critical of my Post-It mechanical drawing:
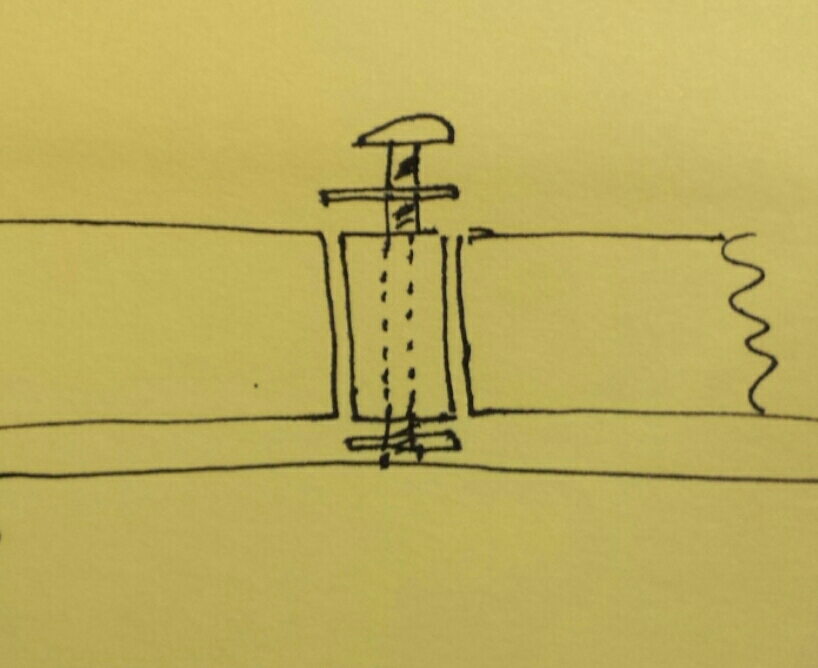
The paddle arm pivots are probably about as well designed and built as one could hope for without the added expense of hand fitting. Shown here is the arm, a bronze sleeve bearing sized to fit in the hole of the arm and the screw and washers to space and secure the assembly to the base.
On my unit, the dit paddle is a little bit loose. It has both vertical play, where it slides up and down on the pivot, and radial play, where the contact end can swing up and down, albeit in a very small arc. It is not loose enough to prevent it from working and I’m not totally convinced that it must be fixed. The movement is, however, different from the dah paddle, so it would be better if they were more consistent. At first, I thought I could simply tighten the screw a little to take up the play, but tight enough to take of the play is also tight enough to drag the return, resulting in a stuck key and continuous dits. A tiny bit looser and the play is back *and* the screw is loose enough to loosen with use.
I think the solution will be a washer that is smaller than the hole in the paddle so that the screw can be tightened down securely against the bronze bearing and another washer large enough to engage with the top of the paddle arm but thin enough to not cause drag. A washer that is too thick can be easily sanded or filed thinner. This is the essence of hand fitting. It takes expensive labor to do such fitting and *not* doing it keeps the cost of the product lower.
One way to do that is to introduce a shim, often aluminum foil, between the arm and the bearing or the bearing and the screw, or maybe both. This is probably fine, though aluminum foil is pretty soft and may need occasional replacement.
An arguably better solution might be to hand fit the bearing to the hole in the paddle arm. I would do that in this case by first lightly stippling the surface of bearing. Stippling is a way to tighten the fit of moving parts. It used to be a common method of tightening loose machinery long ago, particularly in hand fitting gun parts. Similar to knurling valve guides in an engine, stippling is more suited to hand tools. Using a sharp punch, you place indentations over the surface. As the point of the punch penetrates the metal, it displaces a volume of metal away from the point and this material flows away and upward from the point. This gives the bearing high spots everywhere there is a punchmark. Lap those back down but not all the way to the mean surface and you end up with a bearing that is overall larger diameter than the mean, and thus a tighter fit. Since there is no great mechanical stress on this bearing, I will probably put a ring of punches evenly spaced around the bearing, near the ends. It is the ends of the bearing that needs to fit tighter to fix the radial play issue. Punching and fitting one end first will probably be easier, too.
Stippling could also help fit the vertical play by stippling the ends of the bearing, making it slightly longer. This would be a fairly delicate operation considering the surface area on the ends of the bearing, but it would be no washer to add and sand thinner. I will consider it.
Talk about nitpicking, I personally would prefer it if the contacts operated quietly. The contact click and the return to rest click are noisy. The contact click would be pretty hard to silence, short of wetting the contacts with mercury, but I may put a thin pad of some material under the resting points on the arms to muffle the return to rest click. Anything to prevent a metal-on-metal impact should tone it down a bit.
The last compaint I have about the paddle I have already mentioned and that is the acrylic paddles themselves. They are presumably laser cut, so they are of precise dimensions but the edges are uncomfortably sharp against the fingers. A little sanding would probably address it, but I will probably make some replacements, likely from wood.
The eham reviews indicated that these paddles are also pretty delicate. At least one complains that one broke while operating portable limiting the operator to dit-less Morse code, “Guess it’s o.k., if your name is Tom and you are talking to your mom about the sounds cows make.” Another indicated that the paddle was cracked upon unboxing.
In short, it seems that the Code Warrior Jr iambic paddle set has great potential as a small sturdy keyer, but that some units are imperfect upon delivery. Whether that is a factory issue or a distribution and retail issue is hard to say for sure, but I am confident that after just a little tweaking, it will turn out to be a fine instrument that will certainly outperform my meager Morse code talents.
One day you and I will have to get a set of Kent paddles. I had a set when I lived in Plano, but sold them with the station when I ran out of money (when the eco-disaster hit)…
Can you expound on the method you used to countersink the holes for the “tension adjustment” screws? My VCWJR just arrived, and the screws are already bottomed out, but I swear they are actually touching the magnet, making for a sticky action. I tried flipping the screws around so the threaded end is facing the magnet, but even bottomed-out that direction, the tension is too loose. All I have available is a drill press with a reasonably wobble-free arbor and a selection of high-speed bits. It’s either risk disaster or return the key.
Hello! I am sorry to take so long to reply. I simply missed that there was comment on one of my posts 🙂
I used a countersink bit similar to these https://www.amazon.com/Countersink-Pieces-Degree-Cutter-Carrying/dp/B08JZDS77R/ although the specific one I had at that time probably came from the tool department at Lowes or Home Depot. Being all brass, the work can be done completely by hand. These bits have 1/4″ hex shafts that fit in typical nutdriver shafts.
Also, to be clear, there was very little countersinking required, just enough to add some clearance between the heads of the screws and the magnets.
Sadly, it’s a little dustier than it was when I finished the work 🙂