Busy Wednesday

The VDO speedometer sensor arrived today. Even though the dimensions are listed, it still looks bigger than I expected and just as ugly as expected. For reasons of expediency, I will still put it on the front wheel, but I may try to move it to a back wheel at some point to hide it.

The Acewell speedometer for the dragon trike also arrived today, and it is smaller than expected. It should mount well on the handlebar, though the cable may be too short to hide the connectors. There appears to be 14 conductors coming out of it; luckily they are small wires.

Finally, I go to Joe’s to pick up the dragon body today!

Buzz for sale?

I am contemplating selling Buzz.

I am thinking about selling him for two reasons. First, we have a rather full stable of iron critters and could honestly use the garage space. As he’s not on the road, I’ve not had insurance on him since it last expired, but once back on the road, I would need to insure him again. Second, I have a VW trike that I want to run EFI and I need parts. The two most expensive parts that I need are the MegaSquirt controller and the exhaust oxygen sensor and there is one of each on Buzz, who is not really roadworthy.

The battery is dead at the moment from sitting since April. Once I service or replace the battery, the bike should be in at least a minimally running condition, meaning that it *will* start and run and go down the street. It does not, unfortunately, mean that the bike is in any desirable state of tune. It runs quite rich at idle and has a rather unfriendly throttle response. The throttle bodies I installed are far too large for this bike. In short, the injectors cannot deliver a small enough amount of fuel at idle while the throttle body itself cannot deliver a small enough amount of air hardly anywhere above idle. It runs, but not particularly well. It revs like a banshee, though. :)

I have a couple of ideas to address this problem. To my knowledge, there are no salvage four cylinder individual throttle bodies small enough to work with this engine, though there are several for twins and singles. These all would require a manifold to adapt to a four cylinder and I have in fact secured a potential TB and a spare cylinder head that I intended to use in the fabrication of just such a manifold and have discussed this manifold in previous posts. However, I have plenty of other projects, not the least of which is the afore mentioned VW trike, and that throttle body is nearly a bolt-on for the VW.

There are actually several options available to me, in no particular order….

1. Sell Buzz as is, hoping to recover enough for my EFI parts list. Considering he’s only barely a running bike, I would imagine that only someone specifically interested in taking over a MegaSquirt project would be willing to pay anything more than a parts-bike price for him.

2. Part him out. Potentially, this could be the most lucrative, but I really hate to do that to a classic bike with a good title and many miles left to run.

3. Reinstall the stock induction system (all was kept, just in case) and sell him as a working stock bike. This would likely appeal to the largest buying audience, but would also involve the fairly exhaustive list of carburetor tuneup tasks that were actually needed before I took them off, at least if I want any decent money for him.

4. Rob the parts I need off him, put the rest in a corner, put him back together as time permits and maybe sell him then.

I welcome any thoughts, suggestions and comments (or offers)….

Speedometer and nose cone

Rather than use the drill again, I wound this coil by hand. It’s not necessarily better. I was at home and didn’t want to go to the clubhouse that night. 🙂

Once wound and connectorized, I put the meter on it and it read 22 ohms. The other was 14 ohms, so this one really only has 57% more turns. I was hoping on doubling it.

I installed and tested it. It works *better* but still not right. Now I only have to get it to about 20 MPH before it indicates. I didn’t have my GPS with me to test for the actual speed, but it feels about right.

Consequently, I ordered the actual VDO pickup coil from eGauges. It should be here next week. I will need to make a bracket for it, but it should be pretty simple, little more than a flat with two holes in it.

Speaking of speedometers and things gaugey, I ordered the Acewell speedo that I want to use for the dragon trike. It has most, if not all, of the instrumentation I will need. It shows speed and mileage, engine RPM and fuel level in addition to indicator lights for left and right turn, oil, neutral, highbeam and “trouble”, though I will probably use the neutral light for the alternator and trouble light for MegaSquirt. It also has some other cool features like two trip odometers, average and max speed memory, a clock and ride timer. By having all that in one unit, I hope to mount it on the handlebars and avoid cutting any holes in the fiberglass, but I digress….

I replaced the transaxle nose cone on the yellow trike last Friday night.

Per Doug at Qualitat’s suggestion, I used high temp silicone to seal the nose cone and installed it on the transaxle with little trouble. As is often the case, things went downhill from there.

Long story short, we had the front transaxle mount for a ’66 to ’72 model and the frame is apparently a ’62 to ’65 model. The older mount has a smaller center post. I thought the old mount was completely trashed but when I looked closer, it was somewhat trashed, but was also the newer model that had been modified to fit the older frame. So, I did the same modification, else I would have to wait until the next day to buy another one.

Since the nose cone has the mounting hole for the back up light switch, I opted to install the switch and will at some point wire it up. Besides backup lights, I think a dashboard ‘reverse’ indicator would be neat.

So, the new nosecone tightened up the shifter even more. The only thing left that could do much more would be to replace the hockey stick. It’s a little worn where it goes through the nosecone, but the gearshift works better now than it did and it was already acceptable. I will say that, if the transaxle has to come out for something else *anyway*, maybe I’ll replace it then.

The new front mount tightened up the transaxle and stopped the disturbing and potentially damaging banging of the nose cone to the frame during rough shifts and on rough roads. Every little thing like this that we fix makes it rattle less and tightens up the feel and generally improves the driving experience.

Gabby was planning to take it to work tonight. I have not yet received an email verifying whether or not she did, but she most likely did. It will be her first time to do more than just run up and down the street or around a parking lot with it.

Yellow Trike Speedometer and Starter

Speedometer:

I installed the VDO speedometer with a 4 pin weatherpack connector. I was concerned about having to splice into power and ground for it, but I just used the wiring for the old speedo’s lights. Power and ground right there. Internally, I wired the lights and speedo power together.

I wound my own pickup coil. Using a drill mounted in a vice to roll the form, I first used the entire 200 foot roll of 30ga magnet wire, but where I was originally going to place it, it was going to be too long. After I unrolled it (yes, as clumsy as it sounds), I wound a new coil with the same wire that was really a nicer coil, but smaller. I then essentially soaked it in black spray paint for both weather resistance and to stabilize it against vibration and spun it slowly in the drill under the heat of a 250W work light to dry.

Once I had it in hand, I discovered a much more elegant place to mount it, using one of the front brake caliper mounting holes. This hole is in near perfect alignment with the 5 bolts that hold the hub and spokes of the wheel together. I mounted 5 rare earth magnets to the bolt heads with 3M mounting tape and mounted the coil with about a 3/32″ gap between the bolt head on the coil and the magnets.

I put the meter on the coil. It reads 14 ohms. When I spin the wheel manually, I see the pulses, but they seem smaller than I would expect.

I did a little math to figure out how many pulses per mile this setup would provide. Divide the wheel and tire circumference (7 feet even in this case) into 5280 to get how many wheel rotations are in a mile, 754.3, then multiply that by 5 magnet pulses per rotation to get 3771. Following the directions for manual calibration of the speedometer, I set it to 3770. The speedo always forces the last digit to a zero. Shrug.

So, I had the front end up on the jack with the speedometer powered up and spun the front wheel.

Nothing. I spun it as hard I could and still nothing.

I wasn’t completely surprised, considering the small signal from the coil.

I did find accidentally, while testing the timing on the road, I looked down an the speedometer was indicating! Turns out my coil is too small and doesn’t provide a large enough signal to count at low speeds. Above about 40 mph and it works great. I tried using an audio transformer connected in reverse to boost the voltage a bit, but it doesn’t work at all then.

I have the stuff and dimensions to wind a new coil. I expect it to be about 25-30 ohms and probably double or more the signal.

If *that* doesn’t work, ok, I’ll *buy* a VDO pickup….

The entire speedometer assembly is fairly mobil in operation. I made a brace to help hold the dashboard still, but it turns out that much of the speedometer movement is in the speedo’s own mounting bracket. I’ll think of something.

More coil details tomorrow.

Starter:

The verdict is in. I’m pretty sure that the starter flakiness was due to overloading the starter button contacts and thus eventually burning the switch out. I got a grounding type button and rewired everything with a relay instead of direct and it did not fail in 30 start.

I know that the original starter needed replacing, but I’m not so sure the 2nd one did.

Paint!

Yesterday, Bondo Joe called and told me that, while it wasn’t ready to pick up yet, the paint was done on my trike body.

Went there at lunch today and took a couple of cellphone pix. They didn’t come out great, but….

This pic does almost NOTHING to convey just how incredible it looks in person, and this is with it covered in dust from sanding and buffing….

Even with the dust, you can see my wife reflected in the surface of this pic where I was trying to see some of the details of the scales…

The Flat Spot is Banished!

Monday evening, I picked up a warranty replacement starter with no quibbles and installed it with no difficulties. So far, so good. It has not yet failed to crank, though it’s only been used a couple dozen times thus far.

I am not an expert, but I think I have done enough reading and comprehension at this point to understand ignition advance better than I ever have before, even through the EFI conversion on Buzz.

In the extreme short version, the spark needs to happen at the right time based on a large number of engine operating factors. With some engine applications, a lot of these factors can be ignored, or maybe more accurately, considered to be static. It’s the changing parameters that make good ignition hard to do.

The biggest factors are engine load, meaning the work that the engine is *expected* to do at any given instant, and RPM. How the ignition system needs to respond to these two factors is somewhat affected by engine and air temperature, compression ratio, fuel quality, combustion chamber geometry, ignition spark energy, even intake tract length and probably a thousand other little factors, many of which can be taken as constants in any given engine. For example, your compression ratio is not expected to change during normal engine operation.

The reason the ignition timing has to change is because the burning fuel mixture contained within the cylinders tends to burn at about the same speed regardless of the engine’s RPM. In order to extract power efficiently, the spark has to be timed such that the fuel burns and produces peak pressure just as the piston begins to travel downward on the power stroke, just after TDC (Top Dead Center, which might be a good name for a band). If the spark is too soon, pressures build dangerously fast and you get knocking, overheating, melted pistons, etc. If it’s too late, you miss out on much of the available power and greatly increase the amount of unburned fuel that goes out the exhaust.

Timing is expressed in degrees relative to TDC. Because of the nature of the engine and the time it takes for the fuel to burn, timing adjustments are almost universally towards the advance, so that the spark occurs before TDC. If either the load (throttle opening, really) or RPM or both go up, the spark needs to happen earlier so that the burning fuel can catch up with the moving pistons.

With an old school ignition system with mechanical points and distributor, this advance is generally introduced by moving the points in a limited arc around the distributor shaft. This is usually done with a piston or diaphragm connected to a vacuum source (not just any vacuum source will do; see below), centrifugally with weights and springs that respond to the distributor RPM or some combination of the two.

The ubiquitous Bosch ‘009’ distributor, an extremely popular replacement unit on VW engines, uses the centrifugal method and thus responds only to engine RPM. The weights and springs combine to provide an advance curve that generally runs from about 5 to 30 degrees. The weights and springs can be changed out to tune the curve and the maximum advance somewhat, but generally, you set the distributor to the maximum advance appropriate for your engine, usually around 30 degrees, and the rest of the advance curve lands where it lands. With some carburetor combinations, this results in a notorious “flat spot” off idle. The driver opens the throttle needing more power, and the small amount of advance provided at low RPM isn’t enough to to make the engine respond quickly. Since the fuel delivered by a carburetor is very dependent on the volume of air flowing through it, the open throttle combined with the as yet low air flow though the carburetor makes the mixture rather lean and the engine stumbles. The resulting “flat spot” can range from minor annoyance to deathtrap, depending on severity. Proper setting of the accelerator pump, which squirts a bit of extra fuel down the carburetor throat based on the rate the throttle is opening, can go a long way towards compensating for much of the flat spot, though it really just masks the actual problem, too little ignition advance.

A distributor equipped with a vacuum advance system can be much more responsive to engine load. This vacuum signal is provided from small holes placed very carefully at specific places in the carburetor throat. Generally, they are placed very near the throttle butterfly, usually just above it. By placing it so, when the throttle is closed, there is little or so vacuum on the advance mechanism, so no little or ignition advance. When the throttle is opened, especially at a moderate to high opening rate, a relatively strong vacuum is presented to the advance and the engine responds much quicker to the open throttle.

There are distributors that combine vacuum and centrifugal in one unit, allowing the engine to respond quickly to throttle changes, but letting engine RPM dictate the total advance.

With the yellow trike, the flat spot was about the middle of the range, more frustrating that anything else. It was pretty easy to kill the engine, especially when the new foot controls were just installed and nobody was used to them yet. It was also pretty easy to get unintended (and generally unwelcome) wheelies, especially if trying to make some quick maneuver such as a U-turn, as I tended to rev the engine pretty high to avoid killing it and would end uppartly dumping the clutch while wrenching away on the bars, working the throttle, holding your feet up on the clutch and brake, etc.

As mentioned in a previous post, I got a vacuum advance distributor (which may be vacuum and centrifugal; there was no documentation provided and I have not had cause to disassembled it enough to see) in an attempt to tame the flat spot. At first, it did not seem to make a bit of difference in how the engine ran. This made me crank up the research as to why. The most important point I discovered (and this should be intuitive) is that not all vacuum distributor designs respond the same to the vacuum and not all carburetors provide the same vacuum signal.

I picked up a vacuum gauge and kind of plotted the vacuum signals from each of the ports on the Brosol H30/31 carburetor and the response of the generic distributor to an applied vacuum.

On the distributor, I used a handy vacuum pump that I had hanging around (my mouth) and watched the gauge and the advance plate while applying various degrees of vacuum. The plate begins to move at 4-5 in Hg and has moved through it’s range by about 15 in Hg. As verified later with a timing light, this plate movement represents about 30 of degrees advance adjustment.

I checked all 4 vacuum ports on the carburetor. Here is a pic of someone elses (dirty) H30/31 carb with the ports marked with the results of my testing. I simply didn’t have a suitable pic of my own.

The port on the left side of the carb, the one that normally connects to the vacuum advance, provides a signal that responds appropriately to the throttle, but is nowhere near strong enough to move the mechanism on the distributor. The next one had a very strong signal with the throttle closed and dropped with throttle opening, pretty much the opposite of what we need. The third port had no measurable vacuum at all. Finally, the fourth port, the original purpose for which I cannot venture more than a guess, provides a strong enough signal.

With idle timing set at 7-10 degrees BTDC, the engine revs much better and the distributor provides advance to about 40 degrees when reving. The engine definitely worked better but the flat spot was only reduced, not eliminated.

I observed the operation of the accelerator pump and concluded that it was probably set too light. I tried for a bit to get to the adjusting nut, but where it is placed, it was fairly easy to see and nearly impossible to touch, especially with enough force to adjust it. While it’s not conducive to tuning and tweaking, I decide that I would need to remove the carburetor to adjust the accelerator pump, so I set about that simple task. The gasket would need replacing, which would involve a trip to the parts store, but this thing needed adjusting. I’m glad I removed the carburetor because it revealed what I think was probably the single biggest contributor to a host of problems.

The throttle was very stiff, stiff enough that my forearm and hand ached from the road trip last weekend. The throttle did not return to closed very well, either. This helped obscure the flat spot issue to a large degree by keeping the revs up, but when I tweaked with the throttle return spring and was able to get it to return better, the cost was an even stiffer throttle.

Well, once the carb was off the engine and I was trying to adjust the accelerator pump, it became apparent that the accelerator pump linkage was the source of this stiffness. It required substantial effort to push the pump lever and it dragged down the spring’s attempt to close the throttle.

I carefully removed the pump diaphragm from the carburetor and found that the pump arm did not move freely. I drove the pin out and discovered where the problems were. I bent the top arm a bit, reamed the pivot holes open a bit, filed the flat part of the pivot a little thinner then reassembled and oiled it. It now moves very freely. I also maximized the pump stroke to deliver a bigger shot of fuel. I also installed another spring that I had for throttle return, though I need to experiment to see if it’s really any lighter than the stock spring.

The result was just short of magical. Throttle effort is reduced to maybe a little stiffer than a motorcycle. Reving at a halt is quick and has a very strong, hot roddy sound. If you REALLY try, you can just detect a tiny stumble if you are rolling at idle and slam the throttle open. You have to try carefully because doing that behavior will definitely get you a little bit of front wheel air, about 2″ up for a couple of feet if my estimate is good.

I rode up and down the street quite a bit, hard and fast, light and easy and I could not trip it up.

The extra throttle response definitely highlights that the front transaxle mount has got to go. The nose cone clanks against the frame member underneath it. That will definitely lead to Bad Things ™ if allowed to continue. Likewise, the headlight really needs to be mounted better and higher because the fender hits it when you brake hard and the chassis pitches forward a bit and especially when you land hard from the high wheelies which are easier and more controllable now. [did I write that out loud?]

Tonight, I hope to work on getting the VDO speedometer working electrically, which will involve running a wire from the front to the rear. I think I may add some wire from the fuse panel to offload some of the draw on the main ignition switch fuse and add a starter relay. I have blown that fuse a few times with the starter solenoid. I am expecting a mounting cup for the speedometer to be delivered tomorrow, so getting the wiring done tonight would be great.

The Road Home

The weather turned out to never clear up. We decided Sunday morning that we’d rather take a meandering way home instead of adding a long return trip from Fredericksburg. Next time. We took a couple of small side trips, decided against a couple others and neglected to make a shopping stop we’d planned to make. When we got home, we had time to unload everything from both trikes and go inside to relax before it started raining. Perfect timing. Unlike the engine…

The starter gave me no trouble first thing in the morning at the hotel, but it did surprise me a couple times during the day. For example, I killed the engine a time or two at a light or in some other traffic situation and it chose then to just go clunk instead of turning over. Continued stabbing at it was generally successful and it would start perfectly when the starter would finally turn the motor. When we were nearly home and stopped for a late lunch, it wouldn’t start in the parking lot until I’d pounded on the solenoid a bit.

The Autozone starter has a lifetime warranty, so I don’t expect any difficulties in exchanging it, beyond the minor pain of changing it out. Way easier than on a car.

The other problem I had may turn out to be my own fault, at least partly. During the course of the weekend, especially on Sunday, the engine got worse about hesitating at takeoff, which contributed to the afore mentioned killing at stoplights. It got to where I would keep it reved to around 2000 RPM at stops.

As Toni napped on the couch last night, I did a lot of vacuum advance distributor and carburetor selection research on the internet. Lots of good data there, if you have the patience to wade through the irrelevant, or at least unrelated, stuff around it.

For the big picture, I think it comes down to this. The Solex H30/31 carburetor provides a vacuum advance signal, but it is a fairly weak signal, intended for the stock vacuum advance distributor with it’s large vacuum dashpot. The distributor I have has a smaller dashpot and is probably intended for the 34PICT carburetor, which provides a stronger vacuum advance signal. I also have learned authoritatively which port the advance is supposed to connect to. Armed with these bits and without the performance anxiety of a crew of lookers-on, I will see if I can make this combination work. The new carburetor started and idled nearly perfectly out of the box, so I have done no adjustment on it at all. I will adjust it as best I can with either the new distributor with no vacuum attached or if I must, with the 009 reinstalled. If after that I still can’t get the vacuum advance to work correctly, I will see if there is any change I can do to the distributor, maybe change a spring or something of that nature. Finally, I will replace it with the $160 unit from aircooled.net that is made specifically for the H30/31 carb.

In any case, it occurred to me this morning that I don’t remember ever tightening the clamp on the distributor. I remember looking for my 10mm socket for that reason, but I don’t remember actually doing it. In adjusting the throttle cable a time or two, I had to remove the distributor cap and may well have moved the distributor. Besides, an unclamped distributor is subject to movement just from being on a running engine.

So, at lunch, I checked it. Sure enough, it’s not clamped down.

The other issue was the speedometer. The cable was squeaking Friday night. I oiled it Friday night and it was quiet Saturday, but still apparently broke at some point. I had my GPS bungied to the tank, partly because I wanted to check the speedo against it. After the speedo died, I just bungied the GPS to the face of the speedo and used it all weekend. While I probably can just replace the speedo cable, we have a new VDO electronic speedometer that I picked up intending to use on the Harley trike before I succumbed and ordered the actual replacement Harley speedo.

Electrically, the VDO speedometer is going to be trivial to install. A pickup coil that I can probably wind myself and a few magnets attached somewhere, probably one of the rear wheels, a little geometry and programming and it should come up easily. The trickier bit will be mounting it. I found some VDO gauge mounting cups, the back of which is not 100% water proof, but I’m sure can seal it well enough and it will otherwise work and look really good.

Road Trip!

Due to interruptions, it took until Friday night to finish getting the yellow trike road worthy once more.

One of those interruptions was a dead starter. Luckily, I had the troubleshooting braintrust of fellow BTW members at the clubhouse, for our monthly meeting had just ended and everyone wanted to see, point and contemplate. Zipped down to Autozone for a replacement starter, back to the clubhouse to install it and zowie, does it spin over better.

Finished the last bits of it about 1AM and took it home for the night.

We wanted to go to Fredericksburg, but were getting such a late start, that we decided to just head south out of the metroplex and go as far as we felt like going. Once we got to Stephenville, it didn’t seem all that far to Brownwood and from Brownwood, not all that far to Fredericksburg. I am posting this from a hotel room in Brownwood.

We will decide in the morning whether we want to continue to Fredericksburg, or perhaps more importantly, whether we want to trek all the way home from Fredericksburg tomorrow afternoon.

The trike has done well with a couple of exceptions. The flat spot that the distributor was supposed to improve is slightly better, but far from gone. Similarly, and likely related, rather than the nice low idle we’ve been enjoying, it seems to want to idle at about 2000 RPM. The throttle appears to not be returning well. At this point, I suspect it has something to do with my running the throttle cable in at a lower angle in an attempt to reduce throttle effort.

The air shocks were deflated to ease their removal (actually, the removal of the baja cage) and until we were underway it didn’t occur to me that a few issues were symptoms of the ride height being too low. I didn’t have a gauge handy, but I zipped a bit of air in there, enough to raise the already high rear end another inch or so. It went back to riding quietly. Once in Brownwood, we wanted to seek out a place for dinner. We decided to go two up on the trike. With just Toni’s added weight, it got all kinds of squirrely, most disturbingly a lurchy kind of sway. Circled back around to the hotel and with her off it, it settled right back down. It didn’t do that with her up there when we rode around the neighborhood on it the Friday we were leaving for Turner Falls.

Finally, we found good food and finished eating. When we ready to leave, the trike cranked twice (they are a bit cold natured, ya know), but then stopped cranking. The solenoid was clicking, but the motor was not turning.

Long story short, I whacked on the solenoid a few times and next time, it stared fine. We’ll see about the morning.

70-something Stires Trike

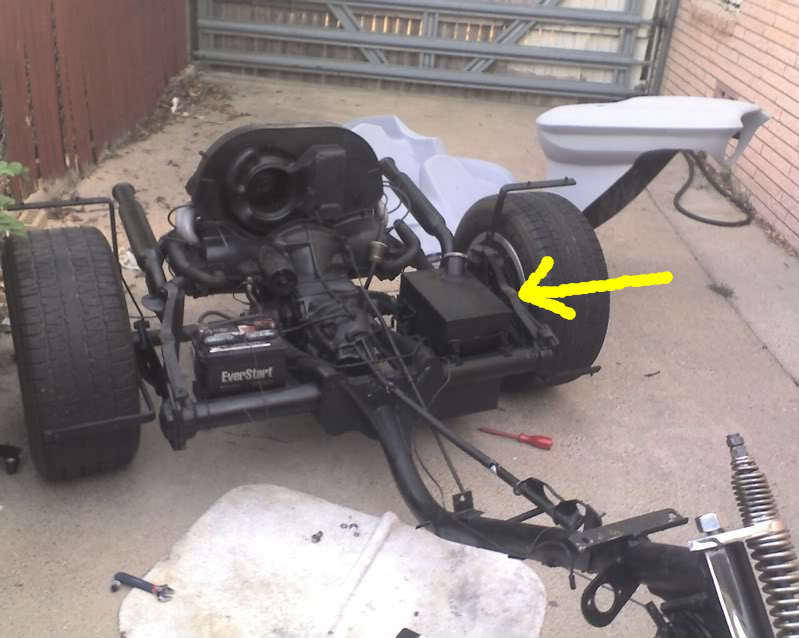
I found and purchased my VW trike even while I was working on Buzz so perhaps needless to say, I am planning to ‘squirt it, too.

As is wise in such endeavors, I have been gathering some parts that will be needed for it.

I have the in-tank fuel pump from a Ninja 650 motorcycle. I think it will be easy to put it in the existing tank which is basically a welded up cube.

I am slightly concerned that the sump may hang down low enough to drag, but there is room to move the tank up on its mounts, too.

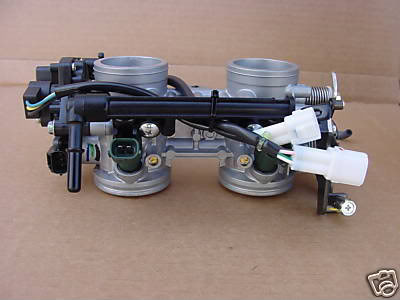
I have a set of thottle bodies that were supposedly from a KFX450, but appear instead to be from a Ninja 650 or maybe a Versys. The throats of this set of throttle bodies are set at 75mm between centers, which corresponds to the spacing on several Weber and Delorto carburetors that are popular on VW engines, so it should be pretty easy to adapt them to readily available manifolds.

The EDIS ignition I got for Buzz could not rev as high as Buzz’s engine, but will work perfectly for the relatively low reving aircooled VW engine. There is ample precedent for adapting trigger wheels from various Ford engines to the crank pulley on the VW.

I will probably borrow the WB O2 system off Buzz, probably temporarily, but maybe permanently.

After those items, the biggest thing left is the controller itself. I’d like to use a Microsquirt, but I will probably just get another kit from DIYAutotune.

More to follow….

Clutch trauma

Ok, I think I see what happened.

Before I could get to the clutch, I had to remove the baja cage. While I appreciate the desire to mount the cage securely, they had welded a part that, for a street vehicle, I think I would have bolted. Removing the cage meant removing both of the monster bolts which hold the main engine/transaxle support to the frame. Of course, in my naivete, I removed the first and was partway through removing the second before I realized that I was in the process of crushing my arms under the combined weight of the engine and transaxle. Luckily, I did realize it in time 🙂

Furthermore, I am spoiled to the extremely easy access that my trike affords to the four bolts holding the engine and transaxle together. The bodywork on the yellow trike definitely impedes access to these bolts.

Then there was the extraneous piece of metal that used to hold up something long gone by bolting it to the engine, but now served only to keep the engine and transaxle loosely connected to one another once all the bolts were removed.

You may recall, though I doubt it, that this post is about the clutch.

I think the real problem was adjustment. I had the clutch arm adjusted so far down, to make it disengage easily, that when I rested my foot on the clutch at a stop, it pushed the throwout bearing WAY too far. Repeated sojourns into this extreme position eventually wrenched the spring clip off one pin of the bearing, which then dangled from the remaining pin and ceased to engage correctly. The spring clip can be seen resting comfortably at the bottom of the bell housing.

Examining the cross shaft while still installed, the ends of the fork arms (fingers?) appeared to be bent, which would further indicate that the resting weight of my size 13’s is beyond the design limits of the clutch system. Once I had the cross shaft out, however, the semi-circular cuts that mate with the pins on the bearing do not appear to be distorted, which I would have expected if the forks were bent.

So, since I was in there, I replaced the cross shaft, cross shaft bushings, the bearing itself and the spring clips. The new cross shaft has wider fingers, so while the old ones did not bend, the new one almost certainly wont. On the other hand, the spring clips are of a slightly different design, with a full turn of wire at the spring end. They are substantially stronger than the simpler U-shaped springs. This concerns me slightly in that if, despite my efforts, the clutch is still not adjusted like it needs to be, the wider fork fingers might wrench off the spring clips again because the clips are too stiff to just spring out and back. Shrug. I’ll find out soon enough.

It seems that the slave cylinder will “pump up” somewhat, regardless of the amount of bleeding I’ve done. I must conclude that it is a design characteristic. If I adjust the clutch such that it operates correctly with one step on the pedal, I run the risk of a second step, as could very well happen in normal driving, could potentially pump it up far enough to exceed the physical limits of the throwout bearing. The main saving grace is that the new components seem to engage the clutch earlier in the step with the adjustment set almost to mininum, giving it more room without crashing. Only driving it for a while will truly tell.

While the engine was out of the way, I replaced the badly worn transaxle mounts. I also cut the welds on the lower tubes of the baja cage so that it can be installed and removed without pulling those big hairy bolts which hold pretty much the entire drive train to the frame.

I took the opportunity to add a connector to the ignition and oil pressure wires and an inline fuel valve, all which will allow the engine to be removed more easily in the future.

Finally, while the engine was out, I rerouted the throttle cable from the original location (red arrow) to a new, lower location (green arrow) in an attempt to achieve a better pull angle on the carb and thus a lighter effort at the hand throttle. Throttle effort is slightly lighter, though less so than I’d hoped for.

I picked up a vacuum advance distributor today. I hope to install it tomorrow evening as well as reinstall the baja cage and thus the shocks.

That should put it back on the road.