This weekend, particularly Sunday, I did quite a bit of work on Kermit, the green trike. The big thing is that the clutch master cylinder leaks down so fast that it’s pretty much undrivable. Certainly unsafe to drive.
Qualitat VW stocks a lot of parts that most shops have to order, so on Friday we went out there to get a rebuild kit of it. He didn’t have the rebuild kit for this size, the 5/8″ piston, but he did for 3/4″. We elected to get a new EMPI 3/4″ master cylinder, but also got a 3/4″ rebuild kit to be used for the brake cylinder. Someone thinking more clearly would have put the new cylinder on the brakes and rebuilt the old cylinder for the clutch. At least I can still do that if I decide to.
After reinstalling the pedal and bleeding the line to the clutch, I began working at trying to make the engine reliable. It’s been bad about getting into a mode where it wont keep running at an idle. It will typically restart without any appreciable difficulty, but it just won’t idle.
Having followed instructions on adjusting the carburetor several times before, I have never been able to get it to act as described.
The entire procedure involves setting everything except the carburetor first. The first two, setting the valves and points, are pretty easy. Well, easy enough to do 100% successfully. Step 3 is setting the timing.
Now, it seems as though setting the timing would be easy, but it’s adjusting the timing that’s easy. Actually setting it to a value that is agreed upon by all the documentation I can find is the tricky part.
Timing involves the distributor, duh. The trouble with setting the timing is that pretty much all the documented procedures are for fairly specific combinations of hardware that are in stock Beetles, running stock carburetors and stock distributors and stock exhaust. Almost none of that applies here.
As for setting the timing, the biggest thing seems to be the vacuum signal from the carburetor to the distributor. Yes, the PICT30/31 is a stock carburetor, and yes, the Bosch 034 is essentially a stock distributor, but the port on the carburetor that is supposed to connect to the distributor has almost no detectable vacuum, certainly not as much as is required to operate the dashpot on the distributor and connection anywhere else maintains a fairly high vacuum at all times and thus has essentially no effect. The distributor is a dual advance model, with both vacuum and centrifugal advance, so it basically ends up running like a 009 distributor.
With the timing running essentially centrifugal only, the problem now becomes adjusting the carburetor.
I did find something interesting while researching a bit on this blog post. Something that apparently happens with some regularity is the diaphragm in the dashpot on the distributor being damaged by connecting it to a vacuum source that is too powerful, particular under certain circumstances where there is a high engine rpm with a closed throttle. Since the dashpot did not seem to respond to the “proper” vacuum port, at one time it was connected to another port and now I wonder if in doing so, I burst that diaphragm. That could explain why advance doesn’t seem to work right and why adjusting the carburetor might be so hard, what with a vacuum leak through at bad advance diaphragm.
I found another related article about air leaking into the engine, generally.
The car acts like it’s not getting enough fuel; i.e., running too lean. Yes…
The car may run well at highway speeds, but the engine dies at idle and will only idle at higher than normal rpm (e.g., >1200 rpm). Yes…
The engine hesitates and dies when you take your foot off the throttle, or hesitates when pulling out of corners at low rpm. Yes…
Difficulty in properly tuning the carburetor (actually tuning will be impossible). Yes…
Since the carburetor cannot be tuned correctly, the timing cannot be properly set. Yes…
You may get engine “looping” (alternating between high and low rpm). Not really…
The engine may backfire. Not really…
It is certainly worth investigating, particularly if the distributor diaphragm turns out to be damaged.
There is nothing major wrong with Sponge Bob Square Trike, but there sure are a lot of little things. As I am writing this, I feel the sudden need to make a list, but it will have to wait…
Last Sunday, we wanted to ride to the monthly club meeting, so I spent some time on Saturday resolving a couple of little things on Sponge Bob and troubleshooting a couple of others.
Sponge Bob has had a few issues with reliability. Seems that he never fails to start, but he sometimes doesn’t make it to the destination. Recently, inspection was due. In the short trip to the inspection station, it threw/broke the one and only belt. In sunlight, the alternator light is very easy to miss, so I was blissfully unaware. Upon arrival, about a 10 mile trip, the engine was seriously hot as the cooling fan is driven directly off the back of the alternator.
As luck would have it, the inspection station is next door to (and owned by) a tractor dealer, so I was able to peruse their selection of belts and find one that worked well enough. However, in the short ride home, the new belt was itself shredded. I think that I chose one that was a reasonably proper length but too wide.
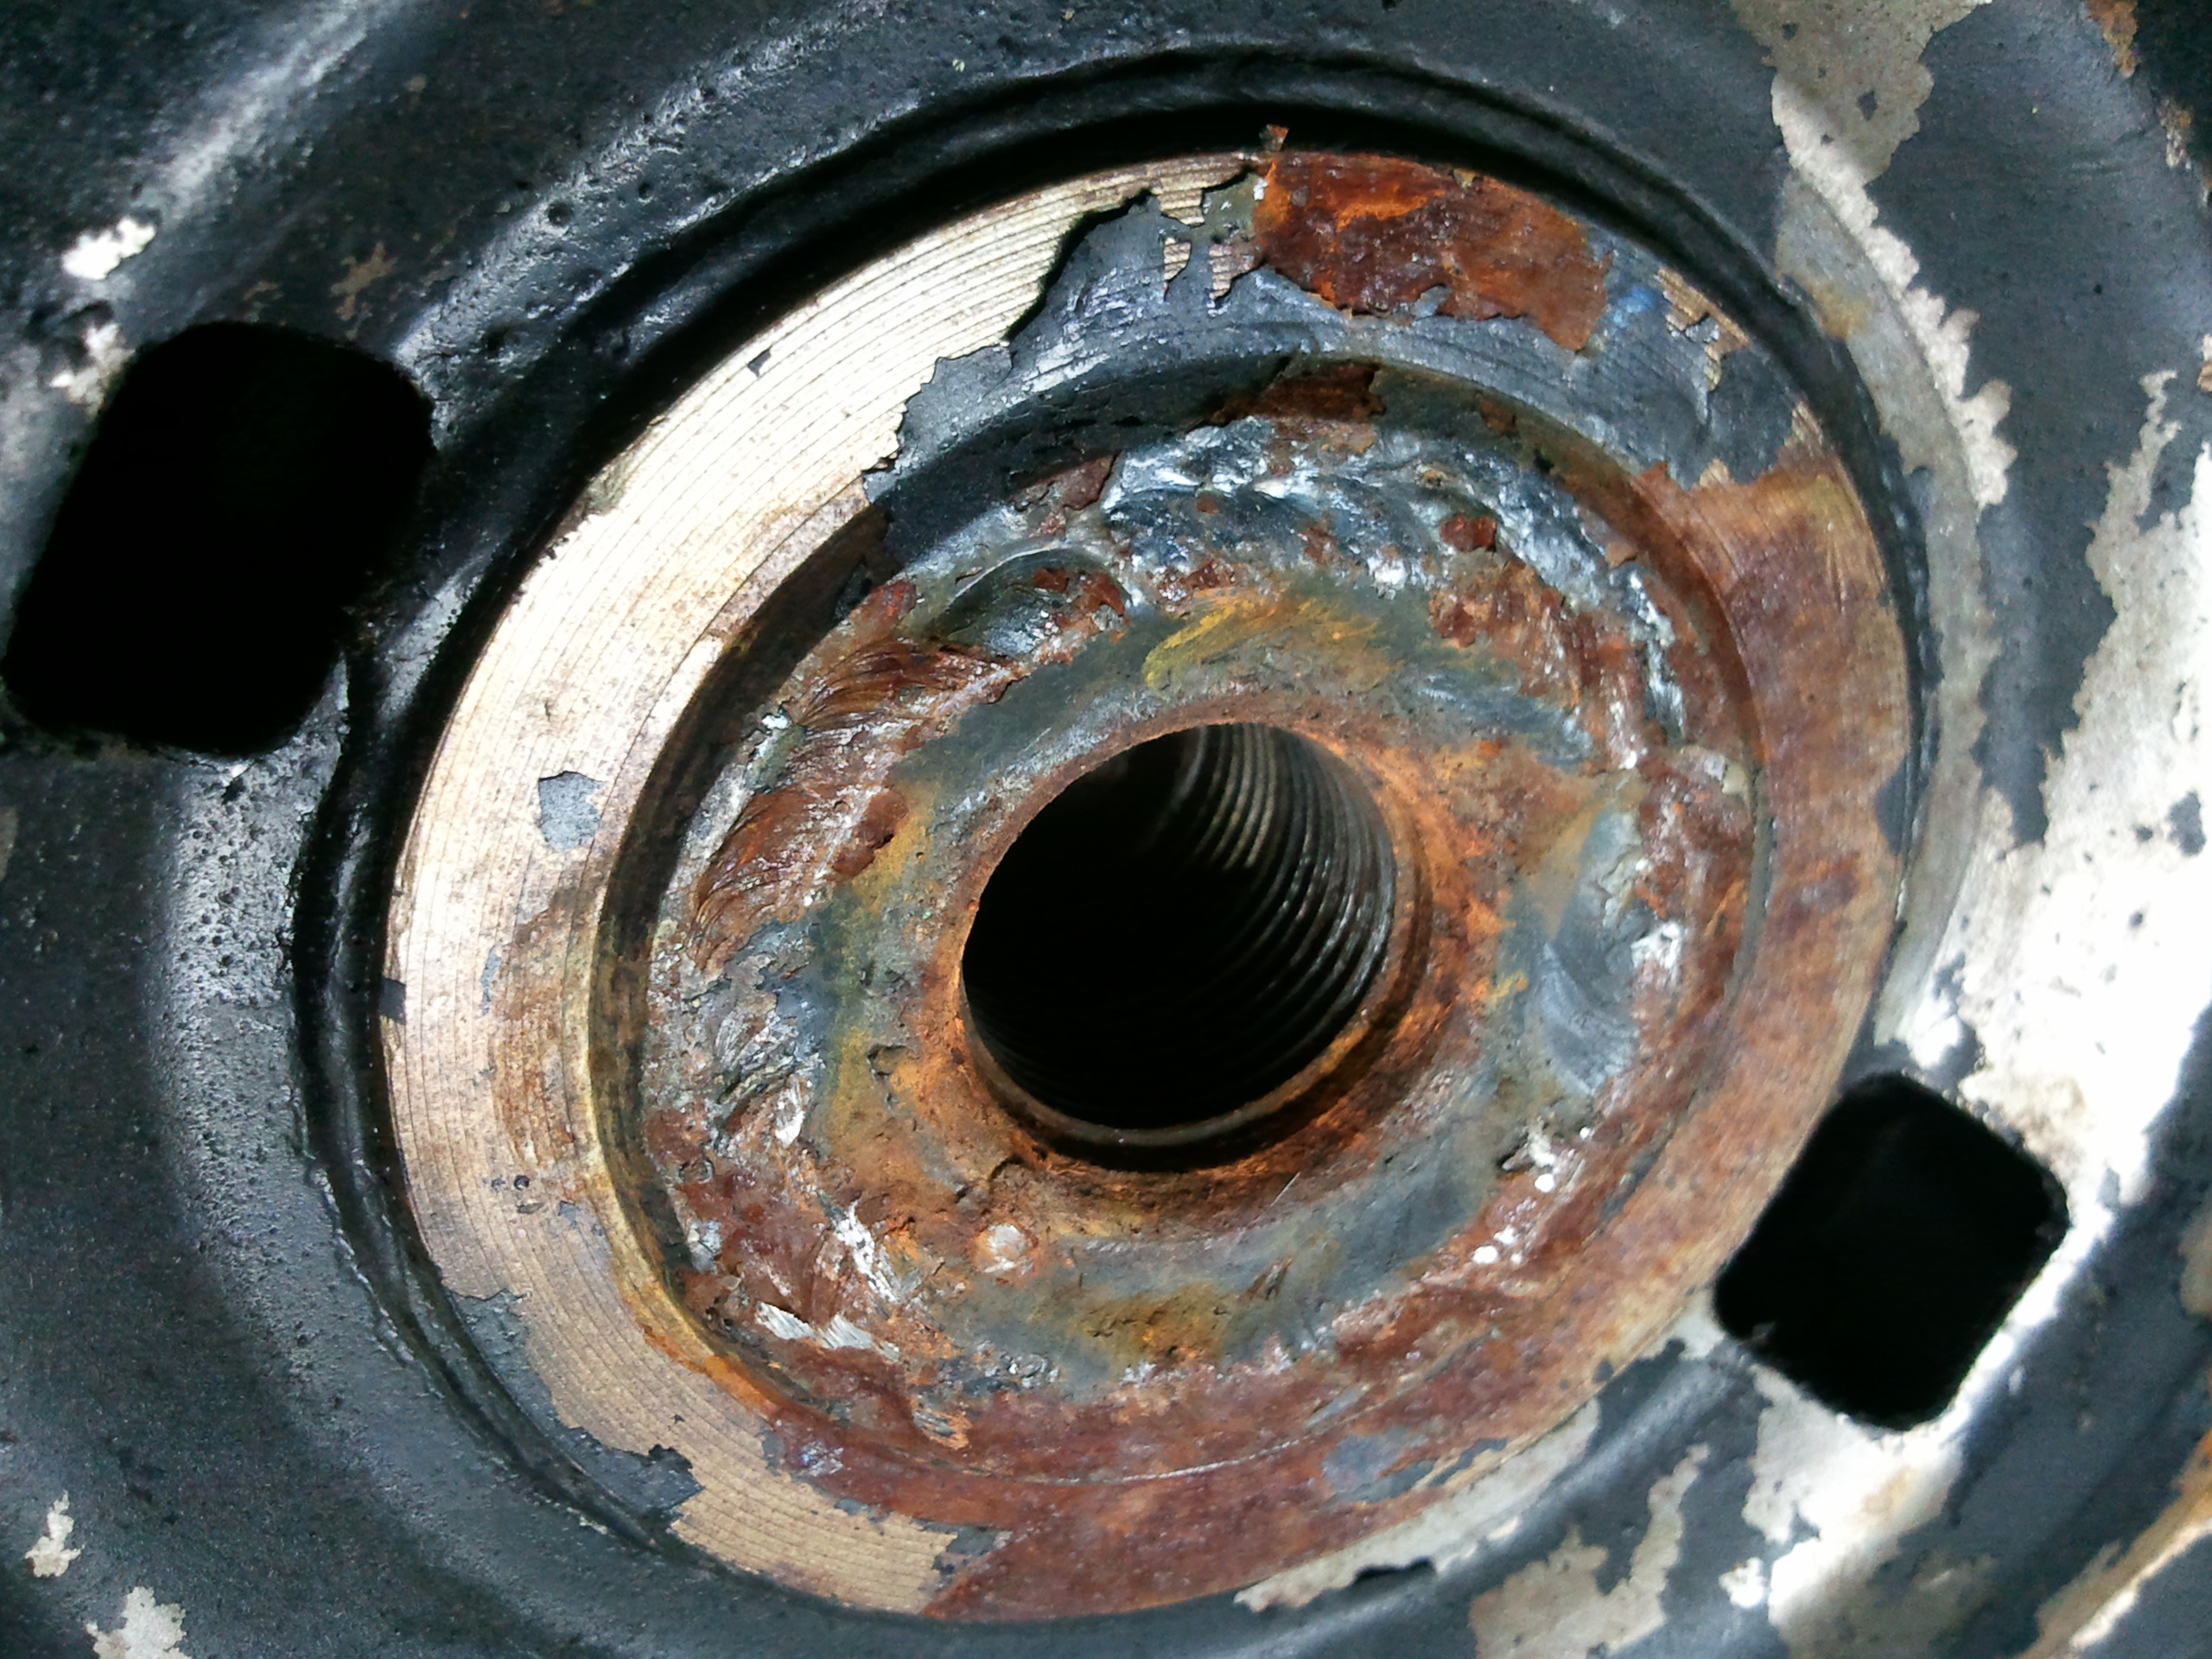
Also, the crank pulley on this engine has had a hard life. At some point the distant past, I was going to change the pulley to dress up the engine. After much struggling, I discovered that it had been welded to the crankshaft, but not before I had bent it trying to remove it.
SAMSUNG
It’s tough enough to straighten a pulley enough to keep it in service on an engine, but try it when you have to do it in place on the engine.
If the distance between pulley faces is variable, it will definitely chew up a belt, which is probably exacerbated by the wrong width or wrong V angle, which seems likely with the tractor store belt. I put a proper stock belt on and rolled the engine manually to see where the wide spots were, where the belt sank deeper into the pulley than it should, then worked on narrowing those areas with a deadblow hammer. I was able to get it where I no longer saw any significant change in the belt depth.
The brakes do a slightly irritating thing wherein they sometimes hang partly engaged, particularly the right wheel. Sometimes, I have to come to a complete stop or even roll backward a bit to free it. In this mode, the trike pulls slightly to the right and you can tell it’s just not rolling right.
I spent far too long searching for but not finding my good jack and ended up using the motorcycle lift (which actually does a pretty good job as a rolling engine jack) to lift the right wheel for removal. There is an adapter plate to let me run Chevrolet wheels on the old four bolt VW hubs, then the big ol’ 36mm nut that holds the hub on the axle. I have on a couple of past occasions, on another trike, had to cut that nut off because it seized badly enough that I couldn’t break it loose. Even without being seized, it is normally torqued to 217 foot pounds. I am very happy I got an electric impact driver some time back. I needed it to change the blades on a BushHog mower, but for this, it made short work of removing and reinstalling the wheel hub.
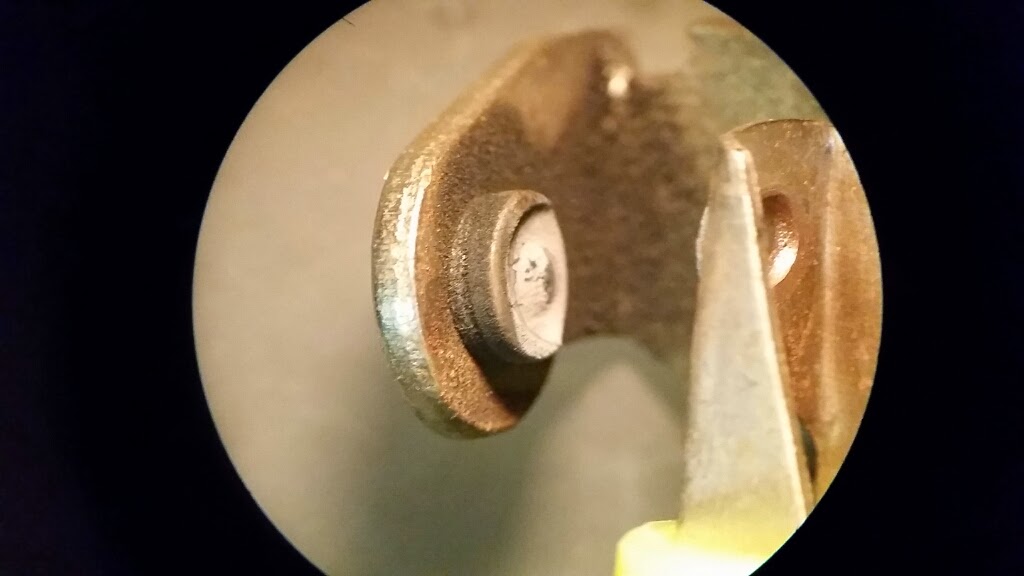
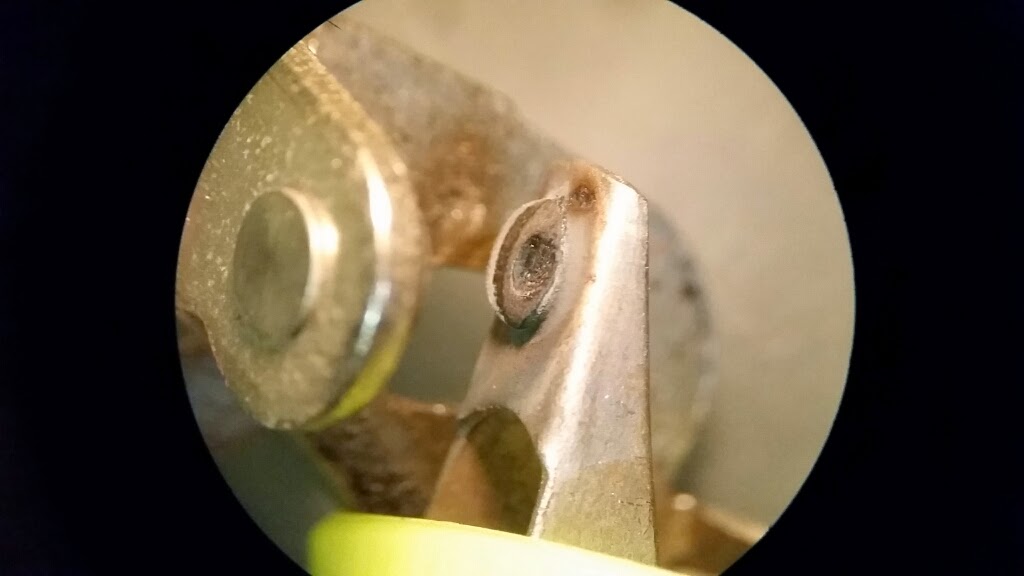
Inside, I didn’t find anything obviously wrong, but there were two weird things. First, the spring looks like it used to have paint on it and the paint was now a gummy kind of coating. At first, it looked like it was solid and could possible prevent the spring from retracting, but upon closer examination, I don’t think it really would. I cleaned the spring and put a bright and shiny spring back in place. While I had the spring out, though, I found that the brake shoes rub pretty hard on the backing plate, which is in itself how it works, but they seemed to drag pretty badly. I removed them, cleaned the surface rust off the backing plate and reinstalled them. I’m not sure that was enough to address the issue, but regardless of the other difficulties Sunday (described below), the brakes didn’t hang. This will require continued monitoring. It is, afterall, only the brakes. 🙂
I also did a little looking at the speedometer. It’s a VDO speedometer and pickup coil, set to pick up 5 boltheads on the front wheel. It worked very well for a long time, but over the last few years, it became intermittent and finally doesn’t indicate at all. It powers up and does it’s power on self test, but it no longer indicates any speed, actual or imagined. I checked the pickup coil itself; it reads 750 ohms. I have thus far found documentation for the resistance reading for another line of coils, so I don’t know if this is the correct reading for *this* particular sensor, but it is neither open nor shorted. A good place to start. I will put the oscilloscope on it to verify whether or not it is generating a signal.
So, when Sunday came, we headed to Fort Worth. Trike ran great until we got on the highway and tried to go highway speeds. Then the engine would cut out like the switch was turned off. Just slowing down wasn’t enough to restore operation. It needed a minutes or two to “catch up”. That symptom usually indicates fuel starvation, but it hits so suddenly and completely that I don’t think it will turn out to be a fuel issue. Fuel starvation is usually a lean-out condition with backfiring and such.
Then again, I have been fooled before.
It happened multiple times. My first thought is the key switch. It is the stock switch from a Honda CX500, which is what the front forks on the trike came from. The switch energizes a couple of relays in the back of the trike for powering stuff, but to save a little back and forth wiring, I run a couple of things directly off it. I may have thus overloaded it, maybe burning the contacts and making it intermittent. Sometimes, I have to jiggle the switch a bit for the engine to start, which is why I thought bypassing it might help. We stopped once and I tried bypassing the key switch by using a jumper to directly energize the main relay, but the problem persisted. We were running late by then and elected to park the trike in a safe place and ride two-up on the Spyder to get to the meeting.
After the meeting, we met with people for lunch, including one of my trike gurus, and discussed this problem. In conversation, he was describing some of the wiring details on his trike and he said something that tripped a thought… he said his key switch doesn’t have any load on it except for a *continuous duty rated* relay and it occurred to me that the relay I am using is a standard 30A Bosch style relay, but I don’t recall it being “continuous” duty rated. Since I bypassed the key switch, but not the main relay, it could be the source of the problem.
Once we finished lunch and headed for home, we stopped at an auto parts place for some wire and a pair of pliers. How I got away from home without a pair of pliers eludes me, but I have another now. I decided to bypass all of the switched power to the ignition system with a wire directly from the battery to the coil. While finishing up that working, it occurred to me that I needed to include the fuel pump, so I did a little more rework to add a branch to it. I used a spare fuse holder as a “switch”. It looked promising for a few miles, but sure enough, the engine still cut out once got up to highway speeds.
Oh, and another fun note. While doing that work, I noticed that a weld between the body and one of its braces is broken. I thought I heard a noise back there.
As for the engine, I may still be reasonably sure it’s not a fuel problem, but I am beginning to have my doubts. It doesn’t cut out at a specific speed, but it lets you run at a decent speed for a while, then cuts in and out like a bouncing power lead, no matter how much that slows you down. Then you look at it (and stuff gets a chance to cool or otherwise reset; maybe refill the fuel bowl) and you get back underway and it’s fine for a while. The rest of the way home, we took a back roads path that let us run 60 or less and it made it without further incident. That does sound a little like a fuel pump that can’t keep up. As long as fuel consumption doesn’t empty the fuel bowl faster than the pump can maintain, it runs fine, then suddenly it starves for fuel. All of my bypassing *should* have eliminated anything on the positive side of the ignition chain, leaving only the grounding components, which could *still* be it.
I am finding mixed information as to whether or not a stock VW ignition system uses a ballast resistor, but I’d bet it does. The ballast resistor is there to reduce the voltage (well, technically, the current) supplied to the ignition coil primary through the contact points in the distributor. It’s absence in this case isn’t necessarily the knell of doom, but they *did* put them there for a reason. Though not specifically about the VW, this article describes the function of the ballast resistor very well.
You may (or may not) recall that I found badly burned points in the distributor once before, bad enough that I misdiagnosed it as a physical engine problem… scroll down a little to find the points story.
Sooooo… If I inspect the points now, when they have only a couple hundred miles on them and find them burned or worn more than just a little, then ignition system damage and malfunction resulting from this missing ballast resistor could be a factor what’s happening and may particularly to help explain why the wiring changes I made on the road would make zero difference.
Or it might be a fuel problem, regardless of my apparent reluctance to consider that… 🙂
Even if *this* problem turns out to be fuel, the electrical issues that I have mentioned still need to be addressed. The key switch needs to not require jiggling to start the engine. The main relay should be rated for continuous duty. There probably should be a ballast resistor in the ignition chain. And that crank pulley needs to go.
I promised a list of little deficiencies that need to be addressed. In no particular order, of course….
Right brake release needs to be monitored.
Verify that the key switch is not damaged then…
Rewire the front of the trike to not draw power directly off the keyswitch.
Speedometer fails intermittently (more like works intermittently) and …
I have a matching tachometer to install, along with …
Indicator lights on the dashboard for turn signals, transmission reverse, etc.
Shifter needs rework or replacement.
Need front fender; mostly notice when it is raining.
Need rear fenders; mostly notice when driving through mud.
Of course, I could make list of bigger items, too…
Replace front fork with springer or some other front end that doesn’t require impressive upper body strength to maneuver in a parking lot.
EFI conversion.
Body rebuild.
This last one would be a major undertaking, no doubt. So many things that are kind of little in certain ways, but major in others, could be fixed. For example, the actual shape of the storage boxes is best described as squarish. It’s not obvious until you look pretty close, then it’s almost whimsical how not square it is. There are gaps in the seams that are wide enough to see through and I have, in fact, used them for temporary wiring as described above. The storage boxes are also not water proof, though they are surprisingly rain resistant. You might have some dampness at the edges of the boxes if the trike is left out in the rain, but they will definitely get water in them if you drive in the rain. The body is supported by a nearly symetrical crisscross of square tubing braces, almost all of which are badly welded. There was no paint applied to the underside at all.
A new body for Sponge Bob should still be roughly the shape it is, just more refined. I don’t particularly like the diamond plate steel that was originally used. It does hide minor fabrication imperfections, by obscuring them in a veritable forest of intentional imperfections. Still, it has it’s charm.
The only big change I might do is to work fenders into the body, rather than the more common application of trailer fenders. Trailer fenders do have the advantage of being ready to use, however, and they would better done with axle mounted brackets rather than hard mounted to the body like the old ones were.
The EFI conversion begins to sound like the easier project. I think I would accomplish that by converting another engine and replacing this one. That would be one good way to at long last swap out that crank pulley.
This last sentence was to add thirty eight words for a total of 2300. 🙂
I’ve been away from my two blogs for a little bit, though there have been some developments in both, especially this one.
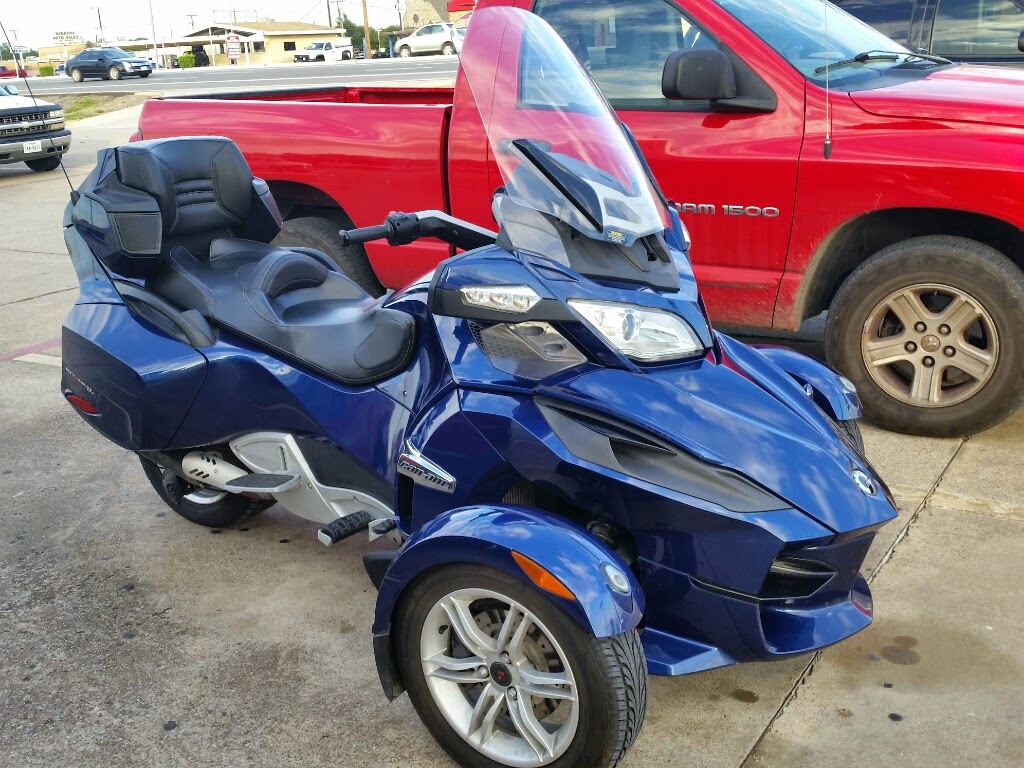
Biggest news, Gabby got a CanAm Spyder RT!
One of her friends at work needed to sell his just as she was shopping for one, so good news for them both. It’s a 2010 model with a 5 speed manual transmission. It will flat scoot if you ask it to.
Last time, I was talking about the trials I was facing with the tank that does not end. I requested a quote from Boyd Welding and at just under $200, it is not a cheap tank by any means. It is competitive with commercially available racing fuel cells and none of them are the right shape. In any case, I went for it and it’s expected around the end of the first week in October.
Before Labor Day weekend, we participated in school supply benefit run. Kermit had some reliability issues wherein he would occasionally flood out and die at a stop. One of these times involved her being towed the last mile or two to the school, an activity she is glad to never repeat. Long story short, it seems to have been that the 5 PSI fuel pump overwhelmed the 3 PSI float valve. The installation of a fuel pressure regulator seems to have abated the problem.
Since it worked without difficulty for a long time, I suspect the overrating has probably mildly damaged float valve. I have carburetor rebuild kits waiting for me to install them.
That same day, SpongeBob was running ok, but not great. It was taking wide open throttle to reach freeways speeds. I tolerated it for the day, but over the next few days, I did some troubleshooting, including new distributor cap, wires and sparkplugs, to no avail. The troubleshooting seems to indicate that he had lost power in cylinder 4 and that either 3 or 4 was filling with oil when it sat overnight, which can’t be good.
I shopped for another engine, and not really finding anything I wanted to pounce on, I decided that I would put the old engine from Kermit in SpongeBob and rebuild SpongeBob’s engine. It’s a slightly better candidate since it’s crankshaft pulley isn’t welded on and the mild oil leakage from Kermit’s old engine would be tolerable in the short term.
So, I moved all the bits over, alternator, intake, carburetor, distributor, oil cooler.
Started it up.
Hmmm. It runs almost exactly the same, no power from cylinder 4 and that pipe is barely warm. It runs just was well with our without a plug wire on 4. I connect a spark plug to the #4 wire and there *is* a spark, though admittedly, it looks a little weak. I dug deeper and found that the contact on the points was far beyond merely worn. They were eroded almost away, essentially missing.
I had a new set of points and changed them out. Fired right up and after a few minutes tinkering with the gap/dwell and timing, SpongeBob runs great!
Lesson learned: Severely worn points can make a single cylinder loose power. Essentially, the dwell was short and contact resistance was high, so the coil likely was not able to saturate. This provided a weak spark on all cylinders and probably a very weak spark on cylinder 4, probably due to very small dimensional differences between the lobes in the distributor. I may have been able to adjust the points such that it would have worked, but they needed replacing anyway. Tinker tells me that this is what points look like when the key is left on for an extended time without the engine running.
The oil in the cylinder still means a rebuild of the engine is advised, but I might have been able to put off swapping engines.
“a smart-sounding word for realizing you’ve been practically retarded for quite some time”
Maybe that’s a little harsh, but it’s certainly how I felt when I finally realized that I had about 40 hours into building this fuel tank and it’s still far from done.
Last night, I brazed studs in the top plate for the filler neck. I had some difficulty getting one of them to completely wet. Funny what a little bit of unidentified trash can do to ya. After that was finally done, I hammered the now warped piece back into shape and prepared to do what I really really hoped was the last couple of steps before welding the top on, namely putting the pickup and return tubes in. I have decided for simplicity to pick up from the bottom rear edge of the tank and return to the top rear edge.
So, I picked up the tank and as I set it on the workbench, I noticed a flash of light inside that was not expected. Ugh. Essentially the entire length of a recently added seam had cracked open. Easy enough to address, and apparently, I hadn’t done a good job of it already.
Once the tubes were in, I thought it wise to do a quick leak check. I simply poured some water in the bottom of the tank and watched the seams for leaks as I rolled the water around inside. Found a couple. Fired up the torch and reworked each of them. I let the tank cool to handling temperature and did it again.
Hmmm How did I miss that leak. Repeat fix/cool/test.
It seems that either my materials, my tools, my skills or some combination therein is not up to the task. I vote skills. I suspect that my welds are marginal and when working on one fix, metal expansion stresses out new cracks. Maybe the torch is too rich and adding carbon to the weld, making them brittle. Maybe I’m overanalyzing it 🙂
In any case, there is at least one manufacturer that has an off the shelf tank that would be serviceable, and they take custom requests. I have submitted a request for a quote. Since it’s custom anyway, I want to make it as close to ideal as possible, so I have asked for two AN-6 fittings for pickup and return, a marine flange for the fuel level sender, an angled filler neck with vented cap and mounting tabs ready to bolt in place. I might add another mounting tab to mount the fuel pump to; depends on some fitting considerations that I will have to experiment with.
With some luck, I will have a first blush quote soon enough to determine whether the custom tank is even worth considering, which will center around whatever the cost is.
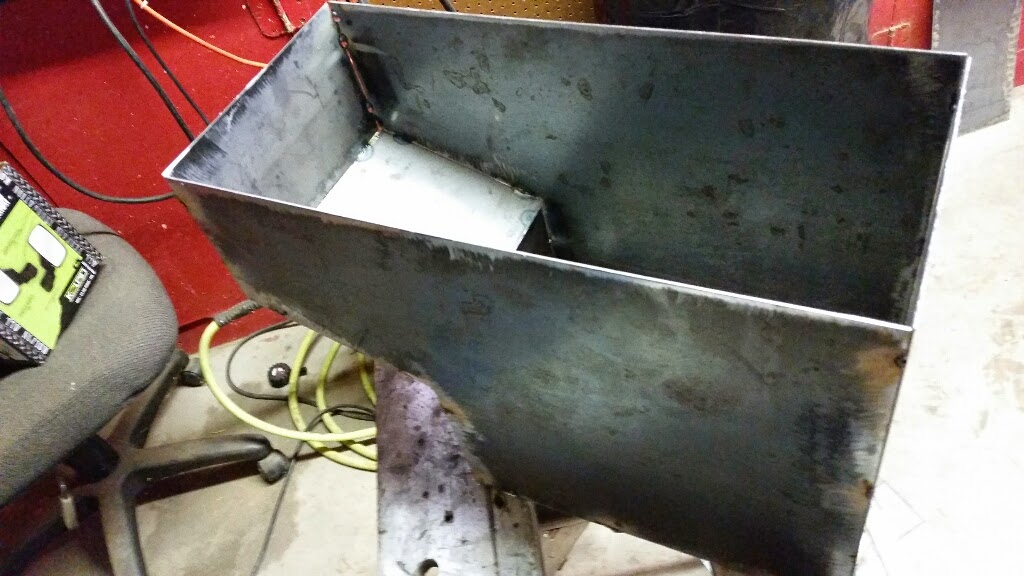
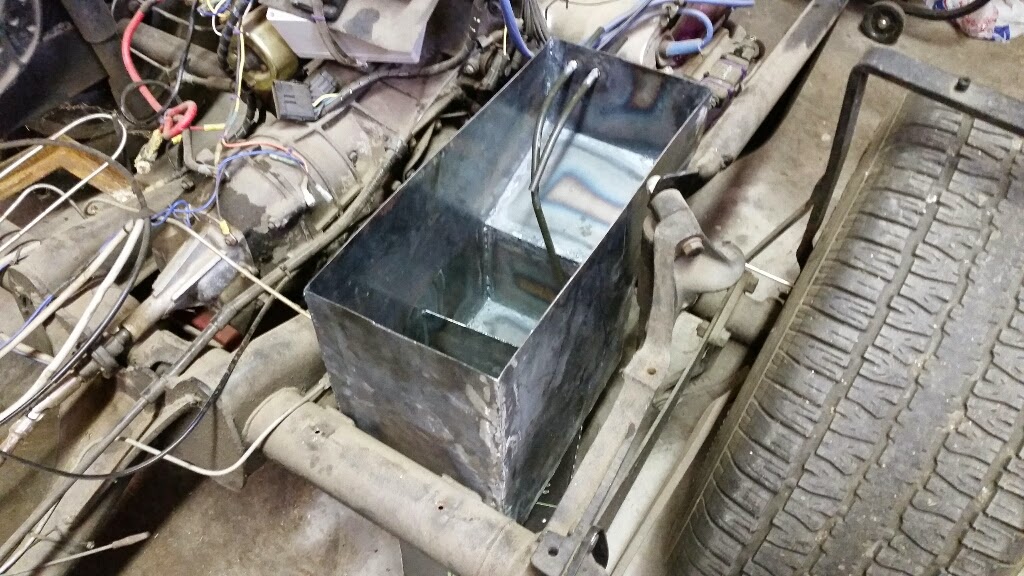
The new tank is largely finished, shown here after tacking the panels together and before welding.
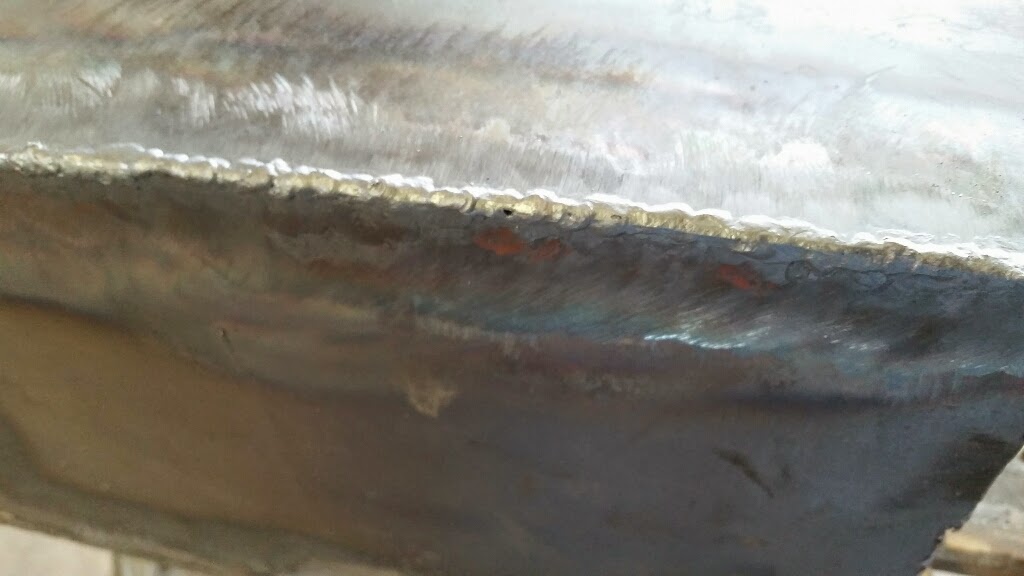
I am disappointed with how rusty I was welding. I had to re-weld almost every seam.
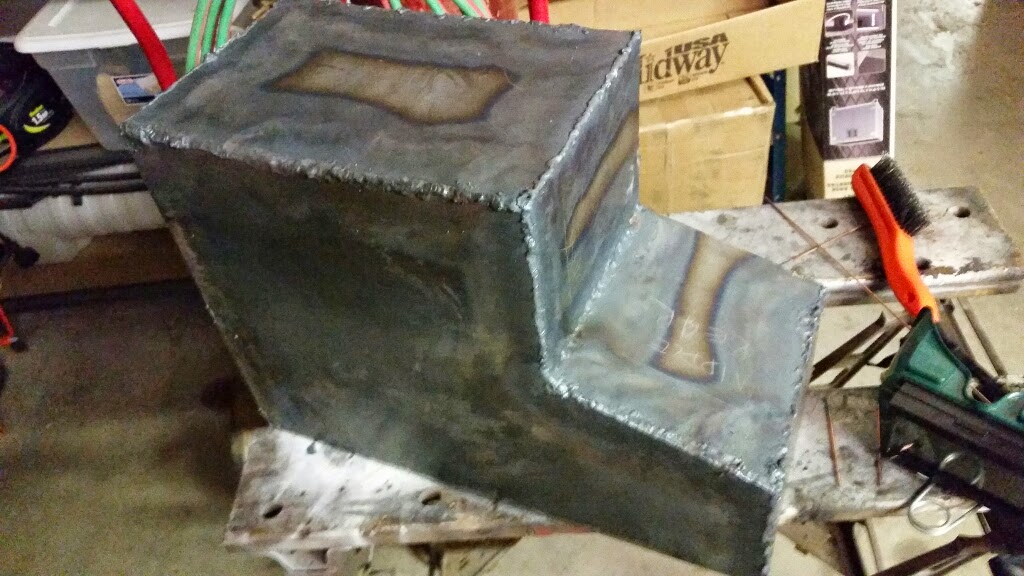
You can see how rough and blobby they are here. I spent much of Saturday grinding them clean and retouching all of them. Once I had done a few of them, I seemed to get my groove back.
Had I started with nice welds, I would not have had to grind NEARLY as much. Pay no attention to the pinhole in the middle of the pic. It’s gone now.
I have decided to go with an external fuel pump, so I added plumbing for pickup and return. Sharp observers may note that the pickup tube takes off at an angle. That was easier that rebending it or cutting it. Deal with it 🙂
Also visible in this picture is a baffle added to the tank. It is tacked to the sides of the tank with about 3/8″ gap between it and the bottom.
Sadly, it is at this point that I also reach another decision, or more accurately, the legacy of an earlier decision, and it turns out to be a bit painful.
I have opted for external plumbing so that I can remove the in-tank fuel pump and lower the tank in the frame. This will in turn let me lower the body, which needed to be raised to clear the top of tank. By not thinking this option through way back when I drew up the design for the tank, I didn’t account for the tank extension interfering with the axle in the lower position. It almost sits on the axle in the lower position.
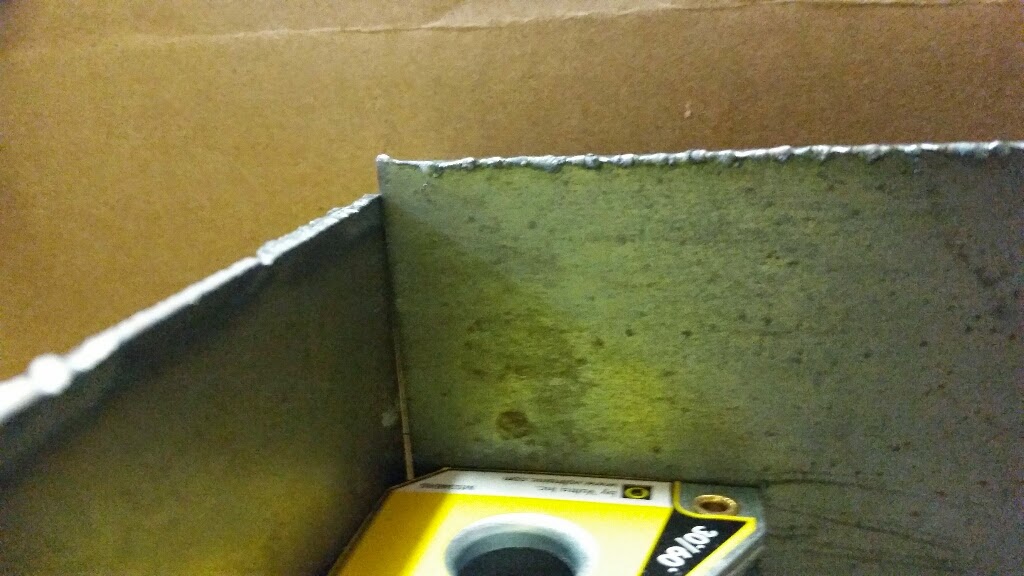
After much hand wringing, I have decided that the lower tank and subsequent lowering of the body is more important than the extended capacity of the tank. So, I will lob off most of the extension.
The single vertical line is where I will cut. This will still add at least a tiny bit of capacity and will under no foreseeable circumstances interfere with the axle. I had considered moving the bottom of this section up, which would allow only a little bit more capacity and would let me keep the plumbing as it is, but would still have a chance of interfering with the axle.
And to be clear, it’s not the axle I presume would be damaged in the collision, but the fuel tank, right there over the exhaust pipe for cylinder 3 and right next to the spark plugs. Lets keep the fuel encapsulated until it’s in the cylinders.
In a related design shortcoming, the fuel level sender, as layed out recently, is directly under the same body brace that I need to lower the tank in order to clear. On the plus side, with the new shorter top, I can cut from both the front and the back of the top to make it fit and in the process move the sender forward or backward away from the brace, whichever seems best.
This change will also hurt my plans to make a nice extended fuel filler neck. I will need to simply move the neck off the old tank. I have looked for a new neck. The only ones better than the one I have are weld in parts for aluminum. Maybe the next tank can be aluminum.
This delay has allowed me to come up with a checklist for what is needed to get this trike well on the road and I’d be fibbing if I didn’t say it will be tough to make it by Labor Day. They are in no particular order:
1. The fuel tank completed, duh. Finish cutting, welding and lining. Includes new plumbing, cleaning of fuel lines and probably the injectors.
2. Wiring issues resolved; there were a couple of emergency repairs made because wires were so short that they pulled loose from the back of the fuse block and were pretty much unreachable for repair.
3. Wiring diagram; optional but almost a requirement to get all back working.
4. Brake master cylinder reinstalled.
5. Brake slave cylinders replaced (optional, but highly desired; need front wheel cylinders instead of rear)
6. Footpegs painted/powder coated and mounted; will involve cleanup grinding of attachment area on frame tube and possible refitting of mounting flange to tube.
7. Replacement of shifter; most likely, I can just take the shift lever from the new unit and leave the rest of the old one in place.
8. Ignition switch placement. This should go in the fiberglass, but I am afraid it will not be a simple project and may do extensive damage to the paint if not done perfectly. Considering putting it down by the shifter. May end up with temporary alternative, probably using the headlight switch on the control pod.
I have, after MUCH delay, began the construction of the replacement fuel tank for Puff, the dragon trike.
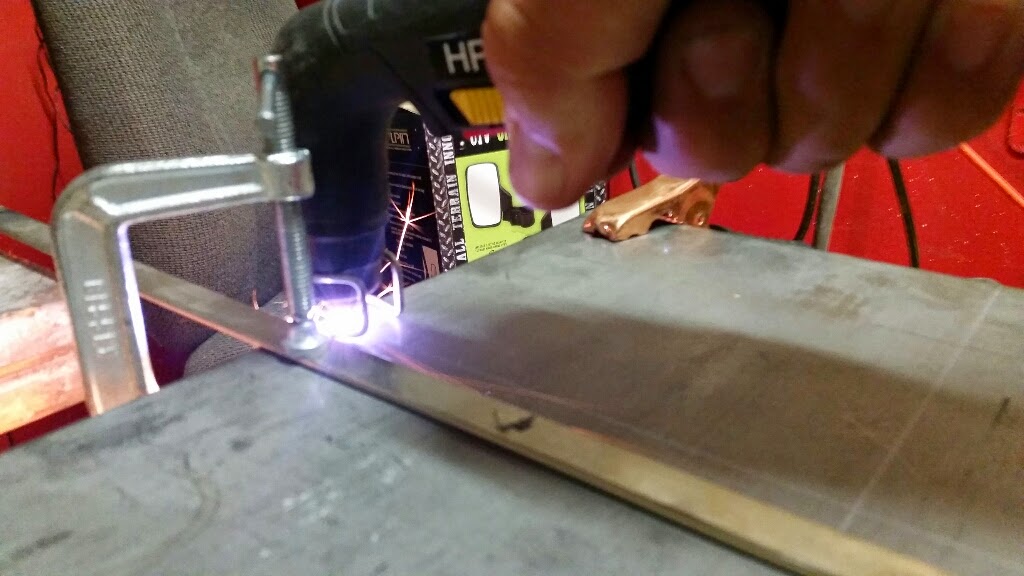
Stacked two 2′ squares of 16ga mild steel and plasma cut them simultaneously….
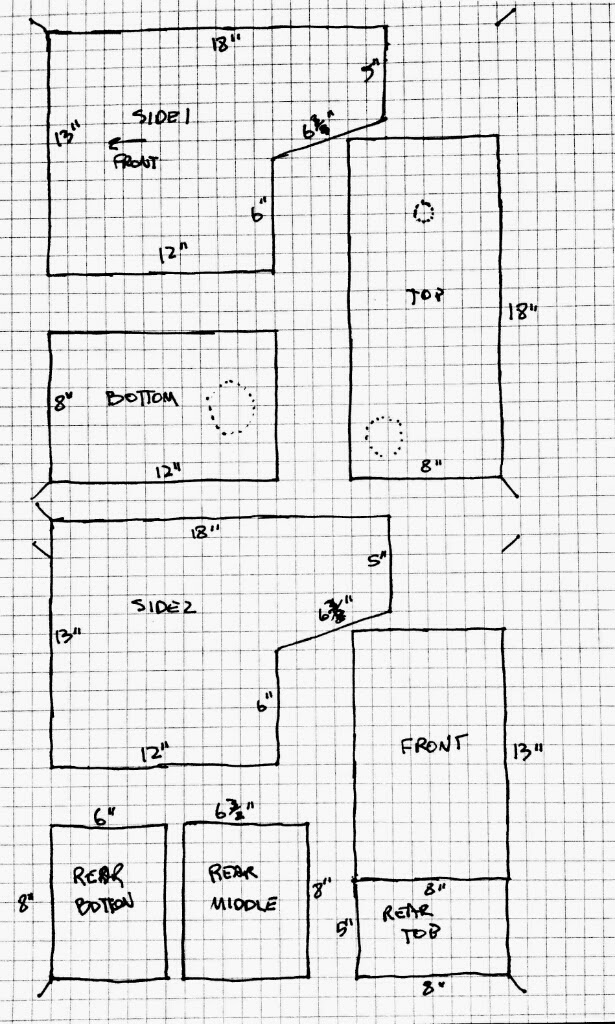
Here is the basic plan:
The layout is intended to use as many of the factory sheared edges as possible to help keep the parts as square as possible. I would love to have used one 5′ long 8″ wide strip for the top, bottom and ends, but I don’t have a bending brake. I have found many inexpensive brakes, but they tend to be limited to 20ga and smaller material. There is a substantial jump in the cost of tools that can bend 16ga. So, instead of about 11 feet of seams to weld, it will be more like 25 feet.
The dotted circles on the top piece are for the filler neck and fuel level sender.
There is a dotted circle shown on the bottom piece is intended for the in-tank fuel pump I am currently using, but I don’t like it hanging out of the bottom of a tank that is already pretty low to the ground, so I am considering plumbing this tank for an external fuel pump. On the other hand, I already *have* the in tank pump, it has a pressure regulator attached and it needs no return line plumbing.
Not shown in this drawing are a couple of baffles to be added to the bottom to minimize sloshing. These will simply be panels tacked to the sides and bottom of the tank, arranged and/or cut to allow free flow of fuel, but not totally free movement.
It’s been a long time since I’ve updated here… Been busy with reloading stuff and even that has been slow to update lately 🙂
Trike stuff has been slow, but not static. Since that last update, Spongebob has had the most blogable action.
Though it was not immediately apparent, while being stored for a while, Spongebob leaked a lot of oil. Turns out that what really happened is that the fuel tank cap did not vent correctly and the pressure was able to overcome the float valve and flood the engine with fuel, which eventually seeped to the crankcase and overflowed it. This became very apparent when I was rolling the trike out to attend a monthly BTW meeting. It first acted like the battery was nearly dead, which was not unexpected. Unknown at the time, the engine was actually in hydrolock and not able to turn over. Keeping at it, I cleared the cylinders, but when it started up, oil poured everywhere.
Though it would be a few days before I got to it, I drained the crankcase and refilled with fresh oil and started it up. It still leaked oil at too high of a rate to operate, so I presumed the event had damaged the front seal and I again left it for a while.
When our vagabond friend John came to visit, he got interested in effecting the repair, as taking Spongebob for the occasional spin is one of his favorite activities, so I let him tear into it. He replaced the front seal and did a lot of cleanup on the engine, as well as a number of other related work. Even after that, if the cap was properly closed, it would do the same thing. For the time being, we were leaving the cap loose unless the trike was underway somewhere. We also installed an inline fuel shutoff valve. That that seemed to have prevent it from happening at all, though it’s not really in a convenient spot to operate all the time.
I opened the cap and reduced the spring tension on the vent mechanism by trimming out a couple of coils. My redneck test of sticking it on my mouth and blowing indicated that I had reduced the required pressure by about half, but in use, it still fails to vent before it blows past the float valve.
I then fashioned a tank vent by putting a fitting in the filler neck and attaching a length of hose to it. There is no pressure build up, so no overcoming the float valve!
In proper followup, I probably need to replace the float valve. Chances are that it may have been damaged by the over pressure situation.
Then comes the day this weekend when we are again wanting to take the trikes to a BTW meeting. I had tried to start the trike the previous weekend when were were attending a birthday party. It would crank and crank, but not start. We were short on time that day, so I didn’t do any other troubleshooting. This time, however, I had a little more time and put some more time into it.
I found a badly cracked rubber vacuum cap on one of the carburetor vents. In my experience, that wont usually prevent it from starting, though it can make it run very badly. It took a while to find the package of caps I had, but of course that didn’t make any difference. It seemed to be getting spark, but I didn’t smell fuel. I started tracing that down and found, surprise, the inline valve was off. Opened it, turned the key on and heard the tone of fuel pump change as it pressurized the system. Hit the start button and he lept immediately to life.
I pulled both trikes over to the house and hosed off the dust; not really a good wash, but roadworthy. We headed in to Fort Worth for the meeting.
As we got close to our destination, the other trike began running rougher and rougher and eventually stopped… in the left turn lane on the access road where we needed to cross over and u-turn to get to the meeting. Try as we may, it would not start. We waited for a clearing in the traffic and I pushed Gabby into a sharp right turn. The road had a bit of a hill on it and she tried bump starting it on the hill and, surprisingly, it started! We were going to try to see if we could make it to the meeting before it died again, but it didn’t get far at all. After another try or two at bump starting it again, we gave up and parked it. Gabby climbed aboard and we headed to the meeting, arriving late, but arriving.
After the meeting, a crew of folks went with us to troubleshoot and it was determined that the alternator belt was loose, very loose. Loose enough to prevent it from charging, which apparently let the battery run dead enough to not provide a reliable spark, which seems to be what stranded us. Also why a bump start worked for a bit, with started not pulling the voltage down.
After establishing that there were no shims left to remove in order to tighten the belt, one of the crew produced a spare belt from his parts stock and we installed it. Well, I say we, but nobody made room for me to help, but I let them do it for me. 🙂
By then, the battery had chemically recovered sufficiently enough to start and the now tight enough belt was actually charging. Long story short, the trike was reliable for the rest of the day and even had noticeably brighter lights. Amazing what you miss if you don’t look for it.
We had the Memorial Day BTW shindig to prepare for, so I changed the oil in both of the currently serviceable trikes and added (re-added) the the long since bypassed oil cooler on Sponge Bob. The new oil cooler is an Empi 9291 shrink wrapped kit that includes an adapter to connect to the block and a remote oil filter adapter. There is an engine adapter already in place from the previous cooler and time and hose constraints have delayed the installation of oil filter at this time.
This cooler is a 8 pass unit, larger than the old one. Consequently, I needed to find another place to put it. There was room under the deck on the right side of the engine.
The bracket is bolted on one side to the box. I made a simple bracket for the other end.
Then I pretty much split the hose that came with the kit and plumbed it into the engine.
It didn’t seem to take a lot of extra oil, but I’m guessing it’s probably about 1/2 quart for the hose and cooler.
Next, I need to add some disconnect fittings into the lines so that removing the engine will not require either pulling the hoses or unbolting the cooler. Pegasus Auto Racing has some nice AN fittings for a reasonable price. I got four female hose ends and two male couplers. Not only can the cooler be removed, this configuration makes it fairly easy to bypass the oil cooler if the need arises again.
In less happy news, the oil leak from the rearish of the engine was not stopped by the replumbing, however having freshened the oil, it’s now a bit more obvious that it may be transaxle oil rather than engine oil. The oil on the ground is black, but the oil on the dipstick is honey colored, even after 400 mile round trip. While this occurred to me earlier this week, I have not yet verified the theory. It should be pretty simple to check; transaxle oil smells horrible.
The engine in Kermit is beginning to show the signs of needing a rebuild, so (long story short; savor that while you can) we found a likely candidate on Craigslist. I got up (relatively) early on Saturday and drove the hour and a half to Lucas, TX, where I found Bob to be a very friendly and interesting guy. We could have gabbed for another hour or so, but I wanted to get back home and see if I could get this thing done in time to ride to the BTW chapter meeting on Sunday.
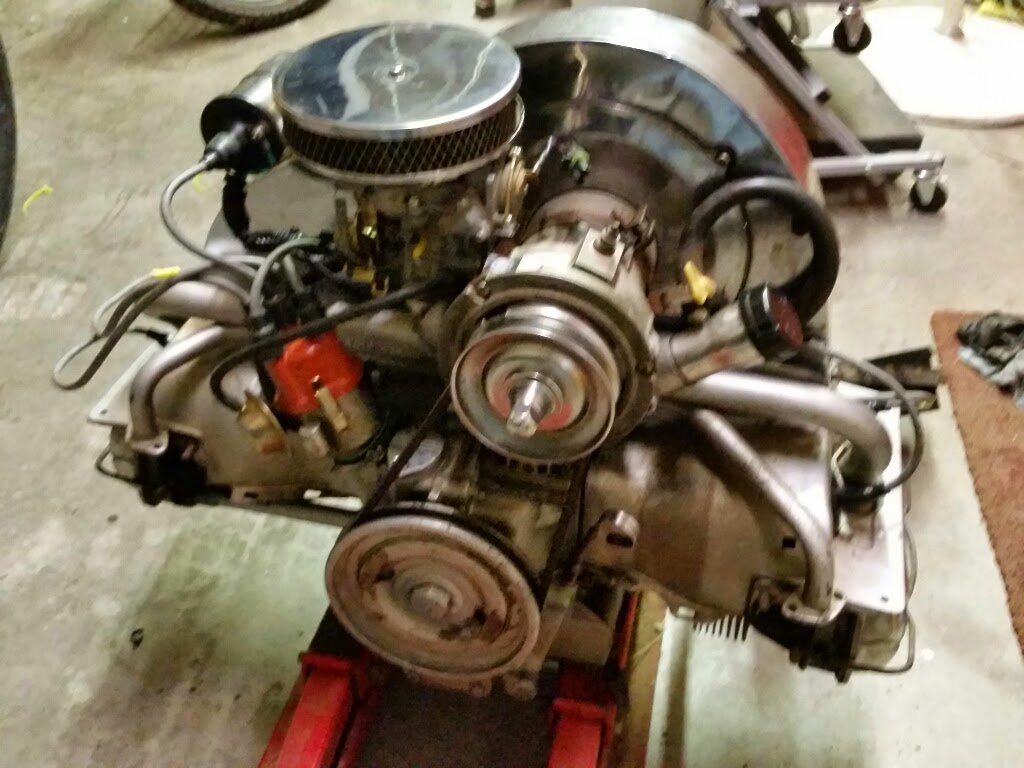
I got started about 1PM. This is Kermit’s old engine before the operation began.
Removal of the old engine was a breeze, especially having done it a few times by now. On the other hand, the new engine had a generator and since Kermit isn’t wired for a generator, I elected to swap them out. I remember now how involved it actually is to do that. It involved so major a disassembling that I should have changed the carburetor while I was at it.
The carb on the new engine is literally brand new. It, like the oil filler neck, had obviously never had any fluid through them. I was mildly concerned because the carburetor is a 30PICT-1, originally intended for 1300cc engines. I was going to suffer greatly if this turned out to be a 1300, but I was confident that the AE- serial number on the case, the doghouse oil cooler and the 200mm flywheel all pointed to it more likely being a 1600.
The new engine had a threaded insert where the old one had an open hole, and the bolt I had was a D-bolt intended for a starter and wasn’t really one for torquing down. It would probably have sufficed, but this is Mama’s trike and I don’t want it to come loose just because I was too lazy to go buy the right bolt. Of course, where we live, that’s a 45 minute round trip, especially if the first place doesn’t have it and Blue Bell is on sale.
The clutch was moved over with a minimum of fuss, but I did not have the handy dandy alignment tool, so I eyeballed it. That turns out to have cost me more time that it would have taken to drive into Fort Worth and get my clutch tool from the old house. Unfortunately, it didn’t occur to me that it could be that until I had exhausted every other explanation as to why I just couldn’t get it to go that last inch. It was in far enough for the splines to engage, but apparently that wasn’t enough. I pulled the engine back out (not that it was actually attached), carefully loosened the clutch bolts until I could just scoot the disc and used my socket handle as the closest tool to the proper one. Tightened everything back down and stabbed the engine first try.
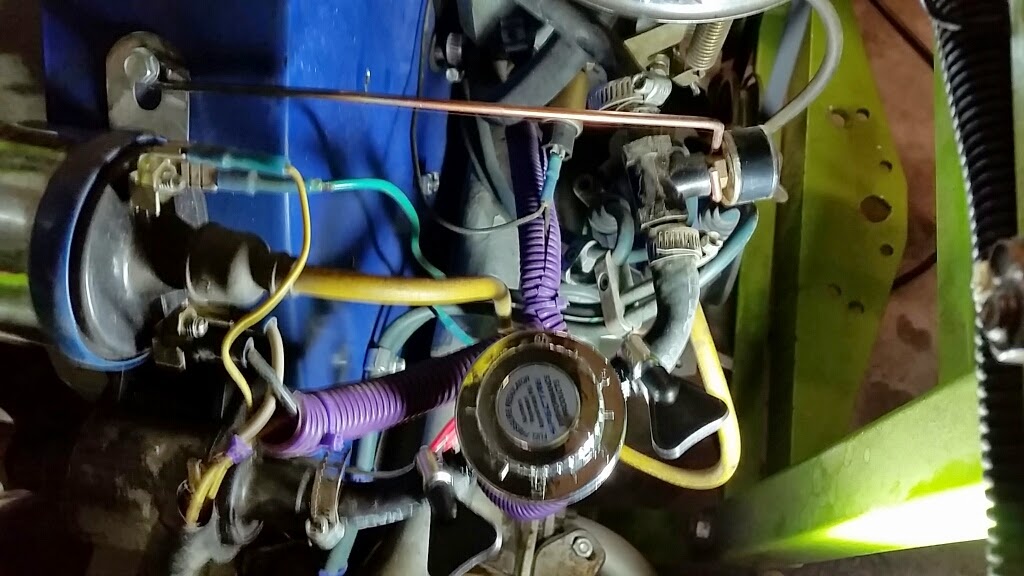
The Mr Gasket fuel pump was very easy to put back where it came from on the old engine, but the coil used to be mounted on the back where the doghouse oil cooler is now. I didn’t like the stock location, though I can’t really define why. So, I put it on the edge of the fan housing, just above the fuel pump. this is kinda ugly from a wiring standpoint, but it’s the best compromise without redoing all the wire in the area and the goal here is to have it ready to ride on Sunday.
I had no further trauma and was able to crank the engine and start it, first try, around 11PM.
Now, it didn’t run very nicely, which turned out to be because plug wires 2 & 3 were swapped on the distributor cap, but once that was corrected, I was able to get a decent idle and rev out of it. I don’t fit this trike; it is carefully adjusted to fit Gabby (and I guess anyone near her perfect dimensions, which rules me out for I am a couple feet too tall), so a test ride would have to wait for her in the morning. I called it a night around 1AM. 12 hour job.
Sunday morning, Gabby took it for a ride, and armed with the knowledge that the carburetor was probably too small and the centrifugal advance distributor was probably not going to act like the old engine, she a little reluctantly agreed to try taking it to town for the meeting. I finished putting the rest of it together, bumper, air filter, etc and we got ready for the meeting.
It generally ran ok, but developed a tendancy to die at stoplights. Trooper that she is, she tolerated it for nearly 200 miles of round trip riding. We went to the east side of Ft Worth for the BTW meeting, then to Bridgeport to find that our Mother’s Day dinner destination closed at 3PM. We went to Sweetie Pie’s Ribeyes in Decatur and had steaks and that horrible apple pie that is so bad that they only serve it a few times each year. We took a walk around the square, enjoying the sights. We went from there to Tractor Supply, cause ya just have to, and on home. It was a long day.
The performance of the new engine was, generally, good, maybe a little lackluster, but not without expecting it to be. So, when I got home tonight, I swapped out the 34PICT-3 carburetor and vacuum advance distributor from Kermit’s old engine. I had some difficulty getting it to idle really smoothly without setting the idle advance to about 20 BTDC. Full advance wanted to go too far, so I had to back it off a little to about 15 degrees to keep maximum advance below 35 degrees. I didn’t touch the carburetor adjustments. Now, it has a little bit of a lopey idle, but revs way quicker than the old engine. Bigger cam? Dunno. We’ll see what Gabby’s new test drive allows. Hopefully, she can do that during the day tomorrow and if she’s happy with it, she might ride it in to work.