All posts by Sluggy

Zowie… 2 years later…

I did indeed get the VeraLite and over the intervening two years, a few devices. Incidentally, MiCasaVerde is now “Vera

Since I didn’t update this blog along the way, I kinda have a current snapshot of two years of intermittent development.

Vera’s two controllers, Vera3 and VeraLite are the same OS running in different hardware. Vera3 has more features, particularly WiFi and network routing features, whereas VeraLite does not. There may be some more connectors or lights on it; not sure. I have an established WiFi network already, so I didn’t see a reason to complicate things. VeraLite costs less as well.

Since they both run the same OS (called MiOS), they present the same web interface. The interface is reachable on the local network or through a (free) internet gateway run by Vera. VeraLite polls Vera’s website frequently using port 80, which allows you to remotely control your Vera device, usually without any special firewall configuration. This does introduce what is, to me anyway, a small but acceptable delay, especially since most of my remote operations are done with a smartphone app anyway.

The primary device that has been used consistently for almost the entire time is the 2Gig CT30 thermostat, which has since been discontinued and replaced with the CT100, which has since been discontinued and replaced with the GC-TBZ48. The CT30 and a couple of different smartphone apps has allowed us to lazily adjust the thermostat without leaving the couch or even the bed. I have played with it remotely, but mostly just because I could. I haven’t really needed it. Our schedules mean that there is not much time during the day that the house is unoccupied.

I have a couple of lamp modules and a couple of heavy duty appliance modules. I have experimented with using them in various functions around the house. The lamp modules haven’t proven to very practical. This is mostly because there needs to be a user friendly (meaning wife friendly) way to turn them on and off without going to another room or picking up the phone, etc. If she wants the lamp on the dresser on, she usually needs it *now*. Where the lamp module has shone is with the Christmas tree. I set up a schedule to turn on in the morning, off in the early afternoon, back on in the evening, and off at bedtime. In a few days, the tree will come down and i will find something else to light up.

One kinda fun application of a lamp module came when I couple of lights in the bedroom were still connected to it. My wife did not have a phone in the bedroom with her and I needed to call her, for a wakeup call if I remember correctly. When I couldn’t get her, it occurred to me to toggle that bedroom light on and off. Hopefully, she would call to find out why its going crazy.  When she called (it worked!) she was laughing and seemed to appreciate my cleverness.

The Jasco outdoor control module is a heavy duty rain proof module designed for non-dimming  outdoor lighting, but really it just switches power to anything that needs it. I originally purchased two of these to control heaters in our water well pump house and horse trough. That attempt taught me about an important limitation of Z-Wave: range. With a brick house and a metal pumphouse, even 20 feet is too far. I could not make it go. Since the power for both comes from the barn and I have network in the barn, I can at some point add a second bridged VeraLite in the barn and control the heaters (and lots else) from there.

For now, one of the outdoor modules is controlling the pump for our little above ground swimming pool. I currently just have it on a time schedule to run overnight since our Texas winter freezes overnight and thaws every day. I’d like to run the filter basically an hour on and two hours off, all day long, but also continuously any time temperatures outside approach freezing. I have a Homeseer HSM100 3 in 1 sensor (motion, light level and temperature) but I am having trouble getting it to work from outside. Maybe the metal garage door is an issue. I’ll try putting the sensor somewhere else, closer to the appliance module for Z-wave network reliability.

The light sensor in the 3 in 1 will hopefully be pushed into service to operate some outdoor lighting at some point. The motion detector, outside, will probably be useless, but I may try having it run the outdoor lighting, if its dark enough.

The final cool thing I have been playing with is video cameras. MiOS is smart enough to be able to grab images from many, maybe most, common IP cameras and can present them through the remote portal. I can monitor the doggies during the day and the horses in the barn at night, from home or away.

Another thing I want to be able to do is monitor our water system. Our well has a lot of sand, so it took a year or so to replumb enough filtering devices in line to keep it from clogging up a filter in the middle of a shower. Water comes from the well (420 feet or so deep) into the garage where the scary plumbing is.

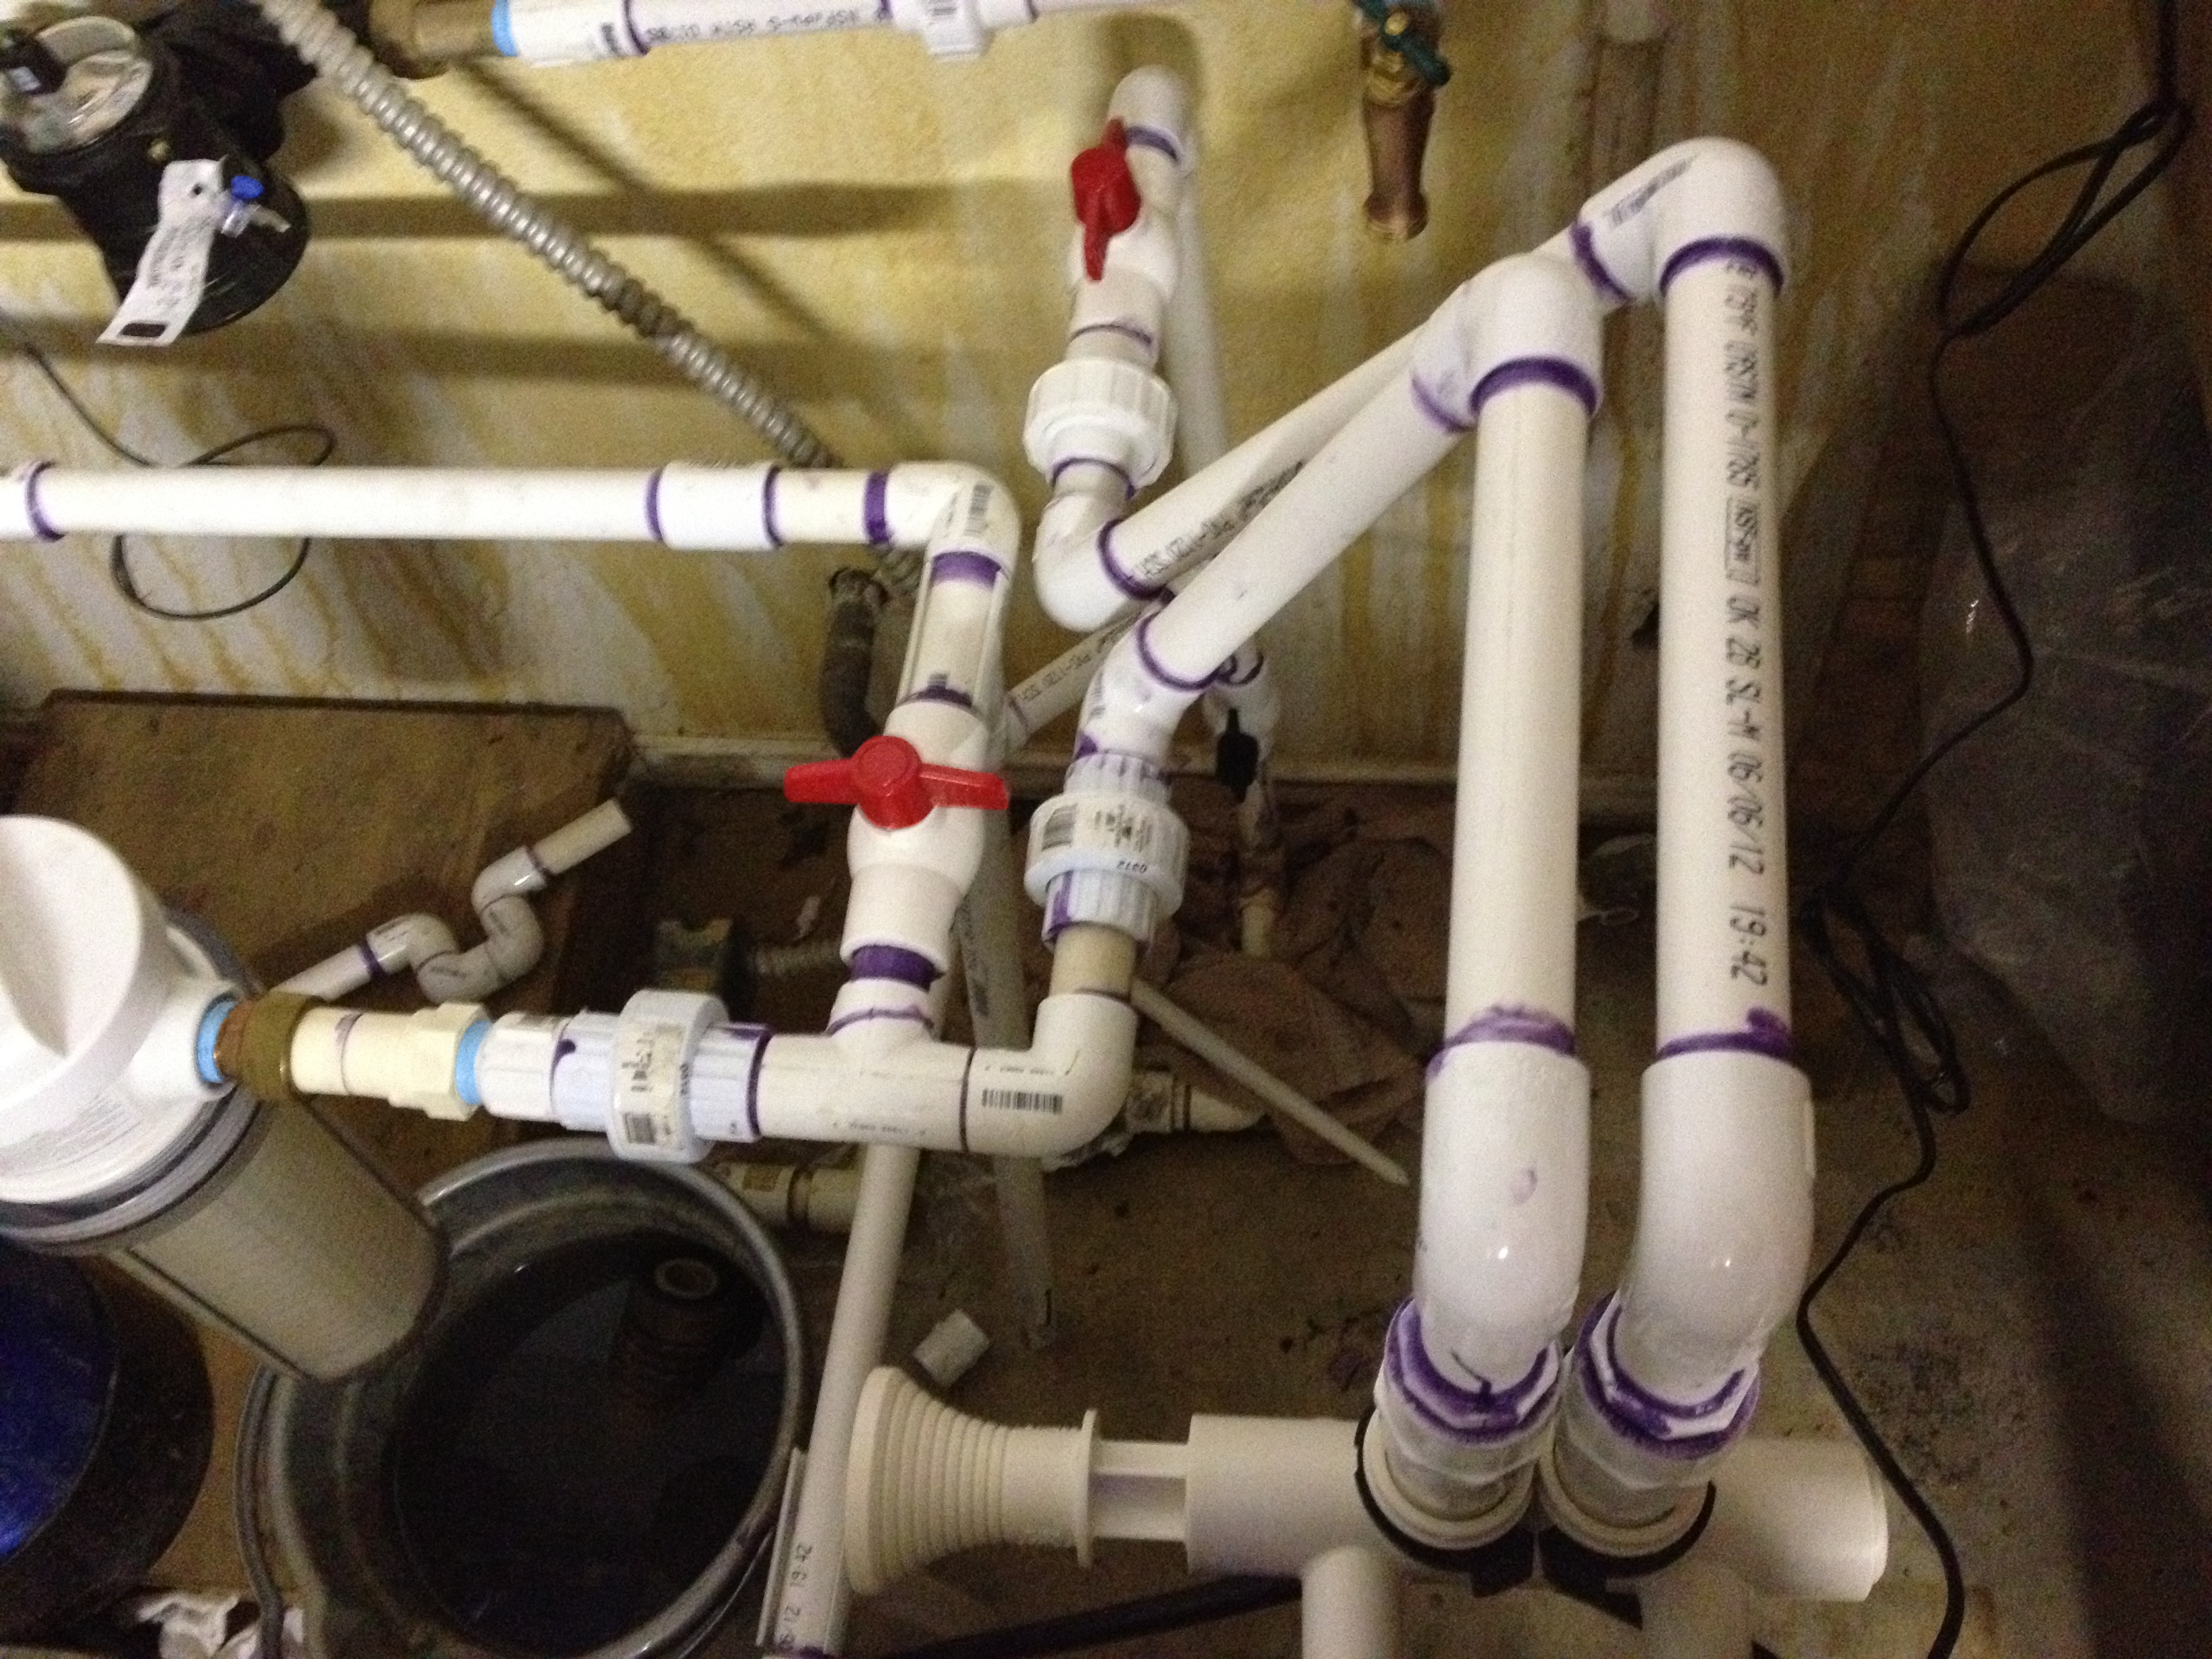
I got pretty good at PVC piping. Sadly, not until after the incident that painted the walls with that rusty orange wash.

Water comes into the garage and splits between the pressure tank and the inlet to the large filter on the right. This is a self-flushing sediment filter. It is programmed to flush at the next 1AM each time 1000 gallons has flowed through it. This is the most frequent interval possible. Sadly, our well produces enough sand that sometimes, this is not frequent enough.  Next in line is a standard cartridge filter, which used to be the first filter in line. This gets the fine silty stuff that eludes the self-flushing filter. This cartridge has to be changed at random intervals, but monthly is not unusual and I can deal with that. Before adding the self-flushing filter, it rarely lasted more than a few days. Next in the chain (but not in the picture) is dual stage sediment/charcoal filter that was already here. Due to the previous lack of prefiltering, it probably needs to be replaced. Next is a water meter, just visible in the upper left. This is just so we can monitor our own water usage. It has a contact that closes once for each gallon, so I really would like to be able to log and report on the usage. There is a little more piping and valves to allow some or all of the filtering to be bypassed if needed and a pre-filter spigot where we can get essentially firehose flow and pressure. This spigot is before the filters, which means it is also before the meter, so I don’t get to monitor it. Adding another meter there would be easier and probably cheaper than replumbing. Again.

In any case, monitoring pressure differentials can indicate when a filter needs to changed or flushed and electronically monitoring water flow would reveal any leaks or other such issues.


The Awl Bid’ness

We had the Memorial Day BTW shindig to prepare for, so I changed the oil in both of the currently serviceable trikes and added (re-added) the the long since bypassed oil cooler on Sponge Bob. The new oil cooler is an Empi 9291 shrink wrapped kit that includes an adapter to connect to the block and a remote oil filter adapter. There is an engine adapter already in place from the previous cooler and time and hose constraints have delayed the installation of oil filter at this time.

This cooler is a 8 pass unit, larger than the old one. Consequently, I needed to find another place to put it. There was room under the deck on the right side of the engine.

The bracket is bolted on one side to the box. I made a simple bracket for the other end.

Then I pretty much split the hose that came with the kit and plumbed it into the engine.

It didn’t seem to take a lot of extra oil, but I’m guessing it’s probably about 1/2 quart for the hose and cooler.

Next, I need to add some disconnect fittings into the lines so that removing the engine will not require either pulling the hoses or unbolting the cooler. Pegasus Auto Racing has some nice AN fittings for a reasonable price. I got four female hose ends and two male couplers. Not only can the cooler be removed, this configuration makes it fairly easy to bypass the oil cooler if the need arises again.

In less happy news, the oil leak from the rearish of the engine was not stopped by the replumbing, however having freshened the oil, it’s now a bit more obvious that it may be transaxle oil rather than engine oil. The oil on the ground is black, but the oil on the dipstick is honey colored, even after 400 mile round trip. While this occurred to me earlier this week, I have not yet verified the theory. It should be pretty simple to check; transaxle oil smells horrible.

Uddn Uddn

The engine in Kermit is beginning to show the signs of needing a rebuild, so (long story short; savor that while you can) we found a likely candidate on Craigslist. I got up (relatively) early on Saturday and drove the hour and a half to Lucas, TX, where I found Bob to be a very friendly and interesting guy. We could have gabbed for another hour or so, but I wanted to get back home and see if I could get this thing done in time to ride to the BTW chapter meeting on Sunday.

I got started about 1PM. This is Kermit’s old engine before the operation began.

Removal of the old engine was a breeze, especially having done it a few times by now. On the other hand, the new engine had a generator and since Kermit isn’t wired for a generator, I elected to swap them out. I remember now how involved it actually is to do that. It involved so major a disassembling that I should have changed the carburetor while I was at it.

The carb on the new engine is literally brand new. It, like the oil filler neck, had obviously never had any fluid through them. I was mildly concerned because the carburetor is a 30PICT-1, originally intended for 1300cc engines. I was going to suffer greatly if this turned out to be a 1300, but I was confident that the AE- serial number on the case, the doghouse oil cooler and the 200mm flywheel all pointed to it more likely being a 1600.

The new engine had a threaded insert where the old one had an open hole, and the bolt I had was a D-bolt intended for a starter and wasn’t really one for torquing down. It would probably have sufficed, but this is Mama’s trike and I don’t want it to come loose just because I was too lazy to go buy the right bolt. Of course, where we live, that’s a 45 minute round trip, especially if the first place doesn’t have it and Blue Bell is on sale.

The clutch was moved over with a minimum of fuss, but I did not have the handy dandy alignment tool, so I eyeballed it. That turns out to have cost me more time that it would have taken to drive into Fort Worth and get my clutch tool from the old house. Unfortunately, it didn’t occur to me that it could be that until I had exhausted every other explanation as to why I just couldn’t get it to go that last inch. It was in far enough for the splines to engage, but apparently that wasn’t enough. I pulled the engine back out (not that it was actually attached), carefully loosened the clutch bolts until I could just scoot the disc and used my socket handle as the closest tool to the proper one. Tightened everything back down and stabbed the engine first try.

The Mr Gasket fuel pump was very easy to put back where it came from on the old engine, but the coil used to be mounted on the back where the doghouse oil cooler is now. I didn’t like the stock location, though I can’t really define why. So, I put it on the edge of the fan housing, just above the fuel pump. this is kinda ugly from a wiring standpoint, but it’s the best compromise without redoing all the wire in the area and the goal here is to have it ready to ride on Sunday.

I had no further trauma and was able to crank the engine and start it, first try, around 11PM.

Now, it didn’t run very nicely, which turned out to be because plug wires 2 & 3 were swapped on  the distributor cap, but once that was corrected, I was able to get a decent idle and rev out of it. I don’t fit this trike; it is carefully adjusted to fit Gabby (and I guess anyone near her perfect dimensions, which rules me out for I am a couple feet too tall), so a test ride would have to wait for her in the morning. I called it a night around 1AM. 12 hour job.

Sunday morning, Gabby took it for a ride, and armed with the knowledge that the carburetor was probably too small and the centrifugal advance distributor was probably not going to act like the old engine, she a little reluctantly agreed to try taking it to town for the meeting. I finished putting the rest of it together, bumper, air filter, etc and we got ready for the meeting.

It generally ran ok, but developed a tendancy to die at stoplights. Trooper that she is, she tolerated it for nearly 200 miles of round trip riding. We went to the east side of Ft Worth for the BTW meeting, then to Bridgeport to find that our Mother’s Day dinner destination closed at 3PM. We went to Sweetie Pie’s Ribeyes in Decatur and had steaks and that horrible apple pie that is so bad that they only serve it a few times each year. We took a walk around the square, enjoying the sights. We went from there to Tractor Supply, cause ya just have to, and on home. It was a long day.

The performance of the new engine was, generally, good, maybe a little lackluster, but not without expecting it to be. So, when I got home tonight, I swapped out the 34PICT-3 carburetor and vacuum advance distributor from Kermit’s old engine. I had some difficulty getting it to idle really smoothly without setting the idle advance to about 20 BTDC. Full advance wanted to go too far, so I had to back it off a little to about 15 degrees to keep maximum advance below 35 degrees. I didn’t touch the carburetor adjustments. Now, it has a little bit of a lopey idle, but revs way quicker than the old engine. Bigger cam? Dunno. We’ll see what Gabby’s new test drive allows. Hopefully, she can do that during the day tomorrow and if she’s happy with it, she might ride it in to work.

Stuff begins with stuff….

I picked up a stack of 24″ squares of 16ga mild steel today. Because of the way they cut and order stuff, 24″ squares must be ordered in lots of 8. I know that the tank for Puff will take two squares and all the other stuff I envision will take more and more, so I thought 16 would be a good order that will last a while.

Bit O’ Metal Trivia…  16 sheets of 2’x2′ 16ga weighs 160 pounds, pretty much…

A New Seat for Kermit

Before I get on with the seat, I have some other update duties to perform.

Kermit had started stalling at most stops, especially in such conditions as a freeway exit or getting caught by a light in a long straightaway. He would always start right  back up and and appear to return to normal without issue.

I suspected either of two things, idle circuit adjustment or the throttle cable arrangement, and really, I figured it would be a combination of the two.

Well, spent a good half day dinking with them both to no avail. I found that even sitting in the shop, I was able to duplicate the issue… If I held the engine at 3000 rpm or so, it would die when I closed the throttle. I also noticed that it had a little bit of a miss during that rev.

Then I finally figured it out, having until then ignored the very thing I had installed specifically to catch this kind of problem! The inline fuel pressure gauge was showing 1 PSI. I shut the engine off and was able to squeeze the hose and get the indicator to swing full scale, so it wasn’t a bad gauge. Started again and watched the gauge. When running at 3000 rpm, pressure dropped even lower, then about the time the engine would die, the pressure would come back up to 1 PSI. The entire circuit from tank to carburetor is less than three feet as the hose flies.

Long story short (too late), it was the fuel pump. Makes sense… could provide good enough volume to run, though a little lean at higher rpm, then when you come off the throttle, it dies because the idle circuit picks up from the top of fuel bowl. By the time you can restart it, the pump has caught up and filled the bowl. Rinse. Repeat.

So, dashed down to O’Reilly in Decatur (about a 30 minute round trip) and got another fuel pump and a new filter. All hooked up, 5 PSI, can’t kill it now.

That day, we went on a ride just short of 150 miles and it didn’t (unexpectedly) die once.

So, fast forward a week and I have a new (new to me, anyhow) Hobart AirForce 250ci plasma cutter to play with. Wanted a plasma cutter forever and finally had both the wherewithall to drop a few bucks on one *and* a decent price for a used one on Craigslist. Actually, it’s so barely used, it may as well be new.

It can cut.

I chipped the dross off, but this is how it does it.

One of my upcoming projects, and honestly one of the reasons I wanted the plasma torch now, is a replacement fuel tank for the purple trike. That will be made of 16ga mild steel.

In any case, today’s project was replacing the seat on Kermit. The old seat came from the basement at American Motorcycle Trading Company in Arlington. It appears to have been a take-off from a modern Indian motorcycle. Decent enough seat, though a trike puts more weight on your tailbone than a motorcycle typically does, so said tailbone can really tell when you’ve been on a long ride.

After looking at a *LOT* of seats online, mostly boat and tractor seats, we decided to try a particular tractor seat from Northern Tool, which also happened to be on sale for $70.

I knew that it would involve building a bracket of some sort to mount pretty much any seat, so after some test fitting and test sitting (by Gabby; I don’t fit on Kermit), I had an idea that 2″ square tubing would work pretty well.

There was no easily accesible square tubing to be had on Saturday, but I did get some 2″ 90 degree angle from Lowes. Using my schmancy new plasma torch, I learned how not to cut a straight line, then refined the technique until I *could* cut a straight line and zeroed in on a plan to give 2″ square tubing in the place I wanted it most, at the ends, by welding a short piece of angle to the span thusly:

The overal bracket is basically U-shaped, with the square “tube” ends holding the back of the seat suspended on a body crossmember and the front sitting on an existing pedestal that I would otherwise just as soon cut out.

I also got to cut out a reduntant piece of metal right where the left rear seat bracket needed to go. I used my welding apron as a blanket to protect wiring and fuel lines from the easily 3-4 second cutting action. This thing rocks. Anyway…

Painted up and bolted in, ready for a seat

I managed to *not* get a pic of the finished seat, but here it is in plywood test garb.

After the seat was tested by Mike Easter, I had Gabby check it out, short of a ride since the trike wasn’t back together yet. She had some errands to run, so while she was out, I also wired up to long installed and never connected oil pressure gauge and tachometer. The oil pressure gauge involved replacing the oil pressure switch with an analog sender and a bit of wiring. The oil pressure switch had a wire going up front to the wiring center, but it was not connected. I needed only extend it a foot or so the back of the gauge and wire up a ground for the sender.

The tachometer took a little more because I had to run a wire for it, pushing and threading the wire through the existing loom. Once connected to the breaker point side of the ignition coil, I started the engine up. The oil pressure gauge worked perfectly, but the tach showed double the expected RPM. There is a switch on the back of the tach, a three position switch to choose whether the connected engine is 4, 6 or 8 cylinders, in that order. I think it’s probably just labeled wrong because I had to put it in the 8 cylinder position to read sanely on this four.

With those now working, I loosened the bands on the fuel tank and turned it slightly to clear interference it developed with the filler cap and decorative lid.

The trim boards on either side of the seat needed cutting to fit around the new seat bracket, but otherwise, it went back together like a charm.

We took about a forty mile meandering ride through the countryside and so far the seat seems to be helping a lot!

Sponge Bob Gets His Stop Back

You may recall when I got Sponge Bob back on the road that the brakes were weak. I did a little hydraulics math and figured out that front brake cylinders might solve the problem.

They do!

Sponge Bob’s speedo had stopped working during the time the transaxle was down. During the week, I opened the connector and checked the pins. The seemed a little loose on the sensor coil. Not sure how they would have been stretched, but squeezing the sockets closed a little seems to have restored speedometer function, so now both trikes have speedometers!

Kermit Gets A Speedo

Not the Spandex kind…

I noticed recently that a couple of manufacturers are offerning GPS speedometer sensors for electronic speedometers. Kermit has been without a speedometer since we acquired him. The 2-1/2″ Drag Specialties mechanical speedometer appears to work, but the cable was broken. The cable was broken because the cable was too short for where it was mounted and did not allow a generous enough radius to it’s bends. I attempted to reuse it with a longer cable, but apparently the nature of the cable’s failure has it stuck in the back of the instrument.

I stumbled across a nice LED speedometer by Intellitronix that comes in, appropriately, green. More importantly, Intellitronix also make a GPS speedometer sensor. I had trouble finding it for sale anywhere, but I found that JEGS carries a couple of GPS sensors. Turns out one of them, the least expensive one no less, is the Intellitronix unit!

So, to simplify my ordering, I found a decent VDO speedometer and an Autometer chrome mounting cup, all from JEGS.

The dogs heralded the arrival of the FedEx guy and I got started as soon as I could.

Of course, the first thing is to ensure that the lighting is green. The speedo comes with red and green silicone caps for the backlight bulbs. I will probably one day replace the bulbs with LED versions, but for now, this is green enough.

The mounting location is intended to be temporary. At some point, I will fabricate a bracket to more properly center it between the handlebar tubes, but for now, I’ll put it on the left one.

The mounting bracket can accept a hose clamp and/or a pair of screws. I had no appropriately sized hose clamps, so I fudged it with a few wire ties and a single stabilizing screw.

You may note that the screwhead is chewed up a bit. Turns out that the handlebar “tube” is actually a handlebar rod. Threading the screw into it without the benefit of my tap set was a challenge.

Wiring the instrument is very simple, especially when running the lights and speedo on the same power. Three wires, power, ground, speedo in. I followed my usual color codes, orange for switched power, black for ground and gray for sensor.

It looks pretty good in place…

The GPS device is not weather tite, so I installed it in the trunk.

The unit has three LEDs, red for power, yellow for antenna data connection and green for GPS lock.

Ignition on:

The first time, it took about 3 minutes for the GPS lock to come on. Now it takes about 5 seconds.

The default setting for the GPS unit is to provide 8000 pulses per mile. It’s pretty simple to set the VDO speedometer to match.

I have verified that it at least indicates a reasonable speed driving across the yard. We’ll road test it tomorrow and compare the readings to a Garmin.

While I was running wire in the trunk anyway, I connected the tail/turn/brake lights in the trunk, too.

On the road again!

Picked up the transaxle and immediately got busy with other parts of life. Where have you heard that one before?

With vacation planned for the two weeks including and following Memorial Day, I had that Friday off work and  headed into Fort Worth to try to get it done.
Besides being a couple hours late starting, I also had trouble finding a bolt I was going to need. Once there, I decided to do the frame repair first. It took a while to get the metal cut to the right angles and length. I then picked up my torch and while setting the gauges, the red hose suddenly breached and spewed acetylene from the base of the torch. A quick trip to the second hardware store got new 25′ hoses. The old ones were 15′, so that’s good, too.
I got the braces welded into place between the transaxle forks and the bit of the body that hangs over it and commenced installing the transaxle. It went fairly well. I got it completely bolted in, shocks on and I mounted the wheels so I could use them and wheel chocks to hold the axles steady while torquing the axle nuts. Basically used my 18″ long 1/2″ drive ratchet and put most of my, um, substantial, weight on the handle, then tightened them enough more to put in the cotter pins.
I got the engine on the jack and lined it up. Since the VW rear end is angled slightly downhill, the rear of the engine needs to be a little higher than the front for the bolts and studs to line up, then you need to lower it slightly as you push it forward.
Then the trouble began.
One of the top bolts holding the engine and transaxle together is shared with the starter. I put the other bolt in, then discovered that my freshly welded in brace blocked the starter. Argh! It was nearly midnight and I knew that either me or the trike was going to suffer an injury if I started over that late, so I went on home. We enjoyed the rest of the weekend without trikes.
I got up Monday morning, Memorial Day, just as if I were going to work and went into town to work on the trike. So I could get the trike on the road, I had decided that I would just cut out the brace that was blocking me and reinstall the temporary bracing that has been temporary for about three years now. I trimmed and cleaned up those braces, got everything assembled and a test ride by 11:30. I hitched Sponge Bob to my truck and towed him home.
During the down time, the speedometer stopped working. It powers up and everything, just doesn’t indicate. Also lost one of the deck driving lights.
The biggest concern is the brakes. They are weak. Pedal feel is good and they bled out perfectly, nice clean fluid. I adjusted the brakes as described in countless documents, and while it improved slightly, braking power is very low. The brakes on the old axles could easily skid the tires if you wanted them to. I could get a tiny skid on the gravel driveway, but basically, they can’t skid.
Still, there was enough brake to stop and my GPS could tell us our speed, so we went to dinner on the trikes. Felt good to be back on the road!
While describing this issue to a guru, it suddenly occurred to me that I had purchased rear wheel cylinders. Makes sense, it’s the rear wheels of the Beetle the axles come from. However, the rear brakes of any car are always weaker than the front. Otherwise, they would always skid.
I did a little research and found that (replacement) front wheel cylinders typically have a 7/8″ bore, while rear cylinders have an 11/16″ bore. That is 3/16″ larger diameter in the front. Putting more math to it, the front cylinders have nearly 62% more surface area, which translates directly to 62% more transmitted force to the brake shoes for the same pedal effort. There is a corresponding reduction in cylinder travel, but that is of little consequence, so long as it moves the brake shoes enough. O’Reilly’s in Decatur will have my two front wheel cylinders this afternoon 🙂 though it may be a few days before I have time to put them in.
It occurs to me that the purple trike has the same hard pedal and limited brake action and I am 99% sure it’s for the same reason. I certainly would not have thought to order front brake cylinders for rear wheels back then.