All posts by Sluggy

The Gateway to the Ether

It’s been a long enough project started long enough ago that I may be a little soft on some fine details, but I’ll try to get it all.

Since I took a fair number of pictures while working on this antenna, the EXIF info helps me nail down some dates.

After much discussion with friends, most notably KD, I decided on a Hustler 6BTV, a 6 band trap vertical. I ordered it from Texas Towers on May 22, 2012. It was $265, including shipping. They offered the best price by a small amount, but I had to wait for the antenna to come in from the manufacturer. I don’t remember when it finally arrived, but on June 4, I sent an email asking about it and it was still not there.

Due to that delay, I ended up ordering the remaining accessories from DX Engineering and upon reflection, I probably should have ordered it all from them for convenience sake. At the very least, they rewrote much of the installation manual, accounting for some real world issues.

I decided that my barn/workshop would make the best permanent hamshack facility, mostly so I would not have to fill a room in the house with equipment and endure the scorn of my beloved. ๐Ÿ™‚ So, I decided on a flat spot equidistant from the workshop and a pasture fence.

antenna

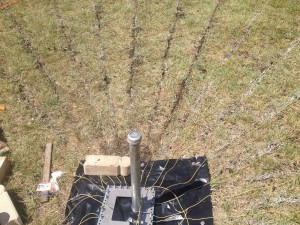
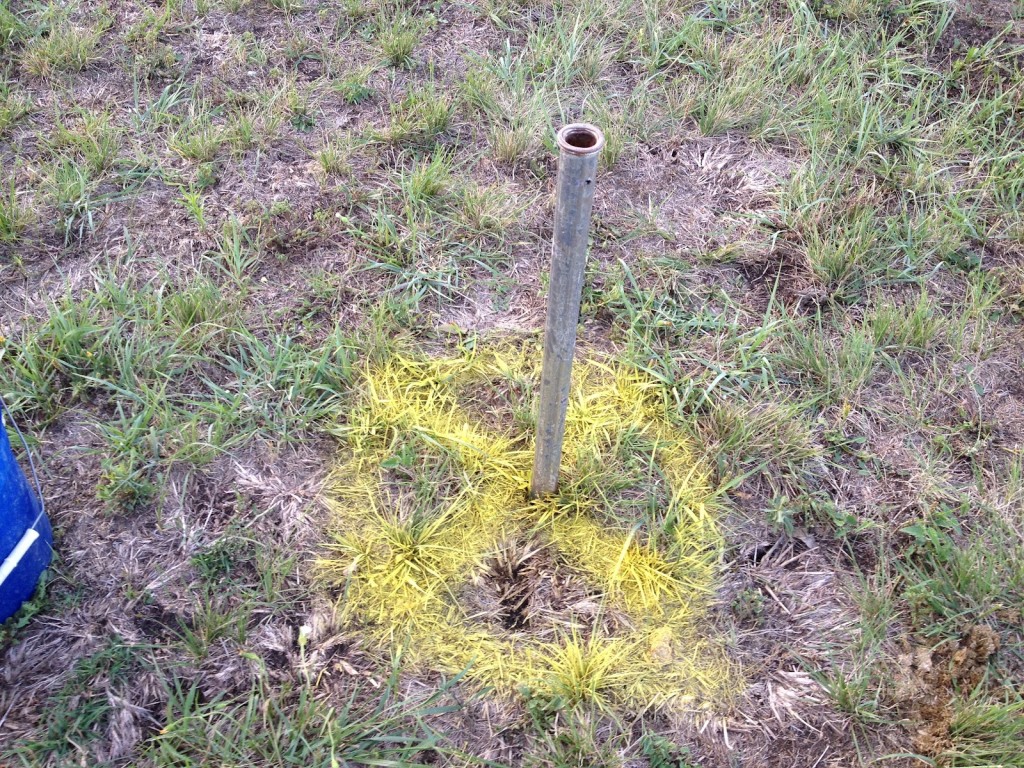
I drove a galvanized pipe, really a chain link fence rail, into the ground to mount the antenna to.

IMG_00185

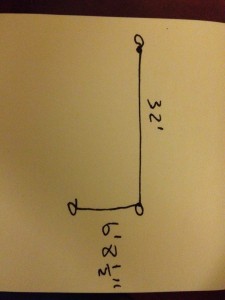
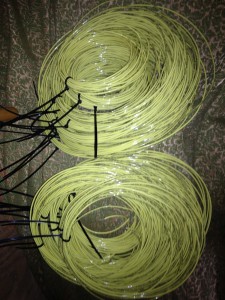
I decided on using 30 radials of 32 feet each. This was a reasonable compromise between the number of radials and keeping the cost down. These dimensions would use almost all of two 500 ft rolls of 12ga THHN wire, about $100. I did a little math and found that the chord of a 12 degree arc of 32 foot radius is close enough to 6′ 8-1/2″ and made a string jig for laying out the radials.

IMG_00178

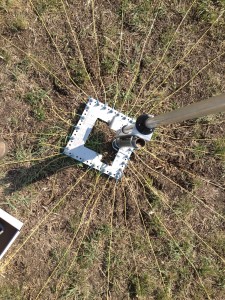
Using the jig and marking paint, I laid out for all the radials.
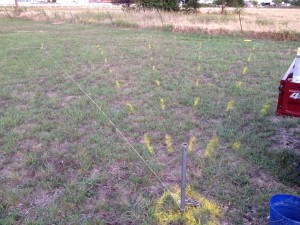
IMG_00186

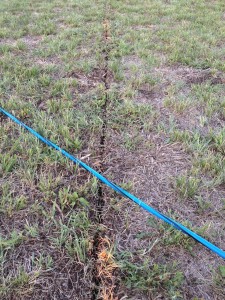
Since the grass in this area is not exactly putting green density, I presumed I could not depend on staples and growing grass to secure the radials, so I elected to use an edger to dig narrow trenchesย to bury them
IMG_00202

The ground was very dry, it being the middle of June. This made cutting the trenches easy, but burying the radials difficult. The method that end up working best was literally hammering the edges of the trench to collapse it over the wire. My arms are still tired years later. I suggest watering the area the night before next time.

Making the radials was a pretty intense assembly line. It doesn’t seem like 30 would be that much, but it took two solid evenings to roll out 32 foot lengths and put ring connectors on one end of them.

IMG_00201

I got the radial plate from DX Engineering and enough stainless steel hardware for 30 radials. *My* plate didn’t come with the hardware like it does now…

With Field Day 2012 now coming up the following weekend and the trench technique limiting me to only getting 6 of them in the ground, I simply laid the rest of the radials out directly on the surface, with nails at the ends to keep them straight.

IMG_00209

On Field Day, we had Amy, Jesse and their daughter out for operations. They brought a TS-140 and a dipole so we could run 2 rigs. We had limited success with the dipole; we didn’t really have a way to get it up in the air and it was too close to the ground to perform well.

IMG_00212

In fact, RFI was pretty horrendous in certain bands. We had a fan to help keep us somewhat comfortable out there. It has a wireless remote control and RFI from the dipole toggled the fan on and off, sometimes per spoken syllable. It was kinda funny, but darned unhandy.

In any case, we had fun and made a few contacts (Cat 2E, 109 QSOs, 488 points) even though the antenna had not been properly tuned. The TS-450SAT’s built in tuner kept SWR at a minimum.

After Field Day, the loose radials were rolled up then later removed, but the antenna was not disturbed for almost a full year. Though I had done some preparation, I was unable to participate in 2013 Field Day due to a schedule conflict. Anytime I can spend the day welding and working metal with my stepdaughter, I’m there.

IMG_01004

In January 2014, I left the house one morning and rounded the corner to find our horses wandering the streets. I knew immediately that I would not be able to corral them without lead ropes, so I rushed back to the barn and grabbed some. I was distracted and in such a rush leaving the barn that I hit the antenna with the truck. I mean, I mowed it down. WHAM!
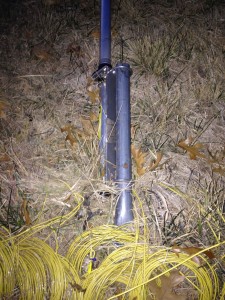
IMG_01373

The thin galvanized pole, which had held up more than a year of winds on the plains could not withstand the RAM. That night, I looked over the antenna and found that, while it was damaged, it was not really as bad as it looked.
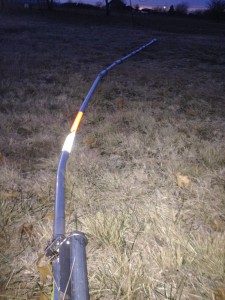
IMG_01374

I would really only need to replace the bent lower section and the 10m trap.

Somewhere between January and June, I procured replacement parts directly from Hustler, which turns out to be manufactured in nearby Mineral Wells, and rebuilt the antenna. As seems to be the pattern, with Field Day 2014 fast approaching, I resumed antenna work.

I used a new heavy galvanized pipe. If I hit it with the truck again, it will resist more, which, come to think of it, may or may not be a good idea ๐Ÿ™‚
IMG_01528

I re-marked the ground for the radials, cut new trenches and got several more buried, assisted by a redneck tool I made to help push the wires into the trenches from a standing position.

I also had purchased DX Engineering’s tilt mount because taking the antenna down to tune and adjust it was going to be quite an undertaking. Also, the tilt mount provides an opportunity to easily secure the antenna in inclement weather.
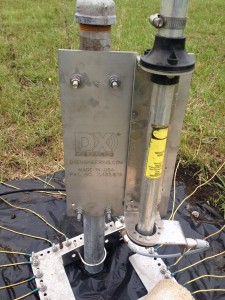
IMG_01534

One may note that, at this point, the antenna system as built (and rebuilt) had become pretty much all the same components that DX Engineering offers in a package. The main difference is that this package comes with only enough wire and hardware for 20 radials 25 feet long and it’s arguably less costly at $514, if for no other reason than combined shipping.

Field Day 2014 went wrong early because I strained my back during setup on Saturday morning and spent the day hurting and barely able to walk. Luckily, most of the day was also spent sitting. We were storing a large camper trailer for a friend of ours and we were encouraged to use it if we liked. In order to be in air conditioned comfort for the day, I set up the station in the camper. It made for as pleasant of an operation as would have been possible.

2014 Field Day results: Cat 1E, 111 QSOs, 472 points

Again after Field Day, the remaining above ground radials were rolled up and essentially no antenna construction action was taken until Field Day preparations began in 2015. There were related developments, though.

The radials are not impervious to accidents. I snagged a buried radial with one of the forks of the hay buggy.
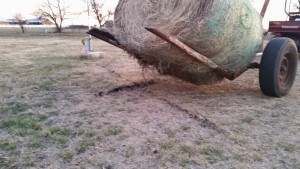
20141206_172803

Although the workshop is a neat place to hang out, there are advantages to being able to operate from elsewhere, so I got interested in RemoteRig.

Many rigs these days have removable and remotable control heads. RemoteRig is basically a hardware device that extends that remote cable over a LAN or WAN. Particularly well suited to this method is the Icom IC-706 and variants. Even if your rig doesn’t have a removable head, but can be operated remotely via CI-V or other such data formats, RemoteRig helps remote that data and, perhaps more importantly, the audio, over a network. For the curious, it basically uses SIP protocols and is thus pretty much just a slightly specialized VoIP phone. Sadly, it is not an inexpensive solution and it took me a long while to pull the trigger on the $530 purchase, but I have been very pleased with it.

The extension cable for the IC-706 is now out of production, but you can find them on occasion. I actually got mine from an eBay seller before I considered RemoteRig simply because I might one day put the rig in a vehicle. It is quite an emotional undertaking to cut a rare cord that people are asking $150 or more for these days. When I got mine, they were still in stock at Universal Radio for $60.

The workbench is somewhat in disarray, but here is my Icom with RemoteRig extending the control head over the LAN switch in the workshop.
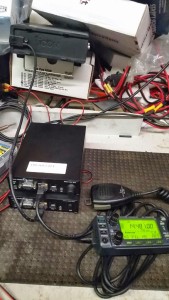
upload_-1.39

Once that was working, it was trivial to move the control head into the house to test it from there.
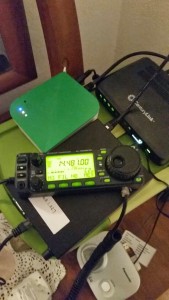
upload_-1.16

It takes a little firewall holepunching to set up the system to work over a WAN, but here it is sitting on my desk at work
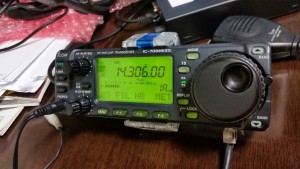
upload_-1.8
So, in the above pic, pressing the band button on the control head sends a serial command over the cable to the RemoteRig unit, which encapsulates it in a SIP message that it sends out the ethernet port over the LAN at the office to the router, through our provider to their firewall, onto the wild internet to my provider, down the DSL wire to the house, through the DSL modem and it’s built in switch, over the long range wireless link from the house to the workshop, to the switch in the workshop, to the RemoteRig device where it is turned back into a serial command that is passed over the cable to the radio. The radio responds and replies over the same chain. There is a generally imperceptible delay to the user pressing the band button.

Almost as an aside, I decided that to support remote operation, I need to add an automatic antenna tuner. The LDGย IT-100ย is operationally very similar to the Icom AH4 tuner, connecting directly to the radio and triggered by the front panel button on the radio. It can tune as for as 10:1 SWR on HF, but most importantly, it can work for those small mismatches on either side of my antenna’s resonances.

Though operating remotely over WAN is neat, at this point I really intend for it to be used most often so that I can operate from in the house on occasion. I ended up using it for Field Day 2015.

I started working on the antenna a little earlier this year, late March instead of mid June. I got a few more radials in the ground.

Pleased with the success of operating in the camper for 2014, I decided to do about the same for 2015. The friend’s camper was long gone, but we have our own vintage camper, a 1972 Jayco Jay Wren. It’s a cute little thing.
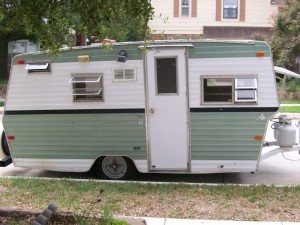
101_0246

As part of the preparation for ย the upcoming event, a week or so before FD 2105, I moved the camper from it’s usually parking place to just outside the workshop. I opened the door and was immediately concerned because there were hundred of dead bees inside.
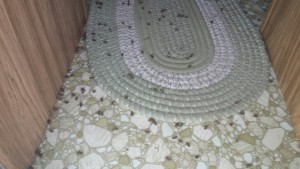
camper-floor-bees

A little more digging revealed that there was a fairly well established hive in one of the storage benches.

I (inadvisedly) sprayed a number of them, but there were too many and really I don’t like doing that, particularly to such a beneficial creature. I was able to locate a beekeeper who came out and was able to capture and relocate the hive. It was quite an involved process and, long story short, the camper was not going to be usable for Field Day.

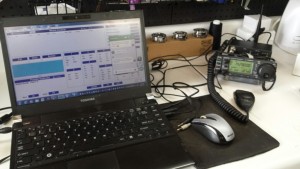
So, I probably could have set up in the kitchen using RemoteRig, but instead I used my wife’s craftroom. This would keep me out of the way and free of most of the distractions in the house.
upload_-1.9

The laptop was used primarily for logging, though I did try to make a few digital contacts. Note the RigBlaster interface behind the control head. The network latency does not appear to be an issue for digital modes, either. Note also the rubber ducky antenna on the back of the RemoteRig device. Using WiFi makes it all that much easier to use at home. The RemoteRig with the wifi adapter needs only 12V power to be ready to use anywhere in the house.

Due to extreme knuckleheadedness, I did not submit the logs for this Field Day. Unofficially, I had 57 QSOs, operating as a 1D station.

Believe it or not, there are STILL a few remaining radial wires that have not been buried. My neighbor and fellow ham had rented a trencher for a project at their house, so I borrowed it and cut three trenches I needed as well, one for power to an outbuilding, one for water to the barn and a shallow one for the coax to the antenna. My LM400 coax is rated for direct burial and buried coax can help choke stray RF currents, even though I do have a set of 1:1 baluns for that.

As it stands today, there are just a few radials, maybe 5 or 6, left to bury plus one to repair from the coax trench digging. Once those radials are in the ground, the only task left is to finally tune it as built.
The Tale of The Ancients

I haven’t been able to nail down the exact date, but it was sometime in the early 1980’s that I got my first ticket. It was just barely before the Volunteer Examination systems was created, but at that time, a General or higher could administer the Novice test. The club in San Angelo, TX held a class. I recall three of us, Mark, lifelong friend KD and me. We got KA5RZZ, KA5SAC and KA5RZY, respectively.

Mark has kept his callsign though all the years, currently Advanced class.

KD kept his through Advanced, then got NN5KS as a vanity call once he got to Amateur Extra.

Once VE testing was in full swing, I was living in Abilene, TX, and in 1989, I took a club-offered Technician class and subsequent VE testing. I passed and got callsign N5HRK.

I was fairly active for a few years, notably with then new-and-exciting packet radio on 2 meters, and a little HF. There was no Novice/Technician phone on HF at the time, so it was all CW, all the time. As I never was particularly good at Morse code, it was not something I really excelled at and so I found it to be somewhat frustrating. That, and antennas on an extreme budget in rented housing can be a significant challenge.

So, I chilled somewhat on the hobby, doing other things over the years. I moved to Fort Worth, working primarily in voice communications, primarily telephone systems. Hobbywise, I did a lot of robotics. I never completely forgot about radio, though it was not front of mind. Expiration of my license in 1999 came and went and then some.

I got interested again in 2010, due largely to KD. My license was long expired and even the 2 year renewal grace period had expired some 10 years earlier. In the good news column, however, the requirement to show proficiency in Morse code had been eliminated. This meant that studying would be all technology, rules and operating. I had originally planned to study for General class, but along the way decided that I would push for Extra

I used a lot of online study tools and eventually I started using online practice tests that presented questions from the pool of questions for all three classes. Once I was studying the Extra class questions, I had refined a process wherein I would get the question and if I did not know the answer immediately, I would research the question to understand the subject rather than simply look up the answer to that question. I think that gave me a much better understanding of the actual material, which I think is the actual intent of testing licensees.

So, I found a testing session and in March of 2011, took all three tests in one sitting. I aced Technician, did well on General and squeaked by on Extra, but I passed! I got callsign AE5XB.

So, with my fresh license, I decided that I was going to run a 1E station for ARRL Field Day. I had a Kenwood TS-450SAT, but I needed an antenna. I knew that a monoband dipole would be too limiting and that with a small property, a standard 50 x 100 foot lot in an older part of town, I needed something compact. I elected to make an off center fed multiband dipole using a commercial balun.

SAMSUNG

My experience with it was not totally positive, but I am reasonably sure that the design, construction and height above the ground would all have been issues.

Still, I got a handful of contacts, 29 QSOs and enough multipliers for a whopping 158 points, 2428th place out of 2632 ๐Ÿ™‚

I found that I could hear a lot of stations that could apparently never hear me. When someone did hear me, they had trouble copying my callsign. Cool as it looked, I decided I would get a vanity callsign.

I looked at a couple of other possibilities, like my initials, etc, but what looked best was my still-available former call, N5HRK.

By Field Day 2012, I had the new call and we had moved to our house in the country on almost 12 acres. Even with the available space, I still wanted to have a compact antenna, largely for aesthetic reasons. I decided to put up a strong multiband vertical. With the vertical in place, FD2012 was good for 109 QSOs and 488 points and we didn’t even work the whole 24 hours.

The antenna installation deserves it’s own story and I’ll put that in the next posting.

Life Happens

I’ve been away from my two blogs for a little bit, though there have been some developments in both, especially this one.

Biggest news, Gabby got a CanAm Spyder RT!

One of her friends at work needed to sell his just as she was shopping for one, so good news for them both. It’s a 2010 model with a 5 speed manual transmission. It will flat scoot if you ask it to.

Last time, I was talking about the trials I was facing with the tank that does not end. I requested a quote from Boyd Welding and at just under $200, it is not a cheap tank by any means. It is competitive with commercially available racing fuel cells and none of them are the right shape. In any case, I went for it and it’s expected around the end of the first week in October.

Before Labor Day weekend, we participated in school supply benefit run. Kermit had some reliability issues wherein he would occasionally flood out and die at a stop. One of these times involved her being towed the last mile or two to the school, an activity she is glad to never repeat. Long story short, it seems to have been that the 5 PSI fuel pump overwhelmed the 3 PSI float valve. The installation of a fuel pressure regulator seems to have abated the problem.

Since it worked without difficulty for a long time, I suspect the overrating has probably mildly damaged float valve. I have carburetor rebuild kits waiting for me to install them.

That same day, SpongeBob was running ok, but not great. It was taking wide open throttle to reach freeways speeds. I tolerated it for the day, but over the next few days, I did some troubleshooting, including new distributor cap, wires and sparkplugs, to no avail. The troubleshooting seems to indicate that he had lost power in cylinder 4 and that either 3 or 4 was filling with oil when it sat overnight, which can’t be good.

I shopped for another engine, and not really finding anything I wanted to pounce on, I decided that I would put the old engine from Kermit in SpongeBob and rebuild SpongeBob’s engine. It’s a slightly better candidate since it’s crankshaft pulley isn’t welded on and the mild oil leakage from Kermit’s old engine would be tolerable in the short term.

So, I moved all the bits over, alternator, intake, carburetor, distributor, oil cooler.

Started it up.

Hmmm. It runs almost exactly the same, no power from cylinder 4 and that pipe is barely warm. It runs just was well with our without a plug wire on 4. I connect a spark plug to the #4 wire and there *is* a spark, though admittedly, it looks a little weak. I dug deeper and found that the contact on the points was far beyond merely worn. They were eroded almost away, essentially missing.

I had a new set of points and changed them out. Fired right up and after a few minutes tinkering with the gap/dwell and timing, SpongeBob runs great!

Lesson learned: Severely worn points can make a single cylinder loose power. Essentially, the dwell was short and contact resistance was high, so the coil likely was not able to saturate. This provided a weak spark on all cylinders and probably a very weak spark on cylinder 4, probably due to very small dimensional differences between the lobes in the distributor. I may have been able to adjust the points such that it would have worked, but they needed replacing anyway. Tinker tells me that this is what points look like when the key is left on for an extended time without the engine running.

The oil in the cylinder still means a rebuild of the engine is advised, but I might have been able to put off swapping engines.

Epiphany

Urban Dictionary seems to summarize it well for me:

“a smart-sounding word for realizing you’ve been practically retarded for quite some time”
Maybe that’s a little harsh, but it’s certainly how I felt when I finally realized that I had about 40 hours into building this fuel tank and it’s still far from done.
Last night, I brazed studs in the top plate for the filler neck. I had some difficulty getting one of them to completely wet. Funny what a little bit of unidentified trash can do to ya. After that was finally done, I hammered the now warped piece back into shape and prepared to do what I really really hoped was the last couple of steps before welding the top on, namely putting the pickup and return tubes in. I have decided for simplicity to pick up from the bottom rear edge of the tank and return to the top rear edge.
So, I picked up the tank and as I set it on the workbench, I noticed a flash of light inside that was not expected. Ugh. Essentially the entire length of a recently added seam had cracked open. Easy enough to address, and apparently, I hadn’t done a good job of it already.
Once the tubes were in, I thought it wise to do a quick leak check. I simply poured some water in the bottom of the tank and watched the seams for leaks as I rolled the water around inside. Found a couple. Fired up the torch and reworked each of them. I let the tank cool to handling temperature and did it again.
Hmmm  How did I miss that leak. Repeat fix/cool/test.
More new leaks. More fixes. More new leaks.
So, I decided to stop the madness.
It seems that either my materials, my tools, my skills or some combination therein is not up to the task. I vote skills. I suspect that my welds are marginal and when working on one fix, metal expansion stresses out new cracks. Maybe the torch is too rich and adding carbon to the weld, making them brittle. Maybe I’m overanalyzing it ๐Ÿ™‚
In any case, there is at least one manufacturer that has an off the shelf tank that would be serviceable, and they take custom requests. I have submitted a request for a quote. Since it’s custom anyway, I want to make it as close to ideal as possible, so I have asked for two AN-6 fittings for pickup and return, a marine flange for the fuel level sender, an angled filler neck with vented cap and mounting tabs ready to bolt in place. I might add another mounting tab to mount the fuel pump to; depends on some fitting considerations that I will have to experiment with.
With some luck, I will have a first blush quote soon enough to determine whether the custom tank is even worth considering, which will center around whatever the cost is.

The Tank That Does Not End

The new tank is largely finished, shown here after tacking the panels together and before welding.

I am disappointed with how rusty I was welding. I had to re-weld almost every seam.

You can see how rough and blobby they are here. I spent much of Saturday grinding them clean and retouching all of them. Once I had done a few of them, I seemed to get my groove back.

Had I started with nice welds, I would not have had to grind NEARLY as much. Pay no attention to the pinhole in the middle of the pic. It’s gone now.

I have decided to go with an external fuel pump, so I added plumbing for pickup and return. Sharp observers may note that the pickup tube takes off at an angle. That was easier that rebending it or cutting it. Deal with it ๐Ÿ™‚

Also visible in this picture is a baffle added to the tank. It is tacked to the sides of the tank with about 3/8″ gap between it and the bottom.

Sadly, it is at this point that I also reach another decision, or more accurately, the legacy of an earlier decision, and it turns out to be a bit painful.

I have opted for external plumbing so that I can remove the in-tank fuel pump and lower the tank in the frame. This will in turn let me lower the body, which needed to be raised to clear the top of tank. By not thinking this option through way back when I drew up the design for the tank, I didn’t account for the tank extension interfering with the axle in the lower position. It almost sits on the axle in the lower position.

After much hand wringing, I have decided that the lower tank and subsequent lowering of the body is more important than the extended capacity of the tank. So, I will lob off most of the extension.

The single vertical line is where I will cut. This will still add at least a tiny bit of capacity and will under no foreseeable circumstances interfere with the axle. I had considered moving the bottom of this section up, which would allow only a little bit more capacity and would let me keep the plumbing as it is, but would still have a chance of interfering with the axle.

And to be clear, it’s not the axle I presume would be damaged in the collision, but the fuel tank, right there over the exhaust pipe for cylinder 3 and right next to the spark plugs. Lets keep the fuel encapsulated until it’s in the cylinders.

In a related design shortcoming, the fuel level sender, as layed out recently, is directly under the same body brace that I need to lower the tank in order to clear. On the plus side, with the new shorter top, I can cut from both the front and the back of the top to make it fit and in the process move the sender forward or backward away from the brace, whichever seems best.

This change will also hurt my plans to make a nice extended fuel filler neck. I will need to simply move the neck off the old tank. I have looked for a new neck. The only ones better than the one I have are weld in parts for aluminum. Maybe the next tank can be aluminum.

This delay has allowed me to come up with a checklist for what is needed to get this trike well on the road and I’d be fibbing if I didn’t say it will be tough to make it by Labor Day. They are in no particular order:

1. The fuel tank completed, duh. Finish cutting, welding and lining. Includes new plumbing, cleaning of fuel lines and probably the injectors.

2. Wiring issues resolved; there were a couple of emergency repairs made because wires were so short that they pulled loose from the back of the fuse block and were pretty much unreachable for repair.

3. Wiring diagram; optional but almost a requirement to get all back working.

4. Brake master cylinder reinstalled.

5. Brake slave cylinders replaced (optional, but highly desired; need front wheel cylinders instead of rear)

6. Footpegs painted/powder coated and mounted; will involve cleanup grinding of attachment area on frame tube and possible refitting of mounting flange to tube.

7. Replacement of shifter; most likely, I can just take the shift lever from the new unit and leave the rest of the old one in place.

8. Ignition switch placement. This should go in the fiberglass, but I am afraid it will not be a simple project and may do extensive damage to the paint if not done perfectly. Considering putting it down by the shifter. May end up with temporary alternative, probably using the headlight switch on the control pod.

More Cutting…

Last night, I rough cut the rest of the fuel tank panels.

I was able to clamp on a straight edge and follow it for all cuts.

I haven’t perfected the offset yet, so I do have some parts that might need a little more trimming.

A simple straight edge, clamped at an offset from the cut line, works pretty well. The wire standoff guide is far from ideal, though.

In any case, I have a stack of panels, ready to trim, clean and assemble!

The Long Awaited Parting

I have, after MUCH delay, began the construction of the replacement fuel tank for Puff, the dragon trike.

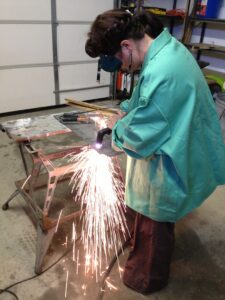
Stacked two 2′ squares of 16ga mild steel and plasma cut them simultaneously….

Here is the basic plan:

The layout is intended to use as many of the factory sheared edges as possible to help keep the parts as square as possible. I would love to have used one 5′ long 8″ wide strip for the top, bottom and ends, but I don’t have a bending brake. I have found many inexpensive brakes, but they tend to be limited to 20ga and smaller material. There is a substantial jump in the cost of tools that can bend 16ga. So, instead of about 11 feet of seams to weld, it will be more like 25 feet.

The dotted circles on the top piece are for the filler neck and fuel level sender.

There is a dotted circle shown on the bottom piece is intended for the in-tank fuel pump I am currently using, but I don’t like it hanging out of the bottom of a tank that is already pretty low to the ground, so I am considering plumbing this tank for an external fuel pump. On the other hand, I already *have* the in tank pump, it has a pressure regulator attached and it needs no return line plumbing.

Not shown in this drawing are a couple of baffles to be added to the bottom to minimize sloshing. These will simply be panels tacked to the sides and bottom of the tank, arranged and/or cut to allow free flow of fuel, but not totally free movement.

Long Time!

It’s been a long time since I’ve updated here… Been busy with reloading stuff and even that has been slow to update lately ๐Ÿ™‚

Trike stuff has been slow, but not static. Since that last update, Spongebob has had the most blogable action.

Though it was not immediately apparent, while being stored for a while, Spongebob leaked a lot of oil. Turns out that what really happened is that the fuel tank cap did not vent correctly and the pressure was able to overcome the float valve and flood the engine with fuel, which eventually seeped to the crankcase and overflowed it. This became very apparent when I was rolling the trike out to attend a monthly BTW meeting. It first acted like the battery was nearly dead, which was not unexpected. Unknown at the time, the engine was actually in hydrolock and not able to turn over. Keeping at it, I cleared the cylinders, but when it started up, oil poured everywhere.

Though it would be a few days before I got to it, I drained the crankcase and refilled with fresh oil and started it up. It still leaked oil at too high of a rate to operate, so I presumed the event had damaged the front seal and I again left it for a while.

When our vagabond friend John came to visit, he got interested in effecting the repair, as taking Spongebob for the occasional spin is one of his favorite activities, so I let him tear into it. He replaced the front seal and did a lot of cleanup on the engine, as well as a number of other related work. Even after that, if the cap was properly closed, it would do the same thing. For the time being, we were leaving the cap loose unless the trike was underway somewhere. We also installed an inline fuel shutoff valve. That that seemed to have prevent it from happening at all, though it’s not really in a convenient spot to operate all the time.

I opened the cap and reduced the spring tension on the vent mechanism by trimming out a couple of coils. My redneck test of sticking it on my mouth and blowing indicated that I had reduced the required pressure by about half, but in use, it still fails to vent before it blows past the float valve.

I then fashioned a tank vent by putting a fitting in the filler neck and attaching a length of hose to it. There is no pressure build up, so no overcoming the float valve!

In proper followup, I probably need to replace the float valve. Chances are that it may have been damaged by the over pressure situation.
Then comes the day this weekend when we are again wanting to take the trikes to a BTW meeting. I had tried to start the trike the previous weekend when were were attending a birthday party. It would crank and crank, but not start. We were short on time that day, so I didn’t do any other troubleshooting. This time, however, I had a little more time and put some more time into it.
I found a badly cracked rubber vacuum cap on one of the carburetor vents. In my experience, that wont usually prevent it from starting, though it can make it run very badly. It took a while to find the package of caps I had, but of course that didn’t make any difference. It seemed to be getting spark, but I didn’t smell fuel. I started tracing that down and found, surprise, the inline valve was off. Opened it, turned the key on and heard the tone of fuel pump change as it pressurized the system. Hit the start button and he lept immediately to life.
I pulled both trikes over to the house and hosed off the dust; not really a good wash, but roadworthy. We headed in to Fort Worth for the meeting.
As we got close to our destination, the other trike began running rougher and rougher and eventually stopped… in the left turn lane on the access road where we needed to cross over and u-turn to get to the meeting. Try as we may, it would not start. We waited for a clearing in the traffic and I pushed Gabby into a sharp right turn. The road had a bit of a hill on it and she tried bump starting it on the hill and, surprisingly, it started! We were going to try to see if we could make it to the meeting before it died again, but it didn’t get far at all. After another try or two at bump starting it again, we gave up and parked it. Gabby climbed aboard and we headed to the meeting, arriving late, but arriving.
After the meeting, a crew of folks went with us to troubleshoot and it was determined that the alternator belt was loose, very loose. Loose enough to prevent it from charging, which apparently let the battery run dead enough to not provide a reliable spark, which seems to be what stranded us. Also why a bump start worked for a bit, with started not pulling the voltage down.
After establishing that there were no shims left to remove in order to tighten the belt, one of the crew produced a spare belt from his parts stock and we installed it. Well, I say we, but nobody made room for me to help, but I let them do it for me. ๐Ÿ™‚
By then, the battery had chemically recovered sufficiently enough to start and the now tight enough belt was actually charging. Long story short, the trike was reliable for the rest of the day and even had noticeably brighter lights. Amazing what you miss if you don’t look for it.

Give me a lei! Its a Lua!

Sadly, no luau…. no roasted pig… no pineapples. Lua is scripting language supported by Vera. Generally speaking, it’s how you do stuff they didn’t already build in.

I mentioned that I have my pool pump turning on or off by a schedule and I have managed to get it to turn on when the temperature sensor goes below 36 degrees. That temperature may be set lower at some point, but for now, I want a margin of safety.

What is not ideal is that the schedule can turn off the pump even if the temperature is below freezing. The next time the temperature is polled, that trigger will turn it back on but that is a bit inelegant and potentially dangers. What if something suddenly stops the temperature sensor from polling for long enough for the exposed filter hoses to begin to freeze?

There are several examples of Conditional Scene Execution and I have lifted the Lua code below and attached it to the scene that turns the pump off.

local dID   = e3    — Device ID of temperature sensor
local tHigh = 37    — Highest temperature of range
local allow = true  — true runs scene when in range
local tCurrent = tonumber((luup.variable_get(“urn:schemas-micasaverde-com:device:TemperatureSensor:1”, “CurrentTemperature”,dID)))
return ((tCurrent >= tHigh) == allow)

I lifted this snippet pretty much directly from the forum then edited to be appropriate in my environment. I don’t really have range of temperatures where I want to allow the pump to turn off. It’s pretty much the one temperature. Below that, don’t turn the pump off.

I looked at the “Settings” tab of the temperature sensor to get the device ID and the “Advanced” tab to get the urn: details. I chose 37 degrees as the set point because the trigger to turn the pump on is 35 degrees. Hopefully, this ensure some hysteresis to prevent the pump from cycling back on if the temperature is hovering at 36.

Once I’m sure this is working, I will add a trigger to turn the pump off above some fairly warm temperature, say 50, to prevent it from running all day just because it happened to be chilly at 6AM when the schedule went by.