The Road Home

The weather turned out to never clear up. We decided Sunday morning that we’d rather take a meandering way home instead of adding a long return trip from Fredericksburg. Next time. We took a couple of small side trips, decided against a couple others and neglected to make a shopping stop we’d planned to make. When we got home, we had time to unload everything from both trikes and go inside to relax before it started raining. Perfect timing. Unlike the engine…

The starter gave me no trouble first thing in the morning at the hotel, but it did surprise me a couple times during the day. For example, I killed the engine a time or two at a light or in some other traffic situation and it chose then to just go clunk instead of turning over. Continued stabbing at it was generally successful and it would start perfectly when the starter would finally turn the motor. When we were nearly home and stopped for a late lunch, it wouldn’t start in the parking lot until I’d pounded on the solenoid a bit.

The Autozone starter has a lifetime warranty, so I don’t expect any difficulties in exchanging it, beyond the minor pain of changing it out. Way easier than on a car.

The other problem I had may turn out to be my own fault, at least partly. During the course of the weekend, especially on Sunday, the engine got worse about hesitating at takeoff, which contributed to the afore mentioned killing at stoplights. It got to where I would keep it reved to around 2000 RPM at stops.

As Toni napped on the couch last night, I did a lot of vacuum advance distributor and carburetor selection research on the internet. Lots of good data there, if you have the patience to wade through the irrelevant, or at least unrelated, stuff around it.

For the big picture, I think it comes down to this. The Solex H30/31 carburetor provides a vacuum advance signal, but it is a fairly weak signal, intended for the stock vacuum advance distributor with it’s large vacuum dashpot. The distributor I have has a smaller dashpot and is probably intended for the 34PICT carburetor, which provides a stronger vacuum advance signal. I also have learned authoritatively which port the advance is supposed to connect to. Armed with these bits and without the performance anxiety of a crew of lookers-on, I will see if I can make this combination work. The new carburetor started and idled nearly perfectly out of the box, so I have done no adjustment on it at all. I will adjust it as best I can with either the new distributor with no vacuum attached or if I must, with the 009 reinstalled. If after that I still can’t get the vacuum advance to work correctly, I will see if there is any change I can do to the distributor, maybe change a spring or something of that nature. Finally, I will replace it with the $160 unit from aircooled.net that is made specifically for the H30/31 carb.

In any case, it occurred to me this morning that I don’t remember ever tightening the clamp on the distributor. I remember looking for my 10mm socket for that reason, but I don’t remember actually doing it. In adjusting the throttle cable a time or two, I had to remove the distributor cap and may well have moved the distributor. Besides, an unclamped distributor is subject to movement just from being on a running engine.

So, at lunch, I checked it. Sure enough, it’s not clamped down.

The other issue was the speedometer. The cable was squeaking Friday night. I oiled it Friday night and it was quiet Saturday, but still apparently broke at some point. I had my GPS bungied to the tank, partly because I wanted to check the speedo against it. After the speedo died, I just bungied the GPS to the face of the speedo and used it all weekend. While I probably can just replace the speedo cable, we have a new VDO electronic speedometer that I picked up intending to use on the Harley trike before I succumbed and ordered the actual replacement Harley speedo.

Electrically, the VDO speedometer is going to be trivial to install. A pickup coil that I can probably wind myself and a few magnets attached somewhere, probably one of the rear wheels, a little geometry and programming and it should come up easily. The trickier bit will be mounting it. I found some VDO gauge mounting cups, the back of which is not 100% water proof, but I’m sure can seal it well enough and it will otherwise work and look really good.
Road Trip!

Due to interruptions, it took until Friday night to finish getting the yellow trike road worthy once more.

One of those interruptions was a dead starter. Luckily, I had the troubleshooting braintrust of fellow BTW members at the clubhouse, for our monthly meeting had just ended and everyone wanted to see, point and contemplate. Zipped down to Autozone for a replacement starter, back to the clubhouse to install it and zowie, does it spin over better.

Finished the last bits of it about 1AM and took it home for the night.

We wanted to go to Fredericksburg, but were getting such a late start, that we decided to just head south out of the metroplex and go as far as we felt like going. Once we got to Stephenville, it didn’t seem all that far to Brownwood and from Brownwood, not all that far to Fredericksburg. I am posting this from a hotel room in Brownwood.

We will decide in the morning whether we want to continue to Fredericksburg, or perhaps more importantly, whether we want to trek all the way home from Fredericksburg tomorrow afternoon.

The trike has done well with a couple of exceptions. The flat spot that the distributor was supposed to improve is slightly better, but far from gone. Similarly, and likely related, rather than the nice low idle we’ve been enjoying, it seems to want to idle at about 2000 RPM. The throttle appears to not be returning well. At this point, I suspect it has something to do with my running the throttle cable in at a lower angle in an attempt to reduce throttle effort.

The air shocks were deflated to ease their removal (actually, the removal of the baja cage) and until we were underway it didn’t occur to me that a few issues were symptoms of the ride height being too low. I didn’t have a gauge handy, but I zipped a bit of air in there, enough to raise the already high rear end another inch or so. It went back to riding quietly. Once in Brownwood, we wanted to seek out a place for dinner. We decided to go two up on the trike. With just Toni’s added weight, it got all kinds of squirrely, most disturbingly a lurchy kind of sway. Circled back around to the hotel and with her off it, it settled right back down. It didn’t do that with her up there when we rode around the neighborhood on it the Friday we were leaving for Turner Falls.

Finally, we found good food and finished eating. When we ready to leave, the trike cranked twice (they are a bit cold natured, ya know), but then stopped cranking. The solenoid was clicking, but the motor was not turning.

Long story short, I whacked on the solenoid a few times and next time, it stared fine. We’ll see about the morning.

70-something Stires Trike

I found and purchased my VW trike even while I was working on Buzz so perhaps needless to say, I am planning to ‘squirt it, too.

As is wise in such endeavors, I have been gathering some parts that will be needed for it.

I have the in-tank fuel pump from a Ninja 650 motorcycle. I think it will be easy to put it in the existing tank which is basically a welded up cube.

I am slightly concerned that the sump may hang down low enough to drag, but there is room to move the tank up on its mounts, too.

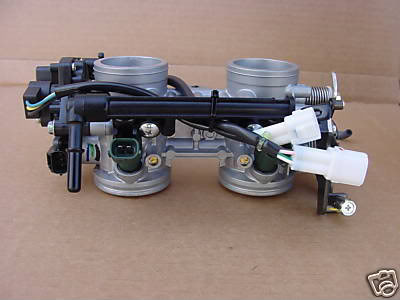
I have a set of thottle bodies that were supposedly from a KFX450, but appear instead to be from a Ninja 650 or maybe a Versys. The throats of this set of throttle bodies are set at 75mm between centers, which corresponds to the spacing on several Weber and Delorto carburetors that are popular on VW engines, so it should be pretty easy to adapt them to readily available manifolds.

The EDIS ignition I got for Buzz could not rev as high as Buzz’s engine, but will work perfectly for the relatively low reving aircooled VW engine. There is ample precedent for adapting trigger wheels from various Ford engines to the crank pulley on the VW.

I will probably borrow the WB O2 system off Buzz, probably temporarily, but maybe permanently.

After those items, the biggest thing left is the controller itself. I’d like to use a Microsquirt, but I will probably just get another kit from DIYAutotune.

More to follow….

Clutch trauma

Ok, I think I see what happened.

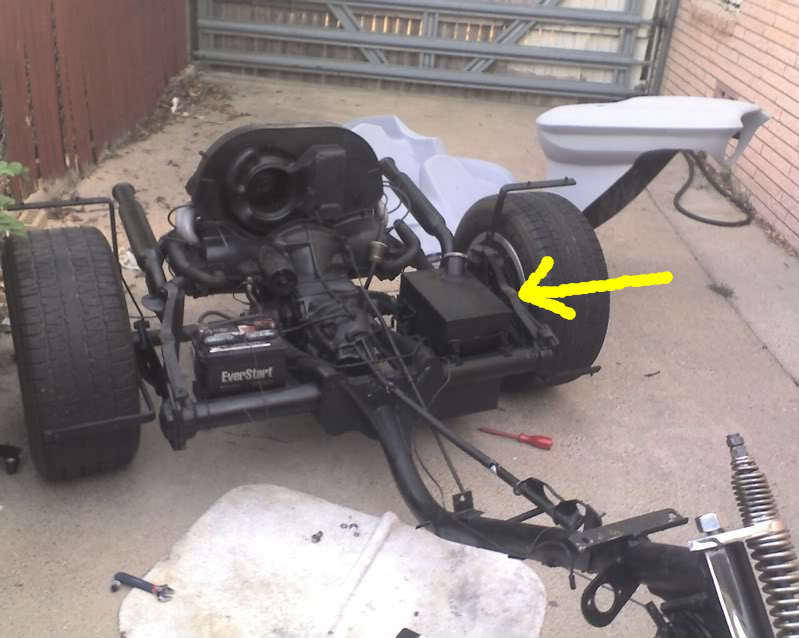
Before I could get to the clutch, I had to remove the baja cage. While I appreciate the desire to mount the cage securely, they had welded a part that, for a street vehicle, I think I would have bolted. Removing the cage meant removing both of the monster bolts which hold the main engine/transaxle support to the frame. Of course, in my naivete, I removed the first and was partway through removing the second before I realized that I was in the process of crushing my arms under the combined weight of the engine and transaxle. Luckily, I did realize it in time 🙂

Furthermore, I am spoiled to the extremely easy access that my trike affords to the four bolts holding the engine and transaxle together. The bodywork on the yellow trike definitely impedes access to these bolts.

Then there was the extraneous piece of metal that used to hold up something long gone by bolting it to the engine, but now served only to keep the engine and transaxle loosely connected to one another once all the bolts were removed.

You may recall, though I doubt it, that this post is about the clutch.

I think the real problem was adjustment. I had the clutch arm adjusted so far down, to make it disengage easily, that when I rested my foot on the clutch at a stop, it pushed the throwout bearing WAY too far. Repeated sojourns into this extreme position eventually wrenched the spring clip off one pin of the bearing, which then dangled from the remaining pin and ceased to engage correctly. The spring clip can be seen resting comfortably at the bottom of the bell housing.

Examining the cross shaft while still installed, the ends of the fork arms (fingers?) appeared to be bent, which would further indicate that the resting weight of my size 13’s is beyond the design limits of the clutch system. Once I had the cross shaft out, however, the semi-circular cuts that mate with the pins on the bearing do not appear to be distorted, which I would have expected if the forks were bent.

So, since I was in there, I replaced the cross shaft, cross shaft bushings, the bearing itself and the spring clips. The new cross shaft has wider fingers, so while the old ones did not bend, the new one almost certainly wont. On the other hand, the spring clips are of a slightly different design, with a full turn of wire at the spring end. They are substantially stronger than the simpler U-shaped springs. This concerns me slightly in that if, despite my efforts, the clutch is still not adjusted like it needs to be, the wider fork fingers might wrench off the spring clips again because the clips are too stiff to just spring out and back. Shrug. I’ll find out soon enough.

It seems that the slave cylinder will “pump up” somewhat, regardless of the amount of bleeding I’ve done. I must conclude that it is a design characteristic. If I adjust the clutch such that it operates correctly with one step on the pedal, I run the risk of a second step, as could very well happen in normal driving, could potentially pump it up far enough to exceed the physical limits of the throwout bearing. The main saving grace is that the new components seem to engage the clutch earlier in the step with the adjustment set almost to mininum, giving it more room without crashing. Only driving it for a while will truly tell.

While the engine was out of the way, I replaced the badly worn transaxle mounts. I also cut the welds on the lower tubes of the baja cage so that it can be installed and removed without pulling those big hairy bolts which hold pretty much the entire drive train to the frame.

I took the opportunity to add a connector to the ignition and oil pressure wires and an inline fuel valve, all which will allow the engine to be removed more easily in the future.

Finally, while the engine was out, I rerouted the throttle cable from the original location (red arrow) to a new, lower location (green arrow) in an attempt to achieve a better pull angle on the carb and thus a lighter effort at the hand throttle. Throttle effort is slightly lighter, though less so than I’d hoped for.

I picked up a vacuum advance distributor today. I hope to install it tomorrow evening as well as reinstall the baja cage and thus the shocks.

That should put it back on the road.

Sad day in mudville

Well, ok, the rains came late enough to not really affect much, and even then it was not any kind of flood, but how can I pass up a great title like that?

There was a bit of disappointment. We got up Saturday morning and met up with Roundman, planning for breakfast. With Toni on Gilbert and me on the as yet unamed* yellow trike, we went from the hotel into Davis proper for breakfast, then back to the hotel, then on to Turner Falls Park. As we approached the entrance, I was having trouble downshifting. Once I was stopped, I realized that the clutch was not disengaging and that it felt wrong, with no “step” between free play and actually pushing against the clutch.

While looking at the cylinder and working the pedal, the hydraulic line popped out of the fitting on the clutch master cylinder. When working on the clutch bracket Thursday night, the slave cylinder end came loose. While I attributed both breaches to installation error, it is apparently fairly common. I got more than a couple of suggestions that I should change the lines to steel because the plastic, while the material can handle the pressure, is subject to enough distortion that it can slide out of a compression fitting. Changing them to steel will not be particularly difficult, requiring only that I bend the tubing and add a flexible piece for the clutch slave cylinder.

In any case, the problem appears to be related to the throwout bearing and/or the cross shaft that actuates it. While the actual replacement of those parts is not particularly difficult, it *does* require pulling out the engine and while it’s out, we may as well clean/paint/replace all the tins, etc.

As for the rest of the trike-in, I proudly rode bi*&h with no loss of manhood and we towed the yellow one around behind my truck for those who wanted to see it.

While we missed taking a lot of pictures, at least we took a few, mostly of trikes that caught our interest for one reason or another.

We dropped the trike off at the clubhouse last night and are definitely planning to be there tonight to tear into it. Toni may even get a throwout bearing and cross shaft today. They should usually be replaced any time they are exposed, just because they are cheap parts that are hard to get to.

* concerning a name, one that we really hope doesn’t catch on occurred to me. “Sponge Bob Square Trike”

On the road

It’s been a couple of days. Working too hard on the trike to update the page!

In the last couple of days, we got the thing back on the road. In fact, I am updating this blog from an Oklahoma hotel room.

We didn’t *ride* up here, though. Just enough doubt to not want to finish a refurb this major then just get on the highway with crossed fingers. We towed it up here and will ride around the area with all the other trikers at Turner Falls 🙂

Biggest adventure was last night. About 4:30 or so, I was putting the clutch slave cylinder back on and noticed that when working the clutch, the casting that the cylinder bracket is hooked to was flexing several millimeters. I figured it wouldn’t last long like that, so I repositioned the bracket to pull at a different angle. Apparently, that was a bad idea because about the third time, the casting broke off.

Long story short, my first bracket was not holding up and was eventually scrapped and remade. This one appears to be holding.

Otherwise, all the hit list has been cleared and a few things added along the way.

I have been up till 3AM for 5 days in a row and have an opportunity to be in bed before midnight, so I’m going to end this update. I promise to provide a better update later….

Wow, another good day’s work

The rules of the place where the BTW clubhouse is hosted prevent us from doing certain “obvious” work during the day, but we are able to do quiet time work. We arrived about 2PM and left about 2AM.

We had a todo list and knocked these items off it:

degrunge tranny and frame
paint frame
paint trim
make dashboard
license plate light
alternator light
oil light (wiring done, but switch is bad; need to replace)
finish shifter
breather hose
spark plug wire keeper
handlebar and mirrors
first clear coat (more about this shortly)

There is still a substantial list, but I’m fairly confident it’s a one-day list.

As for the first clear coat, we’re using Duplicolor “Paint Shop” ready to spray paint, which greatly simplifies things for the do-it-yourselfer. No need to thin it, almost no need to strain it, but you should anyway. It cleans up with acetone. All in all, easy to use.

They also have a clear with prismatic sparkles in it. It looks great over the yellow, but it looks stunning over black!

We’re planning to shoot a couple coats of plain clear over it for depth, but wow! It looks pretty nice like it is.

Lick O’ Paint

We accomplished quite a lot today. In short, got the pedals on and operational and got a first coat of paint on 95% of the trike.

The pedals went extremely well. The brakes were even easy to bleed. The bad news, and it’s pretty minor, is that upon reflection, I don’t think the wheel will clear the fittings on the pedals in the event of a hard turn while braking, so I will need to move them. It’s just a matter of drilling 4 news holes.

The paint was really an all day affair that Toni was working on before I finished the pedals and could join in. In no particular order, we masked off large portions of the trike, removed the fuel tank, cleaned a LOT of surface with acetone, finished painting the front wheel, painted the ‘faux’ tank and the body of the trike. It will definitely all need another coat and we ran out, so we’ll have to buy another can.

Diversions

Just about the the first thing that happened yesterday was that the driver side power lock actuator on my wife’s truck jammed. I spent about an hour getting it out, figuring out how it works and removing a gear to allow at least the key lock to work. Today’s projects will include securing a replacement and installing it. I found one at a wrecking yard for $40, about half the price of a new one.

After laying out and drilling for the pedals (the weights are soft cast iron and thus drilled very easily), we needed longer bolts. It was lunch time anyway, so we closed up shop, got lunch, bolts and matting to cut for the floor, all of which took a couple of hours.

We got a really good start on painting, especially the troublesome front wheel. The reusable aerosol can from Harbor Freight works pretty good for paint, so long as it’s thin enough. The spray head tends to sputter pretty badly when the air pressure begins to drop off, but it’s easy enough to keep it filled up.

I just barely got going on the pedals when a good friend called needing a rescue for the flat rear tire on his Suzuki M109. It’s a huge bike with a wide tubeless tire on the back and the bead had come unsealed, so there is no getting it to air back up so long as the bike is sitting on it.

We cleaned up the shop and I headed to Dallas with a trailer and picked him up, about a 3 hour adventure. It never fails to warm my heart to see someone who REALLY appreciates what you’re doing for them. My karma is balanced.

Speaking of diversions, I have been gathering some parts for the eventual EFI of my trike. The only thing left is a 36-1 trigger wheel. I think I have the plan for mounting one on a stock VW pulley, of which I now have at least a couple.
All that’s left after than is the manifold and all the work.

Since when last it ran, my trike engine was exhibiting symptoms similar to the yellow trike, I think I will see if the same thing seems to be happening with it, a leak around the throttle shaft in the carburetor. If so, I will borrow the new carb from the yellow trike and get the rest of my engine tuned and operational before I attempt the conversion, but I see no reason to spend the money on a new carburetor for my trike when the plan all along has been to run EFI and almost all the the major parts are in hand.

Busy Update

A lot has happened since the last update on the as-yet-unnamed Yellow Trike.

On the way home that afternoon, I picked up the control switch from Mid-Cities. It appeared very solid and had nice long leads.

That evening, I had enough of a break in the rain to allow me to rearrange the driveway so that I had the trike under the 10×20 garage tent that we use to expand the driveway. When the rain really came down, I still got soaked with a lot of mist, but at least I was out of the direct precipitation, so I could continue to work even in the weather. It was still pretty miserable. 🙂

Just about the first thing, I worked the throttle a couple of times, gauging how much work it was going to take to get throttle effort down to a more reasonable level. As I was doing that, smoke suddenly started emitting from all along the frame tube and another pocket of smoke came from the battery area. My first thought was to turn off the key. Um, I hadn’t turned on the key. So, the only other electrical control was the headlight switch, so I toggled it a time or two. The smoke stopped, but as I suspected, it had nothing to do with the light switch.

The previous owner had a cigarette lighter socket on the left side of the dashboard. It turns out that when I moved the handlebar, working the throttle, the wire feeding the lighter socket had gotten pinched between the triple tree and the dashboard, shorting to the dashboard. Whether the 18g speaker wire powering the socket burned in half somewhere along its length or if my panicky gyrations had relieved the short, I don’t know, but the wire was now good and melty.

I should probably mention at this point that, as some builders will do, EVERYTHING on the trike except for the starter is powered from the same power lead going through a 30A self-resetting circuit breaker. Even doubled up 18ga will yield before a 30A breaker does.

After that little adventure, I tested everything else… well, everything that had previously been working… and found that no other damage was done. I had a moment’s panic when steam formed off the exhaust. Looked a little too much like smoke 🙂

So, now began the task of wiring up some lights to the new switch. Of course, that meant decoding the existing wiring.

The wiring was essentially functional, and since people I know know the previous owner, I will say only that I don’t think automotive wiring was their first language. To their credit, the trike is several years old and they rode it all over the country for most of those years, so it couldn’t be TOO out of whack. There appears to have been a few repairs done over those years, wiring spliced and respliced, often with what was apparently the wire on hand. There was THHN insulated 12ga spliced to PVC insulated 14ga, using crimp connectors that had seen inside the jaws of a pair of vise-grips. Though I was under the gun to get the trike inspected the next day, I determined pretty early that I would be rewiring the whole thing.

The switch pod is pretty cool. It’s designed to help make a dirt bike street legal and most features are to that end. It has a parking light/headlight switch that actually has an off position. According to the installation sheet, this switch is intended to serve as the main switch in the absence of a keyswitch and pretty much everything depends on this switch being on. It also has a press-to-cancel turn signal switch, a horn button, a kill switch and a blue high-beam indicator LED.

It took till late in the evening, but I got it in place and as operational as I could. The front signal lights were pretty pitiful, so Saturday morning, we got some nice little lights from Mid-Cities and I returned and finished up the wiring and took it to be inspected.

Our usual inspector was out of motorcycle stickers, so we had to find an alternate. Now, inspections are a minimalist affair in Texas, pretty much verifying you have insurance and that you aren’t so stupid that you drop the bike. Consequently, it’s pretty standard faire for a motorcycle to be inspected on a trailer or in the back of a pickup. This guy refused to do so, insisting that I ride it into his shop. First time EVER that’s been an issue. When we told him that we’d never had to do that before, he said that the state requires it and those who don’t are not following the proper procedure.

So, I get out in the rain, unhook the trike from the trailer, uturn on the side street and pull it around into his garage. After this is done, he begins the proper procedure for inspecting a motorcycle in Texas. This procedure *apparently* consists of not testing the brake lights, turn signals, headlights, horn… He doesn’t test anything, but he fills in his paperwork and puts on a sticker.

I prefer to think that he just didn’t want to get out in the rain. In any case, the trike was now legal. Probably.

We took gathered some general working supplies and tools and such and arranged to meet a keyholder at the BTW clubhouse where we could work on the thing under a roof with lighting and powertools.

First order of business, get the wiring stable.

Very quickly, I decided that stabilizing the existing wiring would likely result in years of psychological therapy, so it needed to be scrapped. It took several evenings, but in short, there is now a fuse panel, relays and terminal strip in one of the storage boxes. I found a Honda keyswitch in the club junkpile that fit the forks and had keys, so I was able to eliminate the dashboard. This put more wiring to front, but I was still able change the ugly frayed bundle of wiring into a nearly undetectable sheath that has far more circuits in it. The only existing wire left are leads coming out of lights and the distributor.

I started the trike on the new wiring at 11:57 one weekday night, barely meeting the goal of “finishing the wiring tonight”.

Well, even so, it’s not *quite* finished. The oil and alternator lights do not yet have a place on the as yet unmade instrument panel. The speedometer is mounted on it’s original bracket, but the bracket has been flattened and cut to mount with the keyswitch. I will be making a replacement of this bracket with room for these and other indicator lights.

Some place in there, the newly covered seat came back. Almost immediately, we saw that it was not up to the usual standard of the shop doing the work. We took it back and had them tighten up the fit and generally just redo it. This time, it came back looking like it should.

The next big thing that needed attention was the engine. It was not obvious when we tested it out, but it would not idle when warm. In reading about idle problems with aircooled VW engines, it seemed like a vacuum leak. Long story short and $160 later, a new carburetor eliminated the leak around the old one’s throttle shaft. Oh, my, what a difference it made! It’s fun to drive now!

It’s too bad, we now have a very clean yet utterly useless used H30/31 PICT carburetor. Somebody makes a throttle shaft bushing kit and I may experiment with that, for my trike has similar problems that were undiagnosed when last I played with it.

We also got quite a few engine dress up items like pulleys, distributor cap, wires, coil cover. At this point, we’re going to wait to replace the tins, but they will one day be either replaced or painted.

Besides paint, the last *big* thing is the replacement of the pedals, which I’ll be working on today. We got pedals with a 3/4″ and a 7/8″ master cylinders, nylon lines and a new clutch slave cylinder. I’ve already made a bracket for the slave cylinder, to eliminate the side loading inherent in mounting a cylinder in place of the stock cable. Installing the new pedals will involve cutting out the old foot throttle and obviously the old brake and clutch pedals and their linkages. The biggest problem I see, short term, is that I must drill through the old weights welded to the bottom of the floorboard in order to mount the new pedals.

Sluggy Blogs All The Subjects