Home Automation really is a kind of delicate balance of things that really aren’t supposed to happen at all, so when it all works, we are so happy. Even though it was a pain in the butt, I found this particular failure somewhat entertaining. I also learned a bit in fixing it.
We have a Roomba. There are a few places where I have deployed Roomba Virtual Wall devices to corral her (Your mileage may vary, but I’m pretty sure mine is female) and keep her out of areas where she will get into more trouble than she can get out of. One such area is under a chair where there is a floor mounted outlet with an extension cord plugged in and another is under a couch where that extension cord continues and powers a lamp at the far end of the couch. This lamp is equiped with a smart bulb, specifically a CloudFree Tasmota based smart bulb.
The batteries have gone out in virtual wall under the chair. Roomba was thus not restricted and in her wanderings under that chair, the cord was partly dislodged. This left a bad connection for the extension cord and intermittent power to the lamp. This was not detected immediately and the condition may in fact have been present for several days without incident. Last night, however, I walked through the room and upon stepping on the rug that this furniture is on, I saw the lamp flicker. That made me investigate and in that process, it would appear that the timing requirements of reboot cycle reset sequence were satisfied (either just then or perhaps earlier) and the bulb began flashing, a sure indication that it had been reset and lost it’s configuration.
It would take a while to discover the details but it would turn out that it had been reset hard enough for the ESP8266 controller in the bulb to have forgotten what it was connected to, to have forgotten that it was once a light bulb!
The ESP32 family of microcontrollers is extremely popular with manufacturers of smart devices. It is designed to do that sort of thing. Tasmota is essentially a replacement operating system for ESP32 microcontrollers, writen specifically to support the kinds of peripherals that common smart devices have on board. Many smart devices have the necessary physical connector or at least the solder pads on the circuit pad to connect to and reflash the device’s storage so that off the shelf devices can be ‘upgraded’ to Tasmota.
In the case of my CloudFree smart bulbs, the come from CloudFree already flashed with Tasmota and ready to use. Chances are that these are the same smart bulbs that some other company (or many other companies) sells, maybe Tuya or someone else, but they are still just a mass produced Chinese product with some LED peripherals connected to an ESP32 controller.
To operate an LED array, the GPIO pin needs to be configured as a PWM output, whereas to operate a switch, it would need to be a digital output. There are a handful of options. Tasmota simplifies controlling these options by a shorthand called templates. You create a template with a string of parameters that tells each pin how to operate and by extension, what controls to expose for those pins. It really is quite clever.
Mind you, I didn’t know any of this. I just knew that, once I got my bulb back on WiFi, it still didn’t work and that my other two working bulbs had full menus and under Configure Module, they had “CloudFree LBC” as the first choice and that was not even on the list in this bulb.
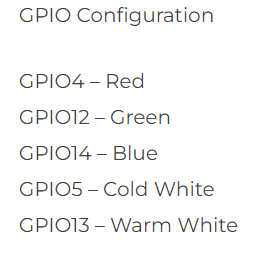
Google helped less than I would have hoped, but looking at CloudFree’s website helped a bit. On the description page for the bulb was some info that I would think would not normally be in the *sales* info for a smart bulb:
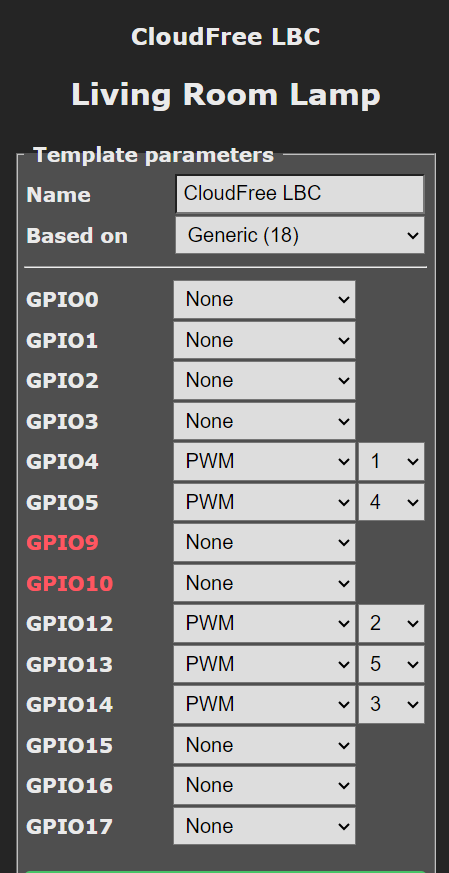
Of course, by itself, that doesn’t help, but it lead me down the right path. I remembered this screen when exploring the menus on my subfunctional bulb:

The pulldowns have various functions, such as Button, Switch, Rotary, PWM, etc.
I figured that I could duplicate the settings from one of my working bulbs and get a long ways towards restoring the functionality.
Now, in a bit of storytelling license, I didn’t show you the whole page, partly because the problem is already solved, but this page is called “Template Parameters” and it has the template name “CloudFree LBC”, which is the missing module name from the earlier mentioned list. From here, it is easy enough to duplicate a template, but it turns out that there is an even easier place, under Configure Other.
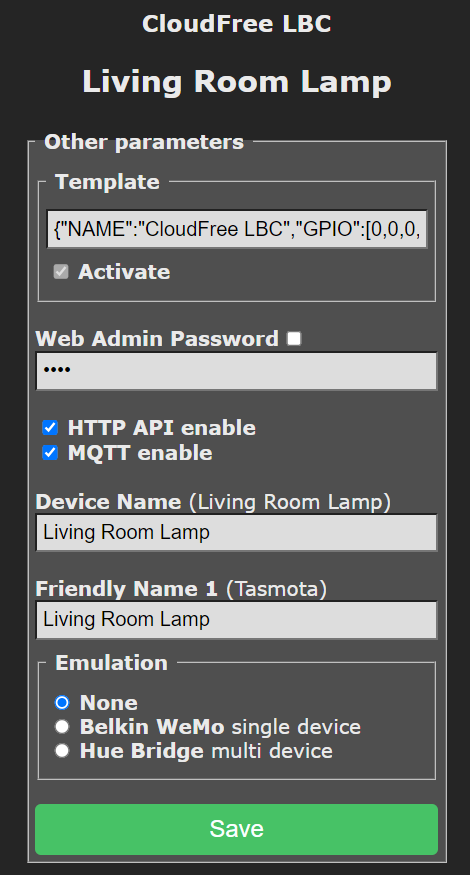
The single line in “Template” is a comma delimited list of the parameters from the “Configure Template” page. One copy from a working bulb, one paste here, one restart and suddenly, “CloudFree LBC” is once again an option. Another restart and the bulb is working again, just like that.
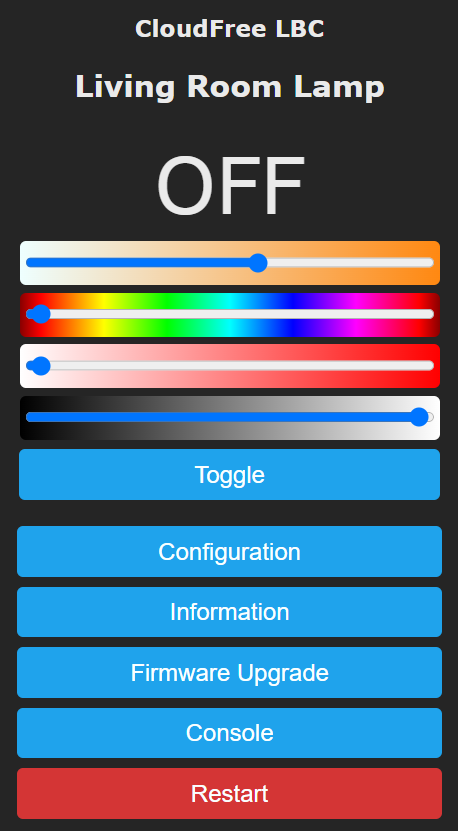
To be clear, Tasmota does ALL the heavy lifting here. Once Tasmota knows a port is PWM, it knows to give the main screen a slider to control it. The PWM parameters tells it the GPIO pin is a member of a 5 channel RGBCCT group, and which member, with channels for red, blue & green and two white channels for adjusting color temperature in white. Tasmota builds the main screen with RGB color, white color temperature and separate brightness controls accordingly. I do wish the white brightness was adjacent to the color temperature slider like the RGB brightness is next to the RGB color, but oh well.
Looking back at the CloudFree bulb sales page, red, green and blue are on GPIO 4, 12 & 14 respectively. Cool white is on GPIO 5 and warm white is GPIO 13, so those are 4 & 5 respectively in Tasmota.
I already like Tasmota for how easy it was to configure these bulbs and some switched power monitoring outlets I also got from CloudFree, but this shallow little dive into the inner workings lead me to appreciate it even more.