Ok, last path metaphor, I promise.
Plus, while it was extremely maddening while it was happening, it was actually resolved pretty quickly and could have been resolved three different ways. Really, other than its temporary effect, I probably shouldn’t say anything.
Before all that happened, I had been slowly resolving little issues bit by bit.
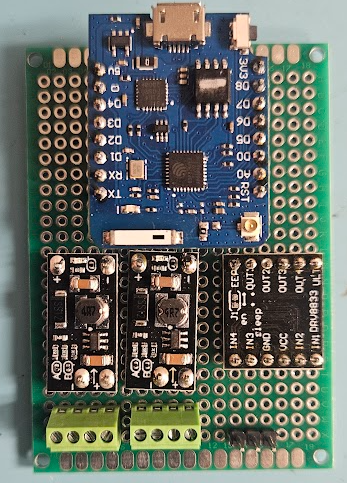
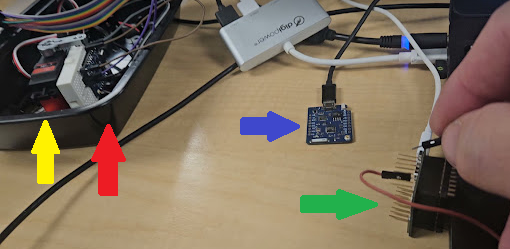
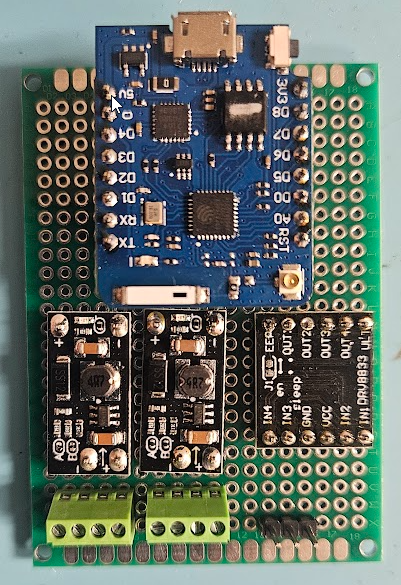
I have assembled what might be V1.0 of the Activator hardware board. The Trigger hardware board will probably be very similar, if not identical. Really, identical board with different software could be ideal.
I say might because I find that I do not care for these particular green terminal strips. When I ordered them, I was expecting larger units. There is not a good sense of scale here, but these are eyeglasses sized screws. Actually, you can see that the screws are about the same size as the solder pads on the circuit board, which are about 0.075″ in diameter. I have already cross threaded one by opening it too far.
Otherwise, from left the right, the first terminal strip is for the battery negative and positive and the external power switch. The next strip is for the plunger reset warning light and the plunger sensor switch. The three pin header is for the servo that trips the plunger.
Above the connectors, left to right are the 5 volt regulator to run the controller, the 12 volt regulator to run the warning light and possible future things and a dual H-bridge board that currently drives just the warning light.
Finally, above that is the star of the show, a clone of the unbiquitous Wemos D1 Mini Pro, so called Pro because it has an external antenna connector, which will be handy since this board will be inside a steel box.
I had two power mishaps with this board. Really, it was one power mishap that caused two problems.
When I was researching what equipment to shoehorn into this system to implement wireless, I had some realizations that could be visualized like rungs on a ladder. First, I knew that my controller board was necessarily going to have to take up some space and my Activator device is pretty crowded inside already.
One step up on the ladder.
The industrial relay that protects the lock motor, while a very robust device, is at it’s heart a very simple device that takes to continuous power from outside and limits it to a short half second or so pulse to the lock motor. I will be providing that lock motor power locally now, through my controller board, which is smart and can do the time limit function. The industrial relay is also pretty big, so removing it might be enough for both my controller and the battery.
Next step up on the ladder.
The lock motor runs on 12 volts. I did some measurments and found that during it’s brief moment of activation, it pulls about 4 amps. If I limit it to less than about 3 amps, it doesn’t pull hard enough to reliably trip the plunger. That is not a terrible amount of current, but as I look around for commerical off the shelf 12V 4A lithium batteries with easy connections and easy charging solutions, they all tend to be kinda big. Way bigger than the space vacated by the timer relay, leaving no space for the controller board. Batteries of other chemistries are even bigger and don’t work as well, so I didn’t even look.
DC to DC boost converters are thing these days. Actually, I have had a really successful history with multivoltage DC to DC converters back in my robotics days. Unfortunately, those blogs were lost ages ago. Anyway, I shop for converters and in a field absolutely flooded with converters for 12 volts INPUT, the few that I could find with 12V output tended to be physically large multivoltage output units for 48V+ input or if they are boost converters that work at smaller inputs, they are never more than 1A out. There are a few exceptions in the $50 range and I really want to avoid those if I can.
I did play with the *voltage* on the car lock and found that, so long as it had plenty of current available, it would reliably work all the way down to just under 6 volts. 7.4 volt LiPO batteries are common and RC car batteries have commonly available connectors and chargers. I found some reasonably high Ah rated batteries and a nice charger that wasn’t stupid expensive and got them on the way, along with some appropriate connectors.
Next step up on the ladder.
Next, I knew I needed to power the controller. I have a couple of options. I can power it from the USB jack with a converter connected to the battery, but it seems more elegant and controllable to supply 5 volts to it externally. I have batteries coming and I did find some nice 5V 1A DC-DC converters in my earlier shopping, so I found them again and ordered a handful. They came in a package of 10, very inexpensive.
Next step up on the ladder.
Big epiphany, with the controller board, I can directly operate a servo! This eliminates the need to ‘protect’ the lock motor and a servo is significantly smaller than the lock motor. I can power it directly from the board or even directly from the battery if the 5V 1A supply is not enough. That will also ensure I have more room for my RC car battery.
Next step up on the ladder.
I had tested the nice big warning light that I want to put on the Activator to remind people to reset it. At the time I chose this one, everything was running on 12 volts, so it made sense to get 12 volt lights. I got a variety of colors. I particularly expect to use red for the Activator light and red, yellow and green on the Control Box. Experimentally, I connected a red light to 7.4 volts from my bench power supply. It lights up, but not very brightly. It will almost certainly be hard to see outside even at full brightness. I need 12 volts for at least the light. Luckily, the same DC-DC converters I ordered above are actually adjustable for 5, 8, 9 or 12 volts output, so other than having to add it to the board, problem solved.
Next step up on the ladder.
This week, I had some time to tinker and got the board built and populated. I don’t think I connected power to it before verifying the power, but more on that in a minute. With the controller board out, I connected one of my batteries and found that the 5V board was outputting 7.9 volts. The 12V board was good, but 7.9V is not 5V.
The default tiny zero ohm resistor jumper settings on the boards is for 12V, so for the 5 volt board, I just removed both of them. I looked carefully to ensure there was not a solder bridge. I alternately shorted them to ensure they they indeed changed the voltage. Only with both shorted did they provide the proper 12V output. All three other settings were higher than they were supposed to be.
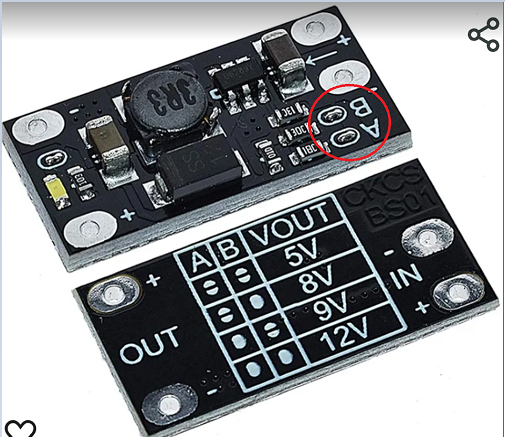
While I was looking up this chart to verify that I did indeed have the jumpers correct, I noticed the error of my ways. This little board is designed for 3.7 volt input.
At some point I briefly looked at 3.7 volt batteries and I’m sure these converter boards ended up in my search history at that point. Later when I just wanted converter boards, I remembered them but I was too high up the ladder to see the the voltage 🙂
As luck would have it, 3.7 volts works fine for me, other than the expense of having purchased some 7.4 volt batteries that I don’t technically need, at least not for this part of the project. My charger will work for them, too.
However, I might choose better DC-DC boards.
I mentioned that these are inexpensive boards. $10 for a 10 pack. The voltage selection chart silkscreen on the actual board is completely illegible. All four setting for A & B look identically blotchy. And for what it’s worth, the output power pins are spaced 0.4″ apart, but the input power pins look at a glance like they are 0.2″ apart, but they are not. They fall somewhere between 0.2 and 0.3″. The output seems to be good for about 6 watts. The specs are somewhat iffy, but hints that higher voltages are probably at less than the 1A specified for 5V. The examples they give all work out to slightly more than 5 watts. This is fine for my needs. I don’t expect to need more than 150mA for 12V.
Until I put Activator board together, I’d been running this controller on either a laptop USB or a USB power pack. Now that I had it put on the board and running on my bench supply standing in for the 3.7 volt batteries that were enroute, it was nice to leave it on the kitchen table where it was close enough to hear the servo cycle, but but off my desk which was cluttered enough with the Trigger and ControlBox modules so that I could hit the buttons on them and observe the display on the ControlBox. For some reason, I had to interact with the Activator. I don’t remember why. While I was near it, I smelled that classic ‘something is hot’ smell. Since I had thrown over voltages at it earler, I finger probed and discovered that the inductor on the 5V board was pretty hot to the touch. I immediately shut off the power supply. I pulled to control board off, turned on the power supply and noted that the voltage was indeed 5 volts, so that’s good.
I presumed that the little 1A supply was having trouble keeping the controller and the servo both supplied, so I rewired the servo to run directly off the battery. That is a little below spec for it; it is rated for 4.8 to 8.4 volts, but in testing, it worked fine and still pulls plenty strong. I do not expect it to be a limitation for the Activator sear. Of course for the testing, the controller was plugged back in and in just a little bit, I smelled ‘hot’ again. I probed the power boards again and while it was not as hot, the 5 volt board was definitely getting warm. I probed around on the controller and ZOWIE a chip on the board was hot enough to immediately cause pain. I removed power again and pulled the board out. It turns out to be the USB serial chip. Once it cooled off, I plugged it into a USB cable on my laptop and it got seriously hot in a couple of seconds, so it definitely has a problem.
As mentioned earlier, I don’t think I connected the 7.4 volt battery to the system with the controller in place, thus applying basically 8 volts to its 5 volt input, but I can’t authoritatively say never. Plus, after working for weeks under various conditions, it acted up the day it was running on the new carrier board. The CPU seemed to be working, by the way. The USB chip was smokin’ hot, but even before I discovered it was baking, the device was responding to ESP-NOW messages and operating the servo. I’m just not sure it would have lasted much longer.
Happily, I have one not in current use, so I could swap it out. It is a slight pain to update the MAC addresses in the software to use the new device, but at least this one doesn’t sterilize the air around it. As these are my favorite boards for this application, small cheap boards with the external antenna connector and not a lot of unecessary IO, I may need to order a few more of them. I do have some 40 pin ESP32s with external antenna connectors, so I’m not without a way forward if needed.
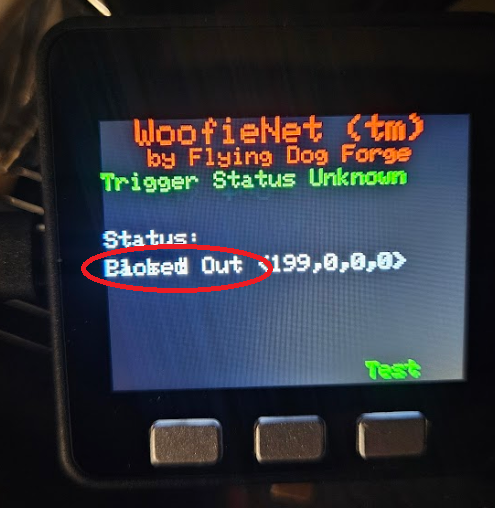
In other hardware news, I have been using a slick device with a built in screen for the ControlBox unit. I don’t know if this will be the final controller for the ControlBox, but it has it’s advantages.
It is an M5Stack Core. I originally got this for ESPHome use and HomeAssistant, only to find that it was not yet supported there. I have not rechecked lately. Anyway, it is an ESP32 in a nice case with a few built in goodies, most importantly for this, a 320×240 TFT display and three front mounted buttons. It also has a speaker, a TFCard slot and, while I’m not sure how long it can run on this, it has a 110mAh battery built in. I am thinking about building a little program to send a message to another module once a minute, with the other module logging the time and see how long it lives.
For use as a real ControlBox controller, it has one drawback. There is not a really strong way to secure external connections to it. It has a row of exposed pins on one side and exposed pin jacks on three sides. The pins are not ideal ones for reuse for my purposes and the pin jacks would be even more difficult to really secure the connectors to for a device that might get tripped over or dropped and has to travel on gravel roads in someone’s trunk or pickup bed. In the long run, I may need to use some descreet components for these setup.
But for now, it seems a good way to start, with a caveat.
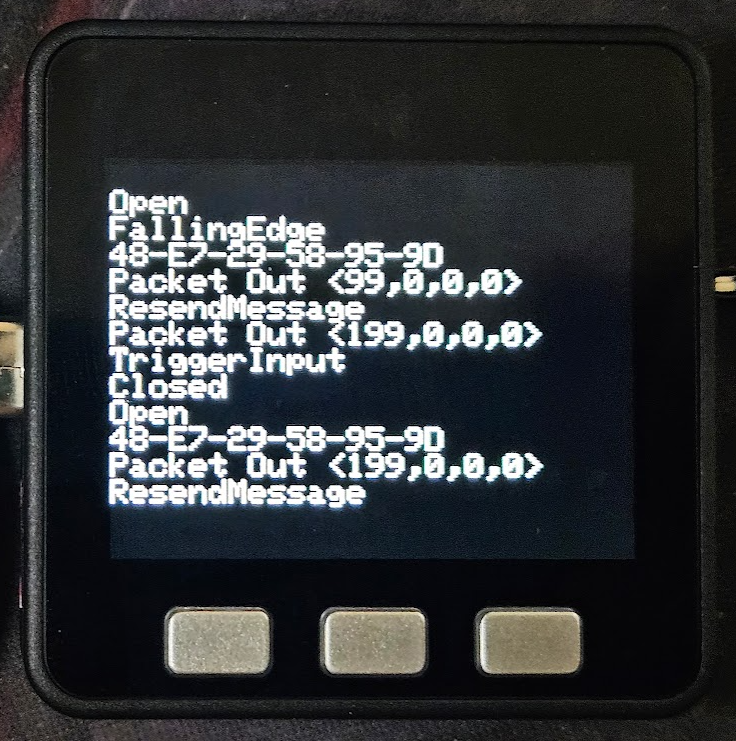
This was before I had it doing anything with text fields. I was sending stuff I would normally dump to Serial0 to the TFT instead.
I have found that, like many of these small hardware displays, or at least the libraries written for them, you often can’t just throw text at it and have it behave the way you would like it to, like scroll like a classic screen. On the screen as shown above, I can send one more line to it, then any subsequent lines will just continue to clobber that bottom line, text written on top of existing text.
Visuino supports text fields. The field is located anywhere on the screen by x-y pixel coordinates then prints text you provide with the font, size and color attributes your provide. But so far as I can find, there is no clear command. Subsequent text clobbers what’s already there. Argh.
I had been working on this issue reiteratively in what spare time I have for a few days now. I have a nice title bar and I intend to determine and display the status of the two (currently) available remote devices and provide a 3-4 line messages window of scrolling messages about whats going on, trigger received, trigger sent, test sent, device needs reset, etc. I have a label over one of buttons at the bottom of the screen and if you push that button, it sends a test trigger to the activator. All of these things work, until you put enough text somewhere to clobber what’s already there.
The only way I have found to clear the screen is to literally clear the entire screen, write it black, then rewrite all this stuff back to it. That seems completely ridiculous and it puts it on me to maintain a screen map somewhere. That’s not what I want to do. I want to make my hardware do stuff and print stuff on the screen to tell my users what my hardware is doing for them. The IDE should know how to make the *display* do stuff.
Sparse documentation is a recurring theme here. For example, these are two very similarly named components:
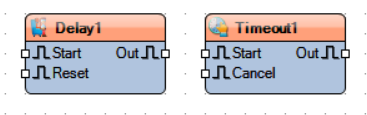
If you get context sensitive help for Delay, you get a Wiki page with thin but not entirely useless descriptions of the settings for the component and what the Start, Out and Reset pins do, as well as links to some example projects that happen use it.
Maybe Delay doesn’t do exactly what you are looking for. Logically, it seems like Timeout might do a similar kind of thing but attempt to get context sensitive help for Timeout and you just get:

It offers that you can search for it in other places, but so far, that has universally not helped on anything I have searched for. I suppose it could happen. Maybe I haven’t looked for the right thing yet.
Which brings me indirectly to my brief but severe irritation last night.
Regardless of this irritation with the documentation, I like the product. I was able to reach a working point with my devices very quickly. As always seems to be the case, a lot more time goes into the user interface than to the actual device (especially if you can’t figure out how it works). Anyway, I had been running on a 15 day trial version of Visuino Pro and there were two days left. I saw no reason to not proceed with the purchase. I looked at the version matrix and while I had been running the Pro on trial, I didn’t see anything in the Pro column that I was actually using, so I elected for the Standard version with a 1 year subscription for updates. The purchase, install and registration went through without a hitch. It automatically opened after installation and I pulled up the ControlBox project and played with it a bit. After a little while, I needed to open a second instance to make a companion change to the Trigger project. When did that, I noticed/remembered that I still had Visuino Pro installed and, fatally, decided to pull up control panel and remove it.
Long story short, had I removed Pro before installing the Standard version or reinstalled Standard after removing Pro, things would have been ok, but the removal of Pro removed all the components from the Visuino library folders. There was some minimal number of components that I guess are built in to the binaries and support for only the Arduino Uno R3, but my projects now spawned a huge list of errors, most of which were missing components and many of those were specific to my missing board. Once I had seethed down to being able to write without being overly abusive, I dashed off a note to Visuino support. I don’t remember exactly the details, but in short I wondered why the uninstall script would remove user files like all my components.
Interestingly, all of this was loaded on my work laptop, which heavily uses Microsoft OneDrive. Not long after my note to support was sent, OneDrive serendipitously popped up a dialog asking if I wanted to permanently delete the several thousand files I had deleted recently. I dove into that dialog and found that I could restore the folders that the Visuino uninstall script had deleted. I ran Visuino and everything was happy as it could be. I was was exhausted and shut everything down and went to bed!
By morning, I had a reply from Visuino support, patiently telling me that a reinstall would most likely fix it and that my own projects were safely stored elsewhere. I am certain that is true and I will probably do that because in restoring those folders, I am sure I now have some Visuino Pro components that I have technically not paid for. Then again, the program and/or license may be smart enough to prevent them from working. Shrug. As I noted when I looked through to version matrix, I wasn’t using any Pro components, which consisted mainly of FFTs and other such advanced data processing components. Interesting, but not applicable to anything I am likely to need for yanking on chains by novel means.