Act I: Somewhere deep in my first catchup post in this blog, I related that I had acquired a couple of nice TPLink wireless routers with the intent to mesh them together so that the house and workshop would be on the same SSID, only to discover that this particular router apparently cannot be a mesh client in that situation. Further, none of the mesh clients in that product line support ethernet backhaul, which is pretty much required for this specific situation.
Act II: Enter home automation and a sudden propagation of WiFi IoT devices. I am not in any real danger of running out of IPs in my main LAN. It would also be trivial to just expand it if I were; it is all RFC1918 address space, with the exception of dealing with the work VPN and the RFC1918 subnets routed there. However, best practices would have the IoT stuff separated from the rest of the network in case they get somehow compromised on the internet and many of the home automation devices need no internet access at all.
With these two related goals in mind, WiFi roaming and multiple WiFi networks, I shopped around and decided that a couple of Ubiquiti APs would serve this need. Between Ubiquiti being affected by chip shortages like everyone else and a ceiling mount not being my first choice for various reasons, I got two in-wall APs as the best compromise that was also not too expensive.
While they were enroute, I knew that I would need the controller console software running somewhere. Ubiquiti marketing really makes it sound like one of their hardware hosts is the only option, one of the Dream Machine or Cloud Key devices, but they have downloadable software that can run on a variety of OS platforms. You don’t really need the software except for initial setup unless you want to track statistics, so it can be run as needed on, for example, a Windows PC.
Another option is to run it as a Docker container in your NAS.

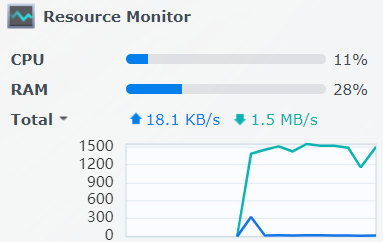
At one time, not that many years ago, I was an anti-VM snob. I was a hardware purist. I have pretty much gotten over that. There is almost no computer that is busy enough to justify doing only one task, especially one server task. Even modest hardware spends most of it’s time waiting for something to do. My Synology DS220+ is arguably pretty modest hardware and I have it recording six IP cameras, hosting my home automation leviathan and now its also the controller for my small collection of Ubiquiti networking components. Oh yeah, it’s still a NAS, too, backing up two computers. And it’s barely clicking over most of the time.
I digress.
There was really only one issue I had bringing them up on this controller. The APs need DHCP option 43 in order to find this controller and that took a bit of research, both in how to format the info and how to implement that in pfSense. It’s not difficult, but it did take some Googling to find the details.

The ’01:04′ tells the AP that the following info is the controller IP, then the next 4 octets are just the IP of the controller in hexadecimal format, 172.29.0.250 in this case.
The related DHCP issue wasn’t super critical, but I wanted to assign static IPs for the APs. I neglected to set the static mapping before I plugged them in, so between the option 43 stuff and changing IPs, I had to have the controller ‘forget’ them, then factory reset them a couple of times to get things settled in.

Interestingly, I had not noticed until I pasted this image that the WorkshopAP, currently in the same room with the HouseAP while we wait for a PoE switch to arrive for deployment in the workshop, for some reason connected via WiFi instead of the ethernet by which it is powered. I will look into that, but I don’t expect that to be a long term issue; that AP will be elsewhere soon.
Meanwhile, I have created my VLANs, subnets and WiFi networks for the redesign. At the time I wrote that sentence, I needed only to update the VLAN configuration in the switch for everything to get talkin’. Little did I know…
As mentioned in the Starlink saga, VLANs are not a proprietary thing, but as I discovered, not all engineering teams approach them the same way or to the same degree. To recap that experience, the TPLink switches would let me segment ports within a switch, essentially dividing it up into smaller switches, but they did not pass that VLAN tagging information on, so no connected switch was aware of any of those VLANs. I had a somewhat more sophisticated Cisco switch on hand, one that as a bonus also provided PoE for my cameras, so I found it a playmate to put in the workshop and I was able to do the VLAN task I needed in order to backhaul Starlink from the workshop to the house while keeping it isolated from the general LAN.
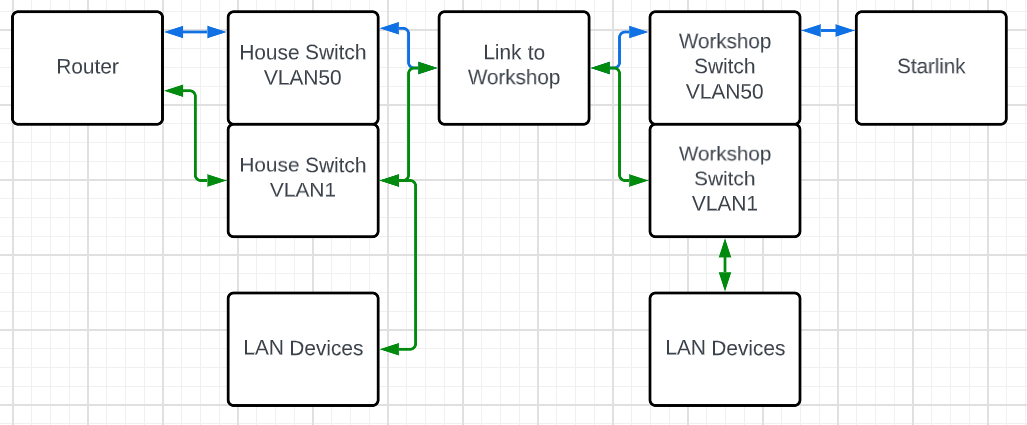
In this diagram, the blue lines are VLAN50, the Starlink backhaul and the green lines are VLAN1, the main LAN. The switches are able to trunk both VLANs over a connection, so whether it was a piece of wire or a couple of wireless devices, the VLAN tagging was preserved.
With the new APs, the task is similar. I want to be able to run multiple isolated WiFi networks, so it would seem to be the same task, but I could not wrench the Cisco SG200 to do the same thing between ports on the same switch after days of trying. On the other hand, I also learned that one weird trick about VLANs and pfSense on the Netgate 1100 appliance.
The path has not been a smooth one, either. During the last several days, I have lost access to the switch multiple times and to the router once. With the switch, sometimes a power cycle was in order, sometimes just moving to a port I had not accidentally lobotomized. For the router, I was able to connect to it’s serial port and restore a previously saved working configuration.
One important and telling troubleshooting step was to monitor DHCP requests with Wireshark. In that process, I could definitely see the discover messages from the AP hitting the switch port it was connected to, but they were not coming back out the switch port to the router. This largely cemented the issue as being the switch not really trunking VLANs as expected.
The solution, as is often the case, has turned out to not be free. I knew I would need a PoE switch switch for the AP in the workshop and since (I guess?) I am kinda slowly moving to the Ubiquiti ecosystem, I ordered an 8 port switch to put out there. I started doing all this VLAN stuff while it was enroute. Somewhere along the way I wondered, since all the UniFi YouTube videos depict this as a largely click and go process, if the new switch would handle it as expected.
Yes. Yes, it does.
When the switch arrived, I first did all the adoption stuff and got it stable. Leaving it with all ports set to the “All” port profile, which is the default and expected to carry all VLANs, I plugged the USW-Lite-8-PoE switch in line between my Cisco switch and the LAN port on the pfSense router, with one of the APs also on the Ubiquiti switch. The VLAN 1 WiFi came up immediately, but then, it had been working all along. I found one thing (the weird VLAN tagging thing for the internal switch in the Netgate 1100 appliance mentioned above) was not quite right due to all the desperate experimentation I had been doing, but once that was corrected, I was able to connect to the IoT WiFi with my phone and get an IP address. It was glorious. I may have peed a little.
I removed the Ubiquiti switch and put the AP back on the Cisco, just to verify that it would fail again, that I had not just finally gotten all the configurations correct, and it definitely stopped working. So, lesson learned: for all it’s other strengths, the SG200-26P just doesn’t handle port to port VLAN trunking, at least not as the AP needs it to deploy multiple WiFi networks.
I then ordered a USW-Lite-16-PoE to replace the SG200-26P. It should be here in a couple of days.
Meanwhile, I configured a port on the USW-Lite-8-PoE for untagged VLAN50 and moved it out to the workshop. It plugged in and Starlink came up working perfectly. The Cisco again handles this sort of VLAN over a trunk just fine, and it doesn’t care that it’s partner switch is not a Cisco switch.
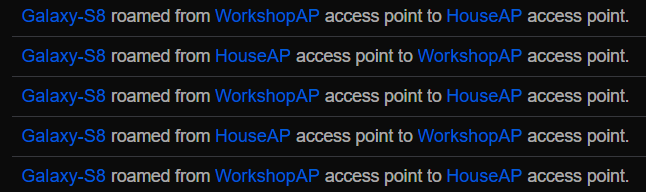
Importantly, the AP out there came up on the main VLAN and I can roam on that same WiFi network between the house and workshop; I no longer have to swap between HippyHollow and FlyingDog.
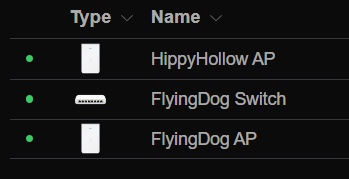
For nostalgic reasons, I will miss FlyingDog. It was a specifically chosen name for the network. I know! I will rename the AP!! Actually, I will rename both APs to what their networks used to be called. I are silly.
Not surprisingly, though, the IoT WiFi doesn’t work from out there, further evidence that the Cisco switch just isn’t passing those VLANs to the router. I am reasonably confident that when the USW-Lite-16-PoE is in place, the various alternate WiFi networks will work from everywhere.
Of course, then I have to start moving all the IoT devices to that network…