I was not fully aware of Starlink as an internet service for a while. I must have started paying attention on or about January 28, 2021, which is the date I received confirmation for signing up for emails about the service.
On February 19th, 2021, I received the email that it was available to order. The email came in around 7PM and it was 10ish before I saw it and jumped on to pay my $99 deposit. In a mere 34,387,200 seconds, it arrived.
Starlink wisely did not email reminders that their dates were sometimes slipping. You have to log in to your account to see the status of your order, which rarely changed. Mine was originally something like “mid to late 2021” then “late 2021” then “first quarter 2022”. In December 2021, it finally said “March 2022”. Since they were willing to narrow the window down to a specific month, I then had the confidence to step up my preparation efforts. The chronology on these various efforts is a bit muddled. I can specify what date I ordered some piece of gear, but for this story, what I did and tried to do are more important than exact dates or times they were tried. It will be like a movie that skips around in the timeline, but it still has a beginning, a plot and an ending. My Starlink kit arrived March 24th, 2022 and it’s working pretty well in my network right now as I write this. This post is the story of making it work.
As detailed elsewhere, I had switched my TP-Link Wi-Fi router for a pfSense router and reconfigured the TP-Link to be an access port. The pfSense router was specifically the Netgate 1100 appliance preloaded with pfSense+.
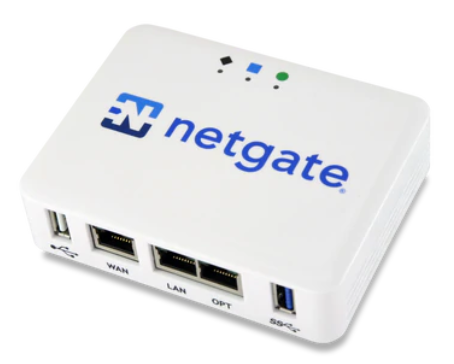
This appliance has three ports, labeled WAN, LAN and OPT. Most commonly, OPT is used for either a 2nd LAN, like a DMZ, or for a 2nd WAN connection, which was my intent.
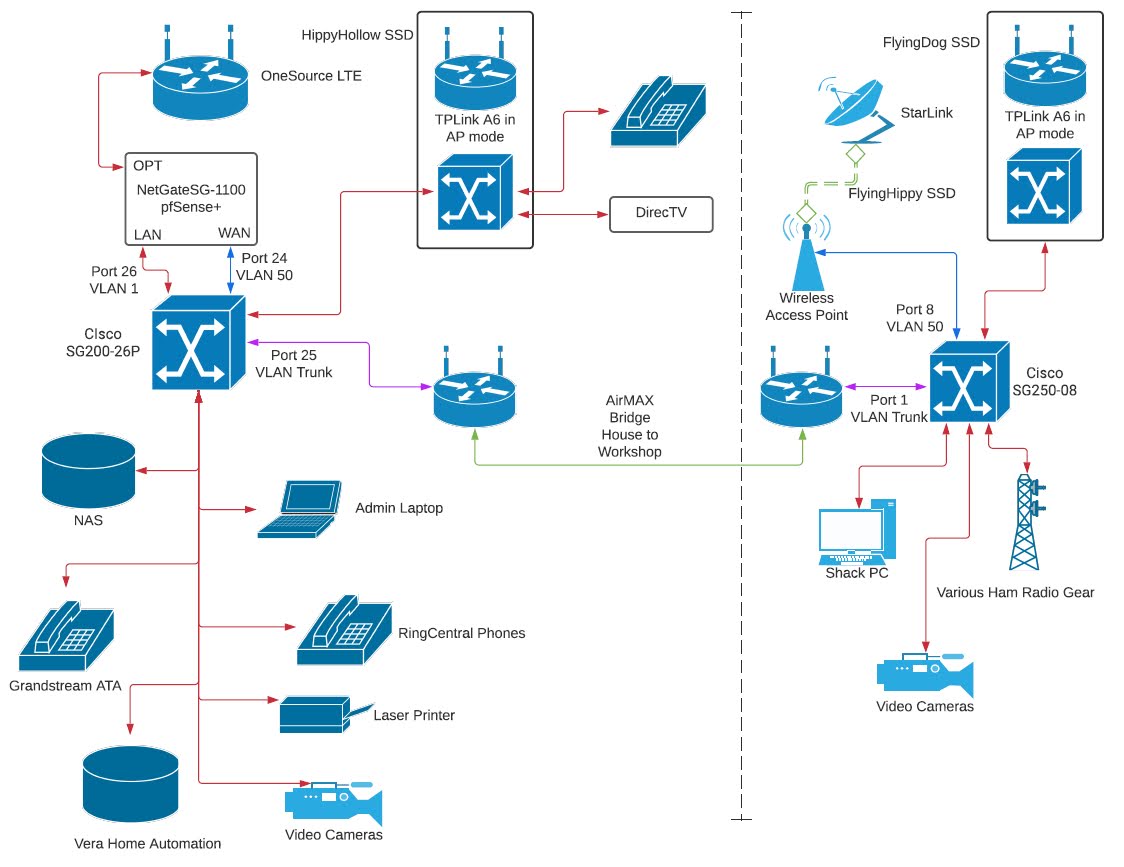
I didn’t really start documenting the network until I had pfSense in place, so there aren’t a whole lot of differences between this diagram and the diagram for the network as built.
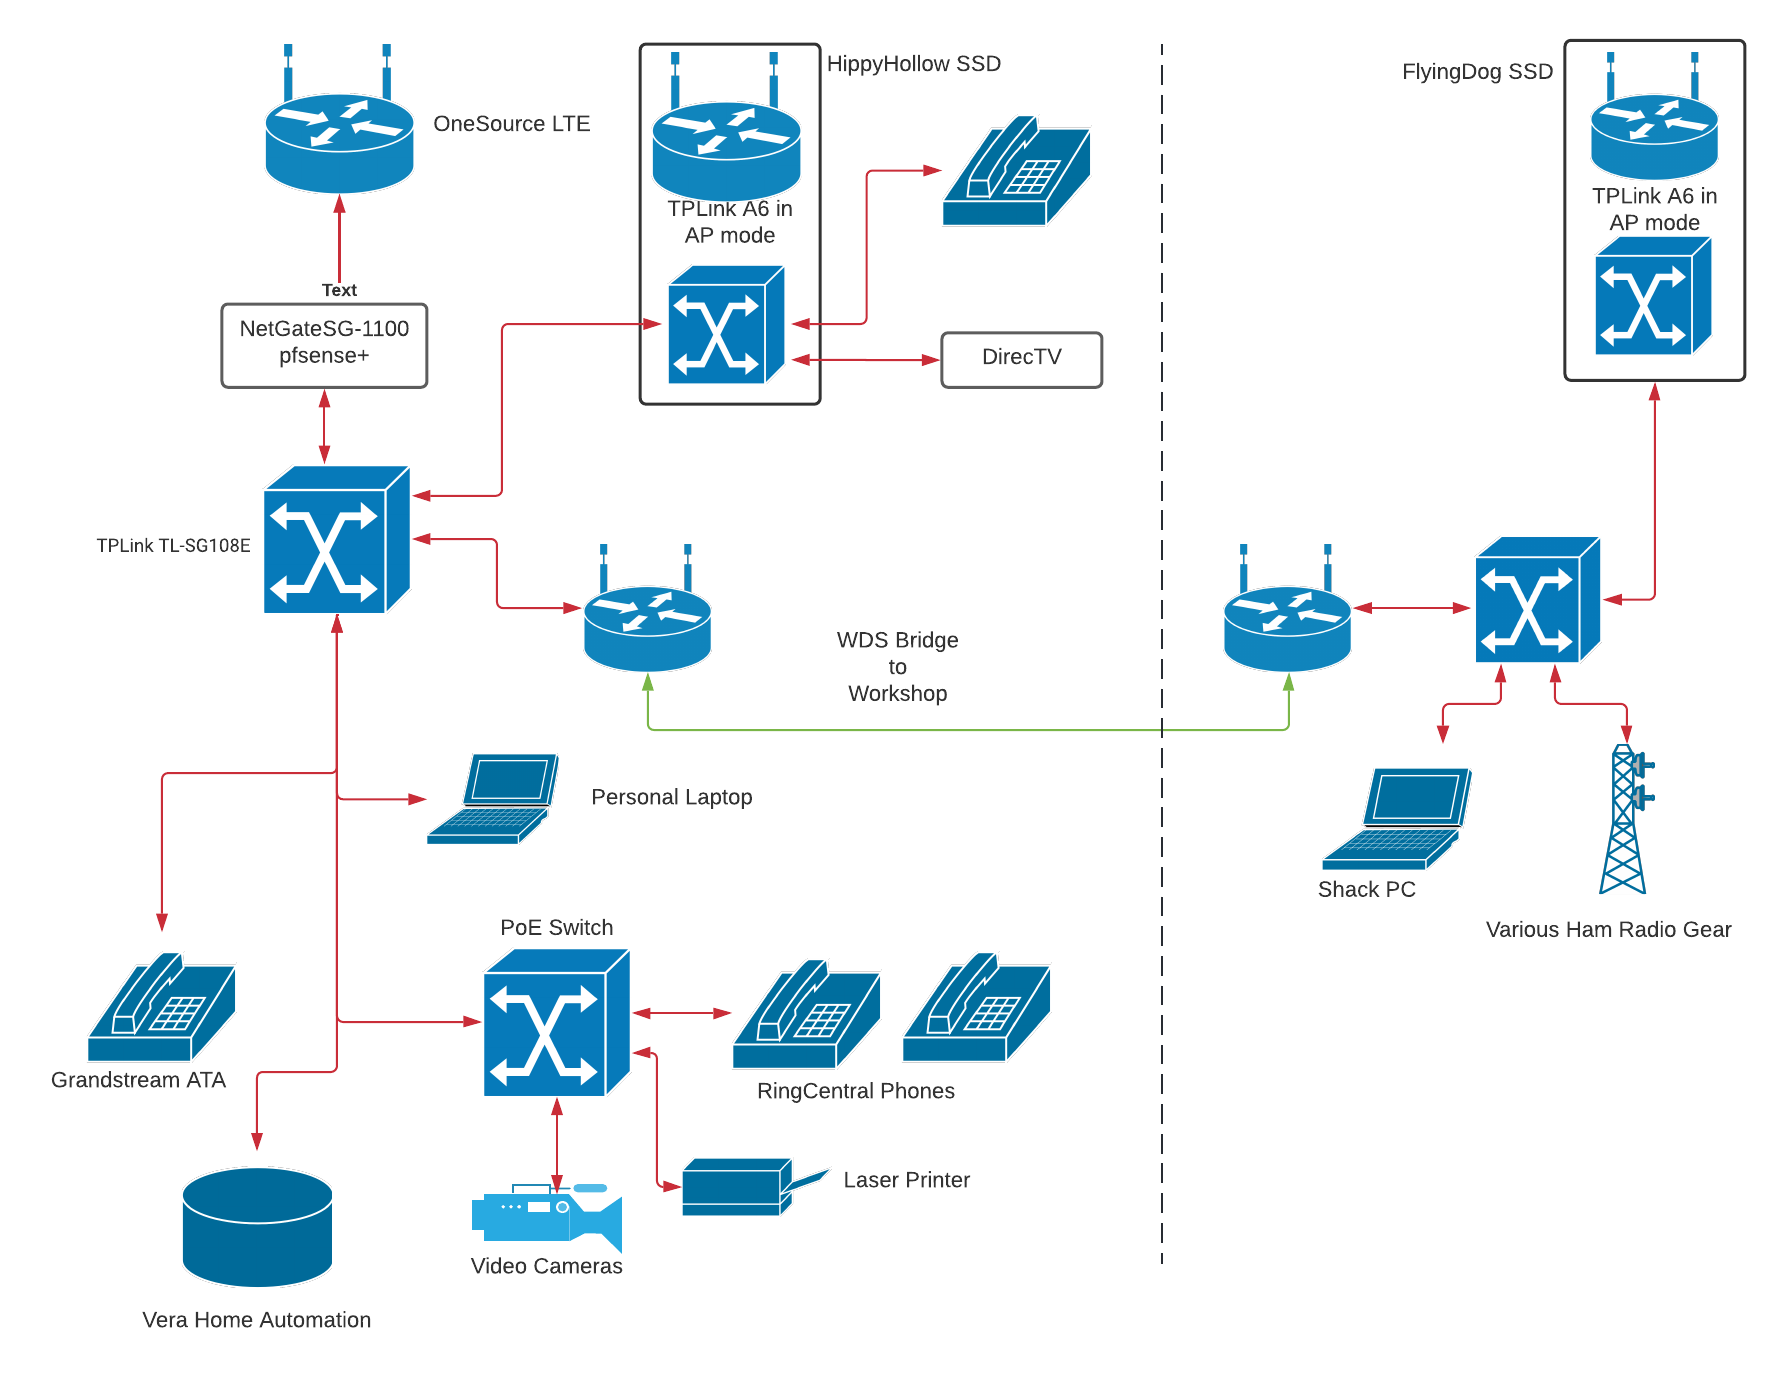
Even as I look at this now, I see a couple of minor typos in text, but this is a pretty good representation of what was in place around October 2021. I don’t remember for sure, but I think this diagram was inspired by the installation of the TP-Link switch in the house. Before this, it was just whatever little 8 port switch I had, maybe a Belkin.
What is not illustrated well here is the number of Wi-Fi devices in the house. Just as I am writing this, there are 25 Wi-Fi devices that I can list, plus a couple of my wife’s devices that aren’t here right now.
Following r/Starlink and other research indicates that obstructions to the dish are a big issue. Also, though I didn’t know it at the time, the dish was likely to orient itself pointing north. From the house, north is pretty much where all the trees in the back yard are, but there are no such obstructions north of the workshop.
The easiest solution I could think of to have the dish at the workshop but connected to the router in the house via VLAN. One port on the switch at one end untagged in a unique VLAN and one port on the switch on the other end untagged in the same VLAN should be all that was needed.
What follows is a completely non-exhaustive description of what a VLAN is. I could be wrong, but this is what I think I know about them.
A VLAN is a group of ports on a switch that are separated by an identifying tag in the ethernet frame. Terminology can vary between manufacturers, but most commonly, the physical port VLAN membership is “untagged”, meaning the frames going in and out of that port do not themselves have a VLAN tag. Internally, the switch tags those frames with the VLAN number. No matter what the device is or what it knows about VLANs, everything on that port is in the same VLAN. Most often, this is also the “default” VLAN, which is usually but not always VLAN 1.
More sophisticated switches will have a VLAN mode for each port, usually “access”, meaning that port provides access to it’s untagged VLAN number, and “trunk”, meaning the switch will pay attention to the tags in frames going to and from that port. A trunk port can allow all VLANs or just a list of VLANs in or out of the port.
The nice thing about a trunk port is that if you have two or more switches connected by trunk ports in both switches and you have everything configured correctly, ports in both switches configured for untagged VLAN 2, for example, will pass traffic between themselves, yet they will be isolated from the other ports on the switch. It is a simple implementation of this characteristic that I am using to backhaul my Starlink dish over the wireless link between the house and workshop, without anything else in the network seeing, or more importantly responding, to those packets.
Lesson one is that even if a switch advertises VLANs, that doesn’t necessarily mean it will do all this. It took a good bit of experimentation to determine that my TP-Link switches, even if a port is configured for tagged VLANs, that doesn’t mean it is actually a trunk port.
In order to connect Starlink to an existing network, it needs an ethernet port. The previous version of dishy, or more precisely, the previous model Starlink power brick, had an ethernet port that could be used for that. The newer rectangular dish comes with a one box power supply/router that does not have an ethernet port. To plug in, you need an ethernet adapter that is cheap enough that I wish they would have just built it in and charged me $20 more. When I completed the dishy order, I also ordered one of these adapters, but it is not expected to ship until mid April. [ed: shipped April 13]
There are all kinds of dishy hacks all over the internet, but for me, waiting for the official adapter is less painful than risking non-warranty damage to the equipment. What I have done in the mean time is use a Wi-Fi extender that also has an ethernet port. I ordered a BrosTrend AC1200 extender, configured it to extend the Starlink Wi-Fi, but I largely ignore that and use the ethernet. It supposedly runs up to 850-something Mbps in 5GHz mode. The bad part is the that ethernet port is only a 100 Mbps port, so that will cap the maximum speed available from this setup to some fraction of 100 Mbps.
When I took Starlink out of the box, it was very simple to set up and use. Knowing it was temporary wiring anyway, I opened the window into the bedroom where the equipment is, fed the dishy cord through and connected everything up. I then moved the dish as far to teh west as the cord would reach, while still keeping away from trees to the north.
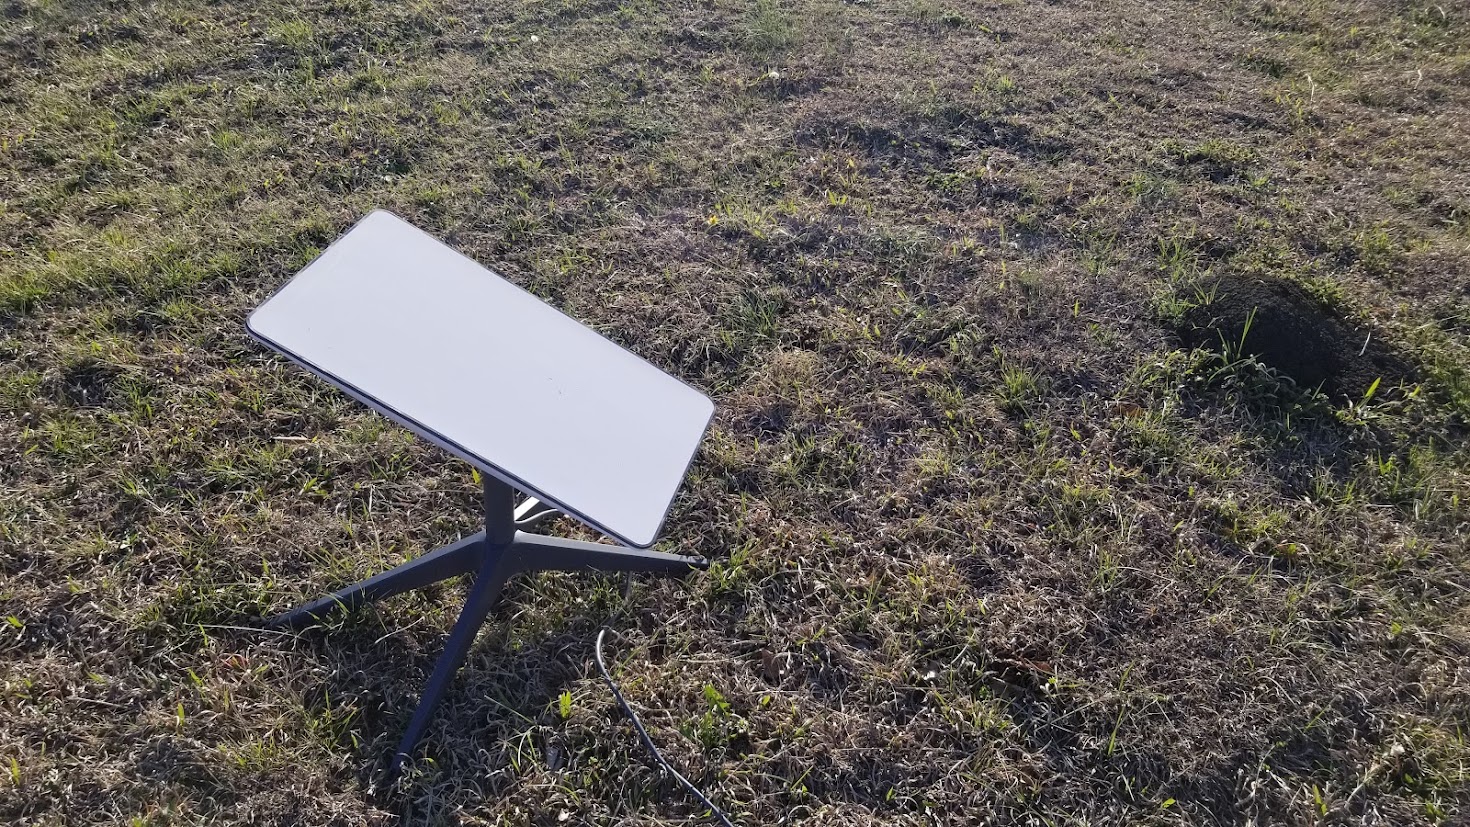
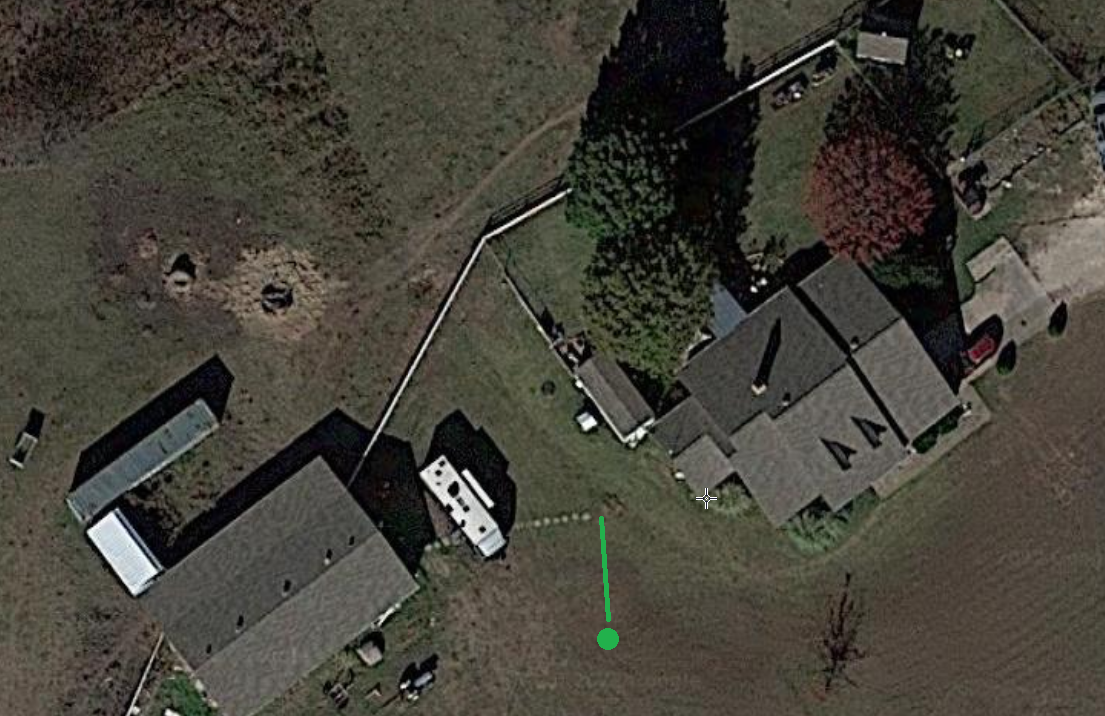
It was about where the dot is.
I powered it up. There was a little interaction with the Starlink app, mostly setting the SSID and password and not much else. After some time, maybe 5 minutes, probably less, it connected well enough to run a speed test. The first one from my phone was not terribly impressive.
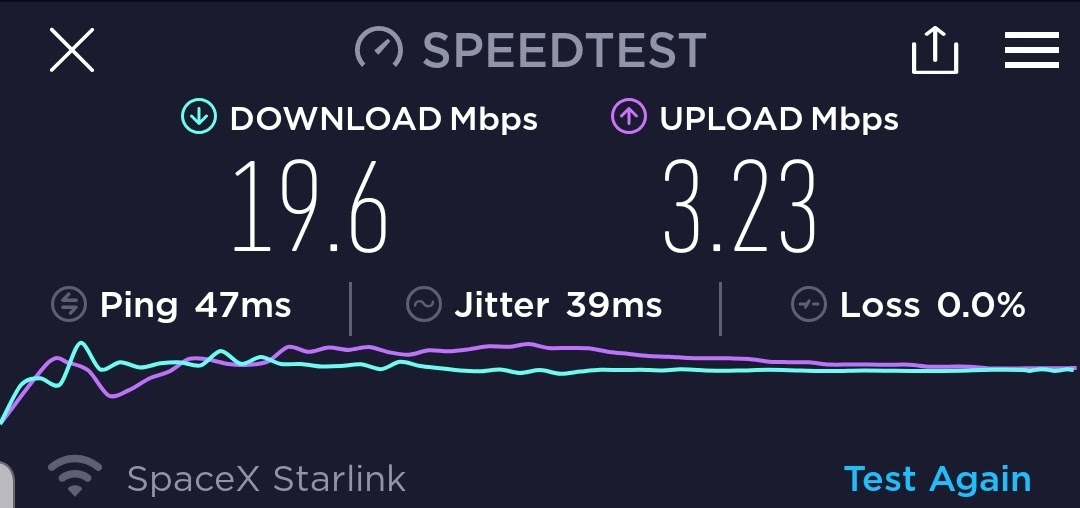
It would turn out that speeds on my cell phone are never as good as on a PC. I presume there is a reason that I have not seen as yet. All the tips tend to be for making sure you have a strong signal. <shrug>
At this point, I had not yet received the Wi-Fi extender, so for a little while, my only option was to connect to the Starlink router for high speed or connect to my existing equipment for anything else. It was only for a day or so.
When it did arrive, testing it was easy and setting it up was easy, too. When you power it up, it provides an admin network to connect to and a webserver for configuration. Basically, tell it what network you want it to extend, provide credentials and it’s done.
I tried for a while to connect it directly to the OPT port of the pfSense, but I couldn’t quite figure out how to configure it. I did find that I could just plug it into the WAN port and the router would just get an IP from Starlink and work. It didn’t care that it was a different subnet than OneSource was. I began to suspect, however, that the issue may have been related to teh fact that Starlink comes up with the same 192.168.1.X network that I am using on the LAN side. As much as I hated doing so, it kind of made sense to renumber my network, since Starlink doesn’t give you any control of it’s subnet.
Sadly, that didn’t do it, either. Furthermore, it would soon come to light that the new IP range, 192.168.2.X, conflicts with routes on my work laptop when I connect to the company VPN. If VPN is connected, I can get to my router, but nothing else on the LAN. The biggest effect is that I can’t get to Gnaz to view the cameras and I can’t remote to my non-work laptop to when Cisco Umbrella blocks a website I want to get to. All that means I will need to renumber again, this time avoiding all the routes in the AnyConnect. I think it the LAN and WAN subnets should be different, if for no other reason that clarity, so I won’t be going back to 192.168.1.X.
Somewhere in here, I had broken something on the router that I couldn’t recover and ended up recording all the static DHCP mappings manually and factory resetting pfSense. This time, I configured it with Starlink on WAN and OneSource on OPT and I guess I had cleared something that was keeping it from working or I had a better YouTube video to follow or something, because I got it to work and even switch to OneSource on Starlink fail. Even now, I’m not totally happy with the failback. If the gateway goes offline due to failed pings to its monitor IP and comes back on its own, it will switch back, and I’ve seen that happen a few times naturally. However, if I unplug either provider’s cable to simulate an outage, it doesn’t want to switch back to it when it comes back up. I have to manually set it to down and then back up.
With that part of the puzzle working, I could move on to local testing of the VLAN setup. At this point, the both TP-Link switches were in the same cabinet with Starlink and really everything else. I had Starlink Wi-Fi to the AC-1200, the AC-1200 plugged into port 8 of the workshop switch, a cable between port 7 on each switch to simulate the link to the workshop and the WAN port of the router connected to port 8 of the house switch.
I started with the simplest configuration I could think of and both switches configured the same. Ports 1-6 were untagged on the default VLAN 1. Port 8 was untagged VLAN 2. Port 7 was to be the trunk port, so I first tried untagged VLAN 1, tagged VLAN 2, which should have allowed 7 to carry both VLANs. In short, I tried all four combinations of tagged and untaged VLANs 1 & 2 on port 7.
The two would not pass traffic between port 8 workshop and port 8 house.
I Googled a bunch and finally found a thread where someone explained it well. Those tagged and untagged determine how the local switch treats the ports and VLANs. The packets coming out of the switch do not carry the tagging information at all, so it can’t pass it to another switch. In short, those are not trunk ports.
As I had mentioned a few times in the network blog, I have a Cisco SG200-26P. This switch has 26 ports, 12 of which can provide up to 100W of PoE and it can definitely trunk VLANs as I expected. I just needed to get it a playmate that could the same. I ended up ordering a SG250-08, an eight port switch with essentially the same set of features, except no PoE and, of course, fewer ports.
Even that was not an instant success. The two switches are different enough that the dialog for same setting may not look the same between them. In the 8 port, the port types are “access” and “trunk”, period. In the 26 port, there are “General”, “Access”, “Trunk” and “Customer”. Choosing Access grays out all the default VLAN, etc. General looked like what I probably needed for all but the trunk ports. Customer had a note beside it that made me wonder if it was some kind of auto VLAN, putting each port on a VLAN of its own, like if you were using it in a hotel or multitenant situation.
Long story short, it still didnt quite work, but it was getting close. The MAC address of the AC1200 plugged in to the 8 port began showing up in the MAC address table of the 26 port, but it still didn’t pass any traffic. More Googling lead to a recommendation that all ports be Trunk, but just control what VLANs are available for each trunk. I reconfigured all the previously “access” ports to “trunk” and made sure my tagged and untagged stuff was configured as I thought it should be and it suddenly started working! I was hitting Starlink from the house and it was traversing both switches to get to the WAN port of the router.
It was definitely too late to start moving stuff to the roof, so I would leave it like that to run overnight and through the next day.
The plan was a simple one. Move Starlink, the AC1200 and the 8 port switch to the workshop, with the dish on the roof. Though it was kind of slow going, that all worked out well.
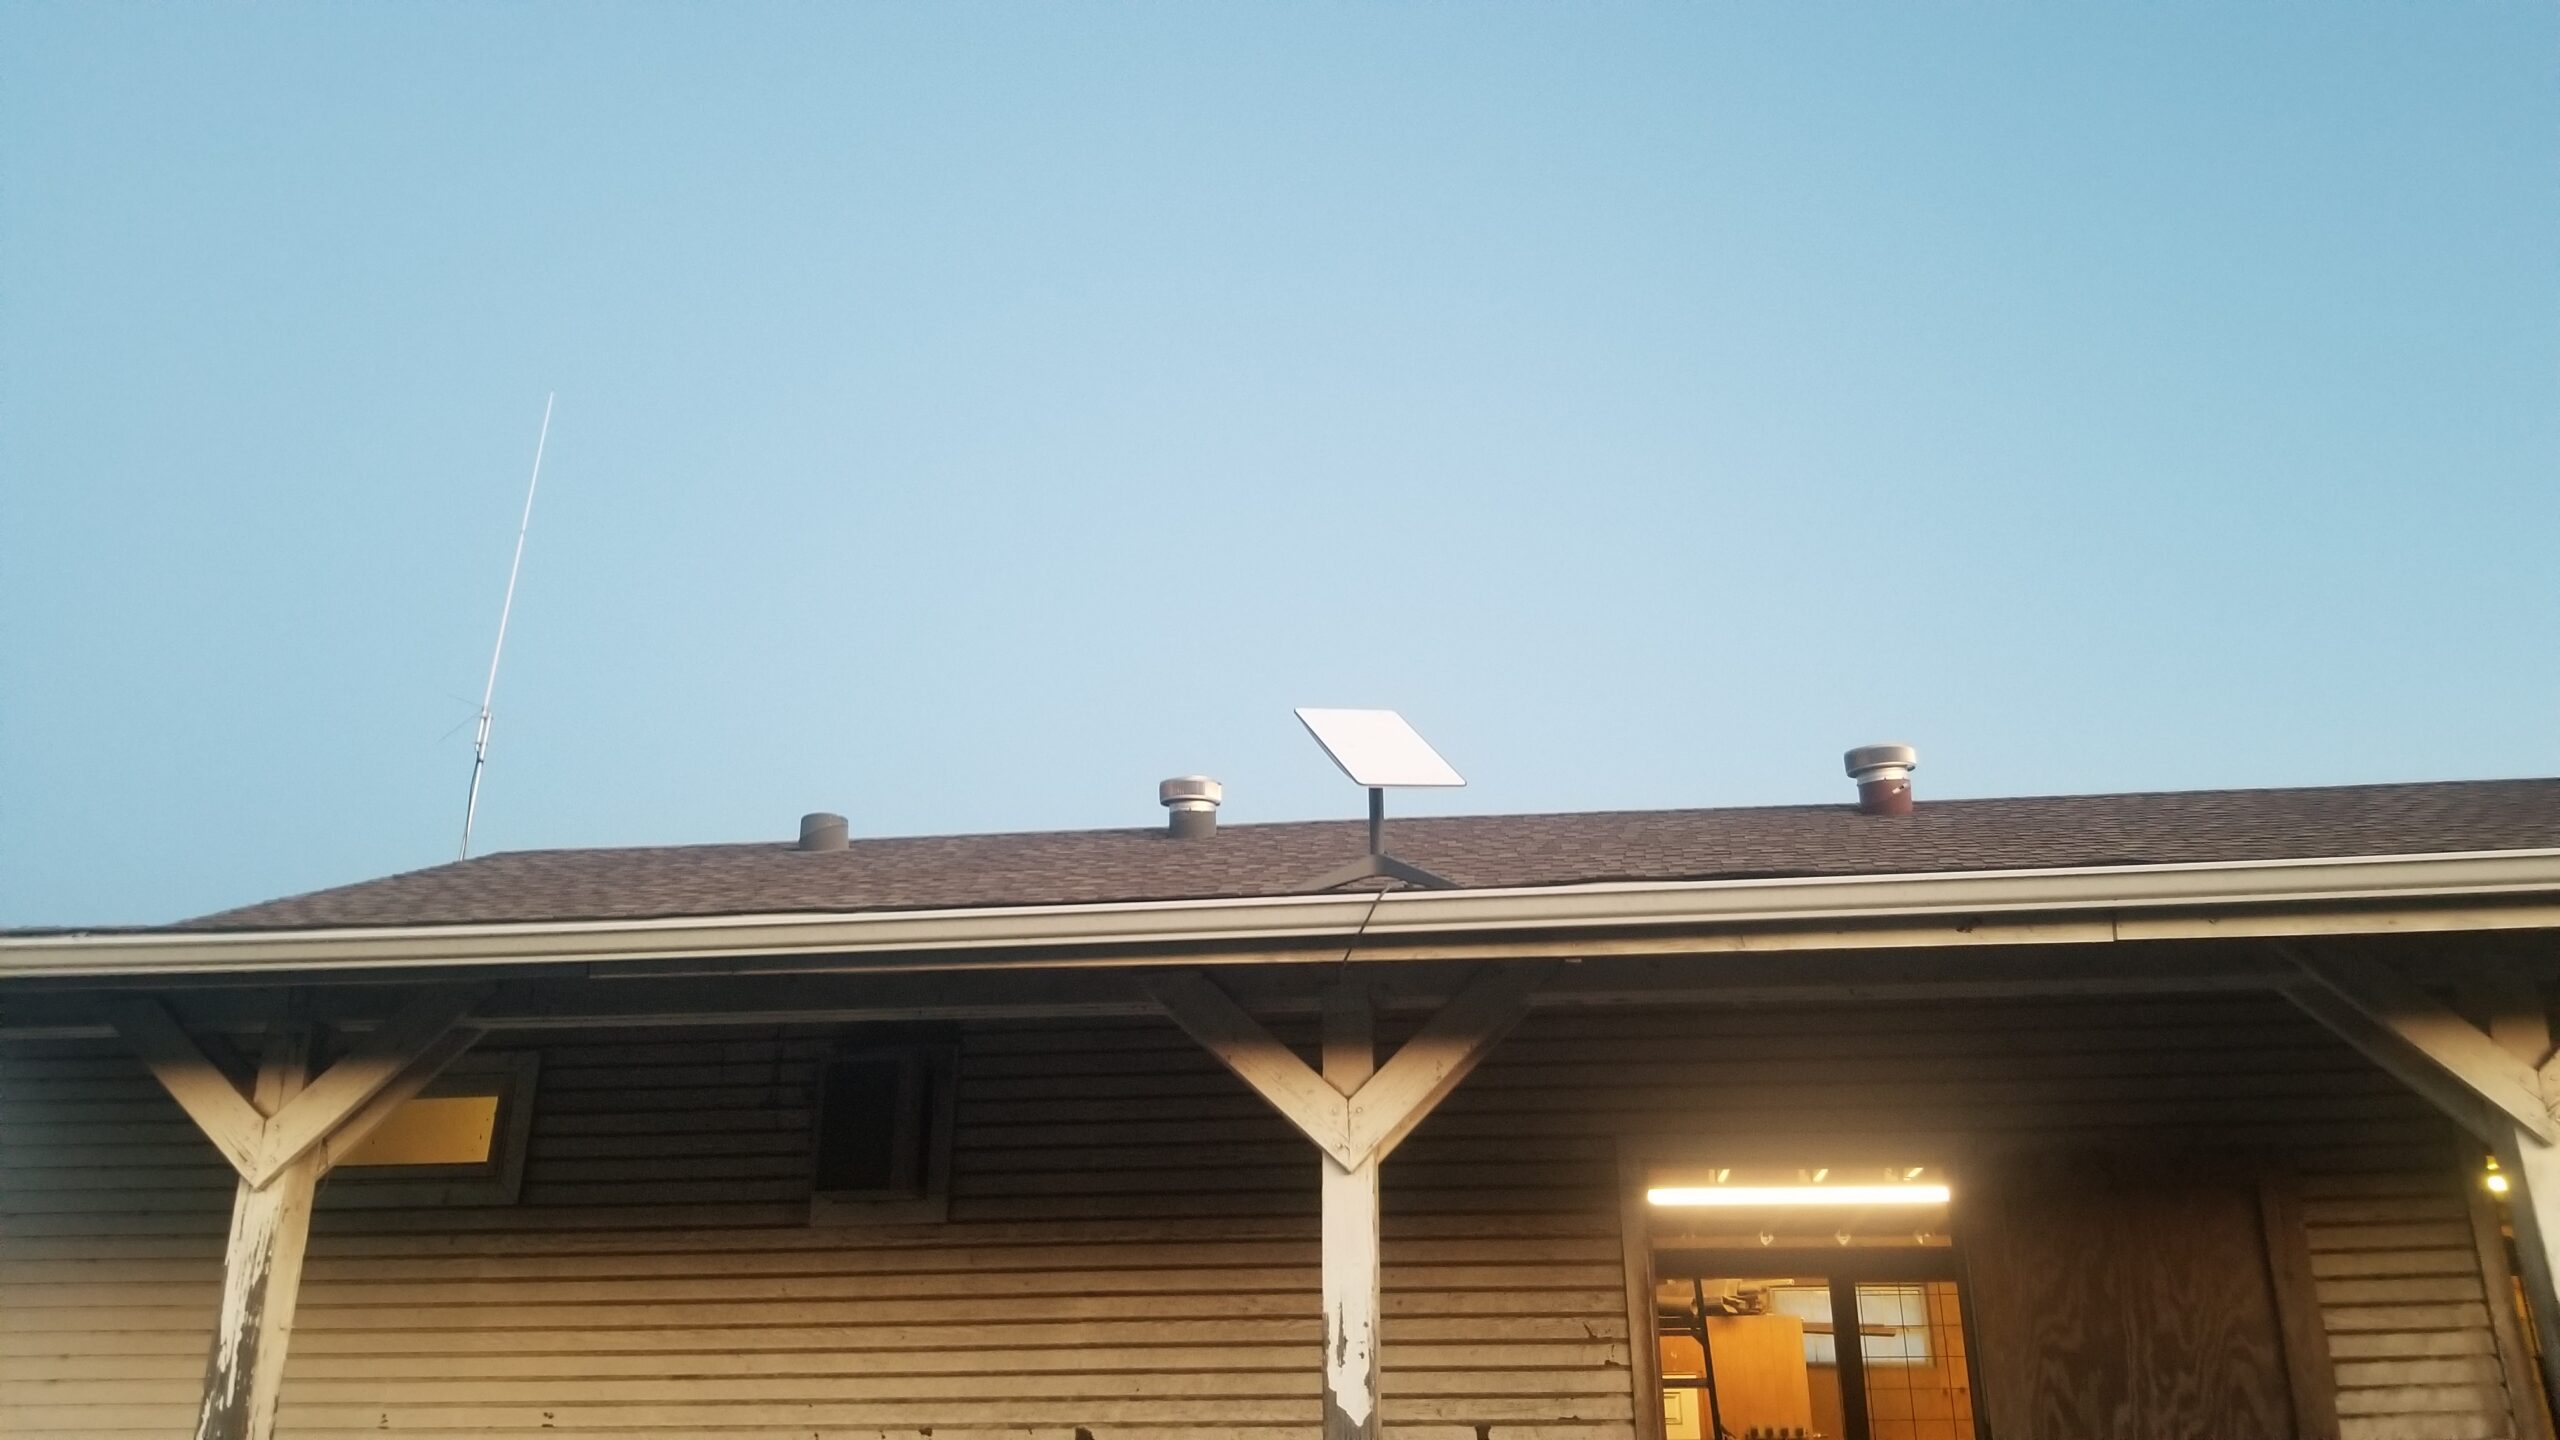
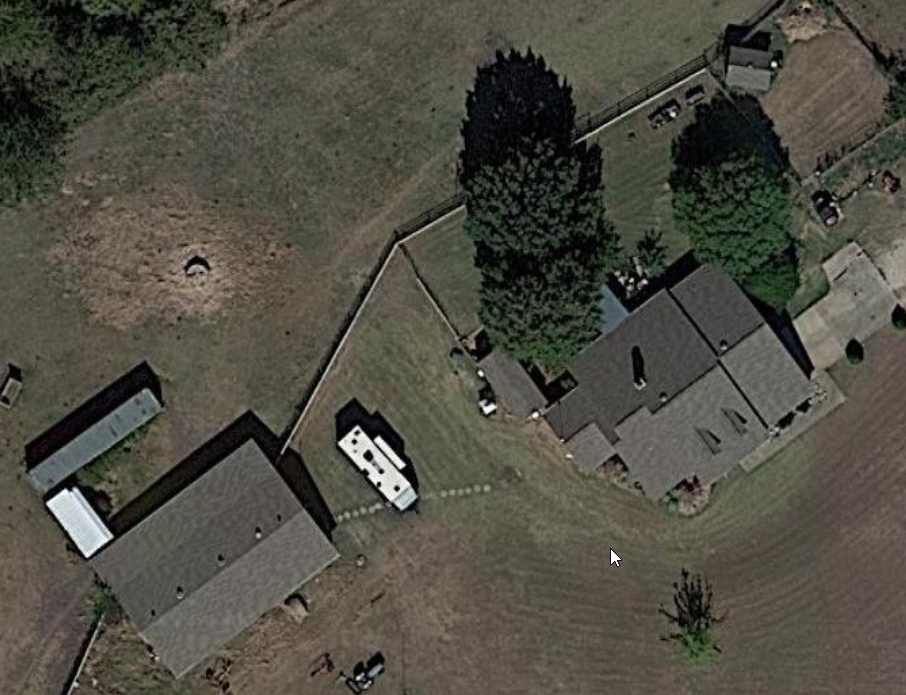
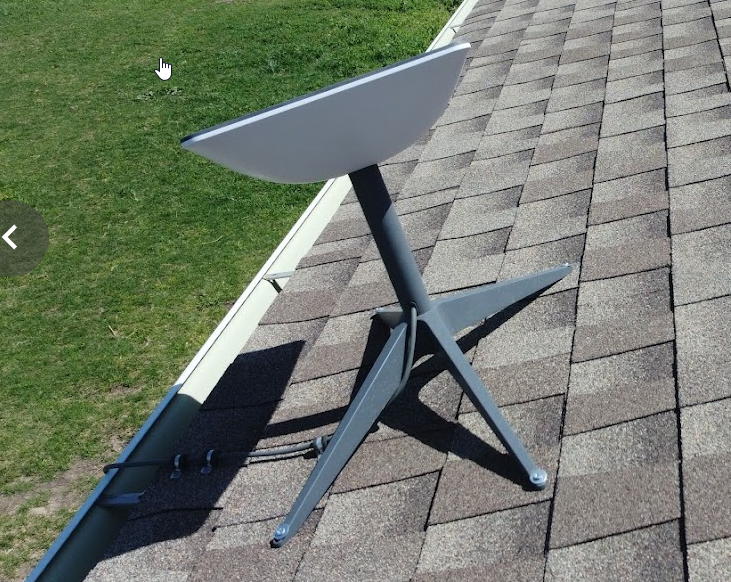
At first I grumbled about having to get on the roof to do this, but it suddenly occurred to me that it just needs to be off the ground. There is no particular advantage in this location between the peak of the roof and where it is shown in this picture. There are no obstacles to clear with a few more feet. I ran the wire into the barn, where the eaves are screened, but not actually sealed and immediately into the loft/attic area above the workshop, which is roughly the left half of this picture. It’s dusty and dirty up there, but I got the job done. I also ran the wire that feeds one of the cameras through teh same path. It has been temporarily run for months. 🙂
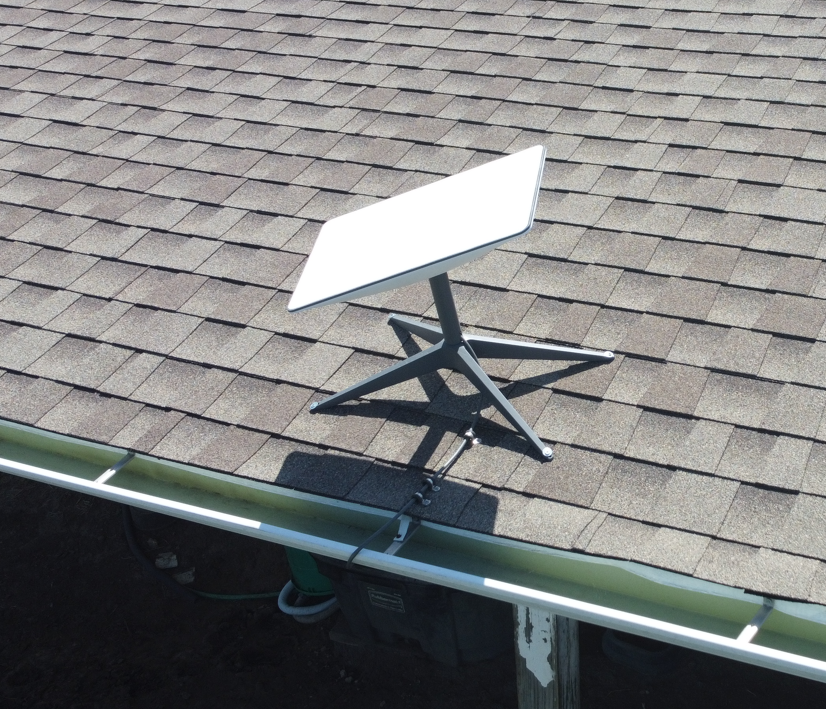
Once in place, I find it interesting that the dish orients itself in a more northeasterly direction.
It was a quick thing to change out the old switch in the workshop for the Cisco and connect the AC1200 and Starlink. I waited for the satellite to come up, verified I could connect directly to it and get data then tried from the Wi-Fi out there. Connecting to Wi-Fi, but no internet. Hmmmm.. Oh, yeah, I still need to make the connections in the house. Hooked it up and everything came up!
I plugged the one hanging cord into the switchport it was supposed to go into. It didn’t come up, even after giving it about 5 minutes. I manually down/up’d the WAN interface in pfSense and it came up!
Again, it was too late in the evening to rewire everything in the cabinet. At this point, the Cisco switch had the two ports involving the backhaul and a couple of other ports in use, but the rest of the stuff was still plugged in to the TP-Link switch.
The next afternoon, I took everything out of the cabinet, cleaned it up and recabled with some color coding. It was getting old tracing black wires connected to mostly black equipment inside a black cabinet. When I finished, it looked like this:
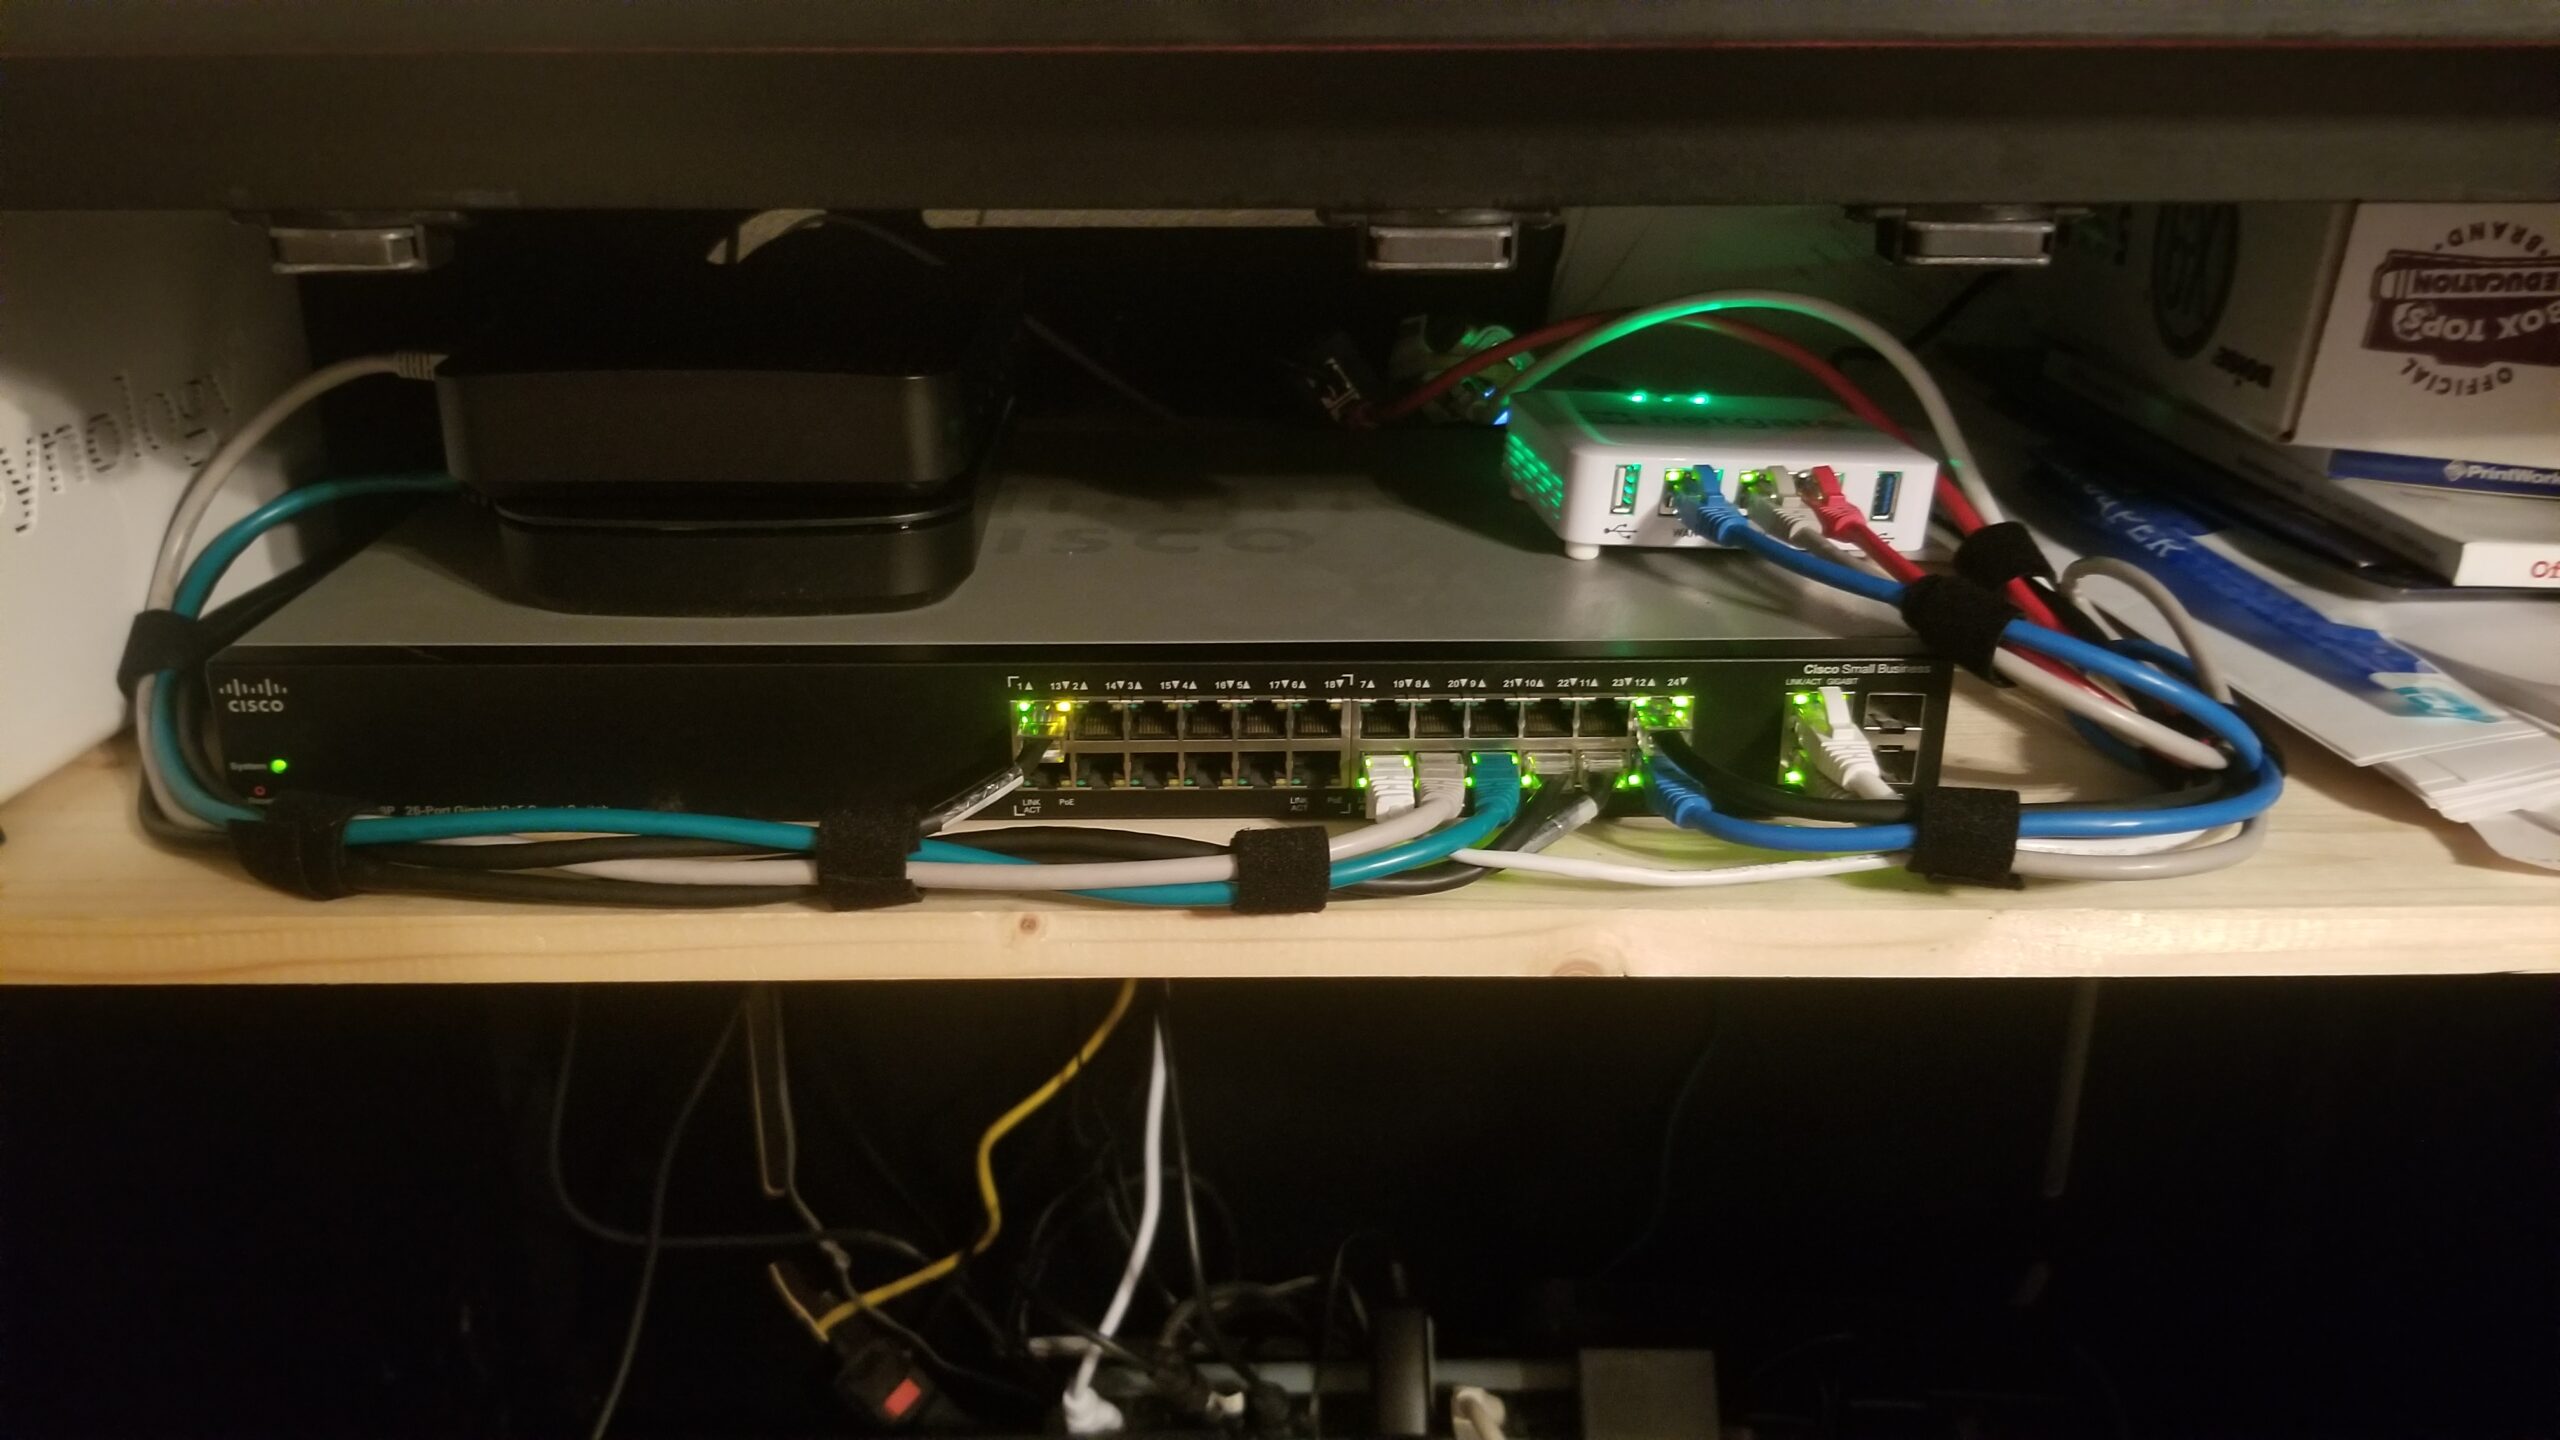
Pretty quickly, I noticed that I was connecting to the Wi-Fi, but not getting internet. I had a link light and all the wiring appeared fine. I dug in the switch configs and found that a feature called Smartport showed a different status for the port the AP was plugged into. I moved the AP to 18 and was able to get internet via Wi-Fi on my phone. I tried the laptop and it would connect to Wi-Fi, but no internet. I looked at Smartport and now the port I moved the AP to looked like it’s previous port.
I chased the Smartport stuff in the switch and online for quite a while and got nowhere. I found that if I put the WAN connection back through the TP-Link and also put the AP on the the TP-Link that everyone worked as it should. Again, I had killed pretty much the whole evening troubleshooting this one issue.
The next day, I mentioned it to a coworker. Networking is not his specialty, but in describing the problem to him, something occurred to me. When I plugged everything in, I could get one complete valid connection, then nothing else could get internet. It tickled the back of my mind that this is an intentional behavior sometimes, to prevent users from adding rogue switches or APs to company switches. It took me a a little more Googling to remember that is called Port Security. I found it under Security, not interfaces or Smartport or VLANs. Sure enough, the ports the APs had been on were locked, configured to allow 1 MAC address. I cleared them, set them to allow 50 MACs and normalized all the wiring. The AP works perfectly now.
As it turns out, the Smartport thing could have been a clue. When port security locked a port, Smartport responded to that action; it never was Smartport doing it.
All that has been operating untouched for 24 hours, pretty much as I am typing this. For now, I’ma call it good. Here is the updated drawing.
The next thing should be another simple change when the ethernet adapter arrives. I don’t know what the effect of disabling Starlink’s router will be, other than freeing up an AC1200…