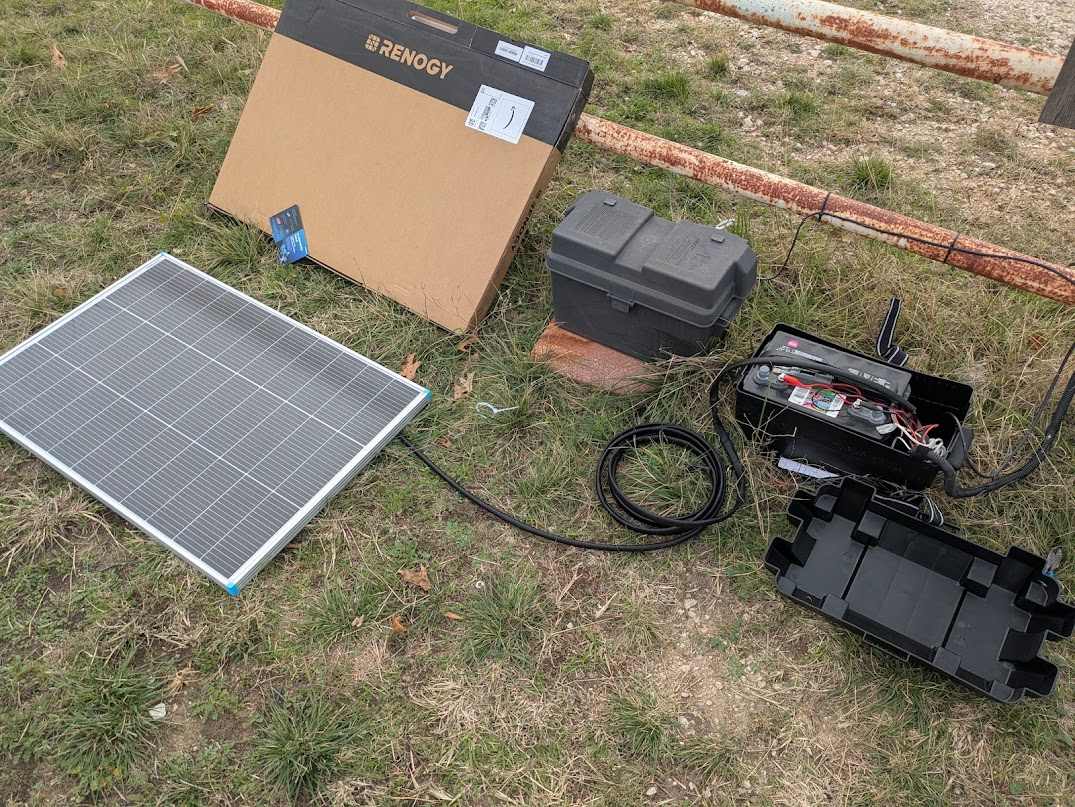
I decided on a 100 watt Renogy panel, along with an appropriate cable to connect it with. It has been here for several days because I realized that it is far too large to mount where the little 25 watt panel is without major redesign of that mount.
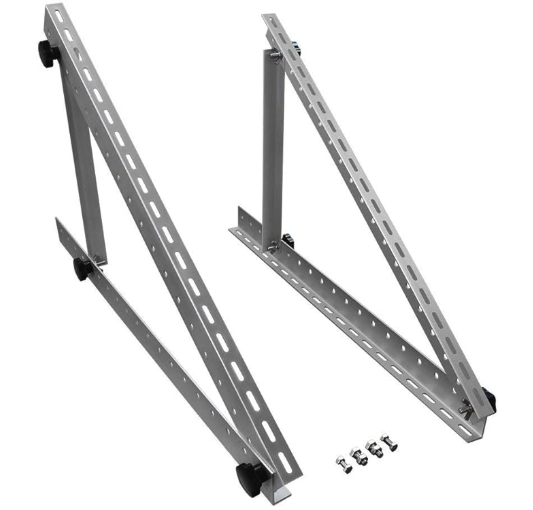
I decided to order a simple set of angle mount brackets for it and to mount it to the ground, probably on something else attached to the ground, a couple of treated lumber 2x4s or something. It will be a few more days before they arrive.
Meanwhile, I noticed when looking at one of the other cameras that the gate camera was down. That lead me to check the Gate AP and sure enough, it was down as well.
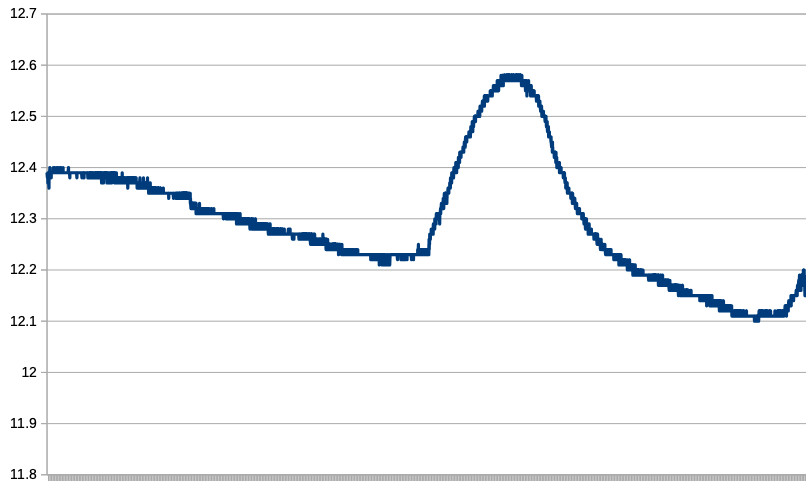
I retrieved the voltage logger. With several days of logs, I can confirm my suspicions that the 25 watt panel cant provide enough power to run the camera and AP during the day with enough left over to gainfully charge the battery. The battery voltage trends downward over six days until the charge controller sheds load. The deep cycle marine battery just extended the time that the system could tolerate the undercharge conditions.
It appears that everything connected to the charge controller remained powered up until the ugly bit of charting near the end. The small charging peak on 11/24 corresponds to a rainy cloudy day with a little bit of sun in the afternoon. The really flat part near the end shows both a couple more cloudy rainy days and the weirdness that a fairly deeply discharged battery can display.
Once I saw this chart, I thought it might be better to connect the new panel, even without the proper brackets. Perhaps laying on the ground, it can charge the battery better than the small panel.
Today is a cold and mostly cloudy Sunday. It took less than 30 minutes to unbox the panel, cut the connectors off one end of the cable and connect it up to the charge controller. The controller was “stuck” in the E01 state, so I disconnected the battery and the solar panel to clear the error. When I reconnected everything, the solar panel was showing 12.9 volts at 1.4 amps, which is about 18 watts. It was enough to power up the AP and camera. Even laying flat on the ground in cloudy weather, this panel is providing almost as much as the old panel is even capable of.
A little later, I saw that the sun was valiantly trying to come out. At that point, the charge controller reported that the panel was puting out 12.4 volts at 2.6 amps, which is 32.24 watts. While I was looking at it, I manually tilted the panel towards the sun and got it up the 3.3 amps for a peak of 40.92 watts.
I am cautiously optimistic.
I do need to solve some installation issues. The cable from the panel needs to be protected from the elements and the weed eater and right now, it’s just coiled up on the ground. Once mounted, the panel being low to the ground may be subject to mud splatter in heavy rain, so keeping it clean may become a thing.
Interestingly, there is no reason I can’t connect these two panels in parallel. Solar panels will operate at essentially whatever the lowest voltage panel is and the resulting amperages will sum. In practice, it is unlikely that I would ever get an actual 125 totals watts from these two panels, but they will add together. There may be some lost efficiency; we will just have to see what gives. The wiring from the 25 watt panel is currently just sitting there unconnected inside the battery box anyway.
In my last post, I posited that my gate camera connectivity issues might not be connectivity issues at all, but rather power issues, complicated by the camera’s irritating tendancy to lose its WiFi configuration when it loses power.
Eschewing proper scientific method in favor of a rapid solution, I approached this from several directions simultaneously. I installed a (probably unnecessary) mesh WiFi AP at the gate to ensure good WiFi signal out there. I replaced the probably near end-of-life lawn mower battery with a new marine deep cycle battery. I put a voltage data logger on the battery to see if the solar panel and charge controller I have is capable of charging it. I submitted a ticket to Amcrest to find out if the loss of configuration is a feature or a bug.
I kind of hinted that I was having trouble getting the camera to connect to the network at all anymore. I was blaming this on the tendancy of some network devices to latch on to a particular AP, even if there is a logically better AP to connect to. I presumed that the camera was desperately trying to connect to one of the APs in the house and the now stronger new Gate AP signal was probably interfering. Unfortunately, it still did not connect when I powered off the Gate AP. Power cycling made no difference.
Meanwhile, Amcrest suggested that the loss of the configuration is not normal and that there is a “newer” version of firmware available for the camera. I treked out to the gate this morning to attempt again to connect and upgrade the firmware. Not only would it still not connect, but I noticed that the app indicates that the last version of firmware it knew about was newer than the one the Amcrest tech suggested.
I decided to take the camera inside to attempt connection from inside the house, first via PoE. Turns out, this camera does not appear to run on PoE, at least not PoE as supplied by my Ubiquiti switch. The other Amcrest cameras I have do run on this switch, so I’m reasonably confident that it just doesn’t do PoE afterall. So, I provided appropriate power and found, almost unsurprisingly, that it still would not connect to WiFi, although all the steps up to the last did work. Factory reset made no difference.
What finally got it connected was DC power and wired ethernet. The camera works fine, just apparently no longer on WiFi. And the firmware is indeed the latest offered for that model, newer than the Amcrest tech suggested. Shrug. There are some places where I can redeploy it.
My best option now was to reinstall the ADC2W that was removed when the previous Renogy USB output failed. I changed cameras primarily because the ADC2W WiFi signal was weak. With the Gate AP in place, that should not be a problem now.
The only thing left is the battery log.
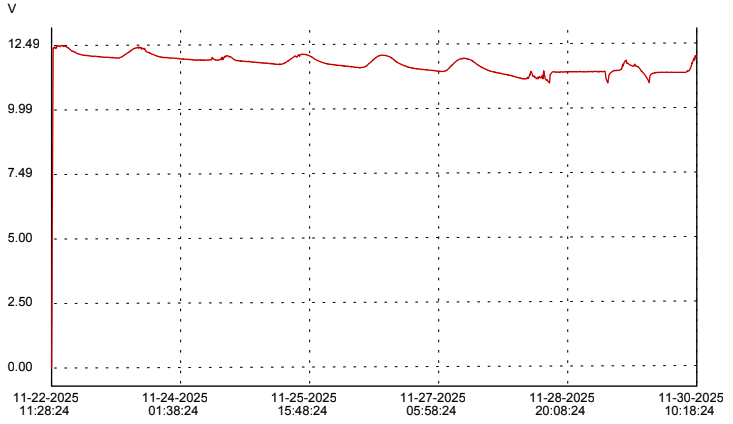
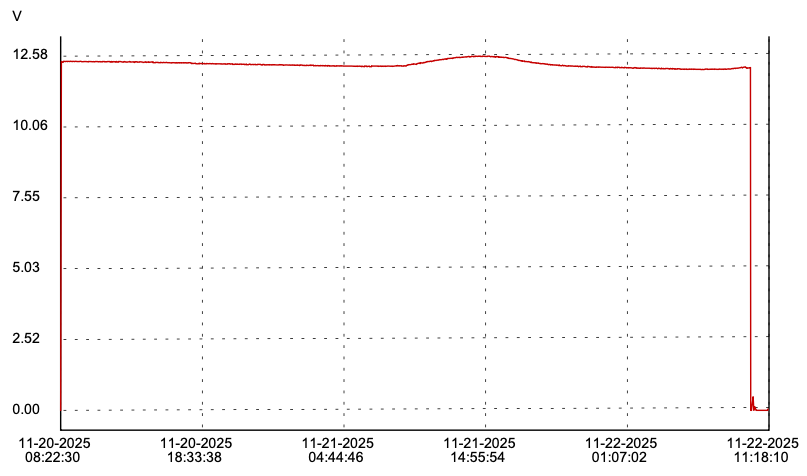
The chart provided by the logger’s own software is scaled to include the zero volts from the first few samples before and after I connected it to the battery. By making my own chart with the CSV data, I can scale it to exaggerate the two points that was was able to glean from this slightly more than 48 hours worth of data.
The first day, November 20, was a rainy and cloudy day. There was not enough sunlight available to offset the power draw, not at all.
Beginning about 09:00 on the 21st, there was enough sun to effectively charge the battery, until about 16:30, when the battery voltage tapered off fairly rapidly. Sunset was officially 17:25. By 20:30, the battery was back down to where it had started at 09:00 and it would continue to drop even lower until about 06:00 on Nov 22nd.
This is only 48 hours of trend, but it seems likely that my 25 watt panel is not enough to recharge the battery with it’s nominally 10 watt or so load. I need to get a bigger panel.
Do I double the power to a 50W panel, which is a more manageable size? Straight to the larger 100W panel that might be overkill, but is only 30% more money?
Some time ago, I discussed a connectivity issue with the gate camera, specifically adding an outdoor wireless AP to strengthen the signal to and from the camera. Since that post (but undocumented, mostly because I am lazy), I upgraded the antenna on that AP to the higher gain somewhat directional patch antenna.
The camera continues to disconnect randomly.
These days, however, it does not reconnect without human intervention and not before I dropped more networking dollars on attempting to address this would I realize that it is probably not actually a networking issue. More on that later, especially since I made it worse.
After just accepting that I was going to have to reconfigure the camera occasionally and tolerate it not working between the time that it goes down and the time I get around to reconfiguring it, I finally decided to drop a few bucks on the networking “solution”.
First, a bit about the power system.
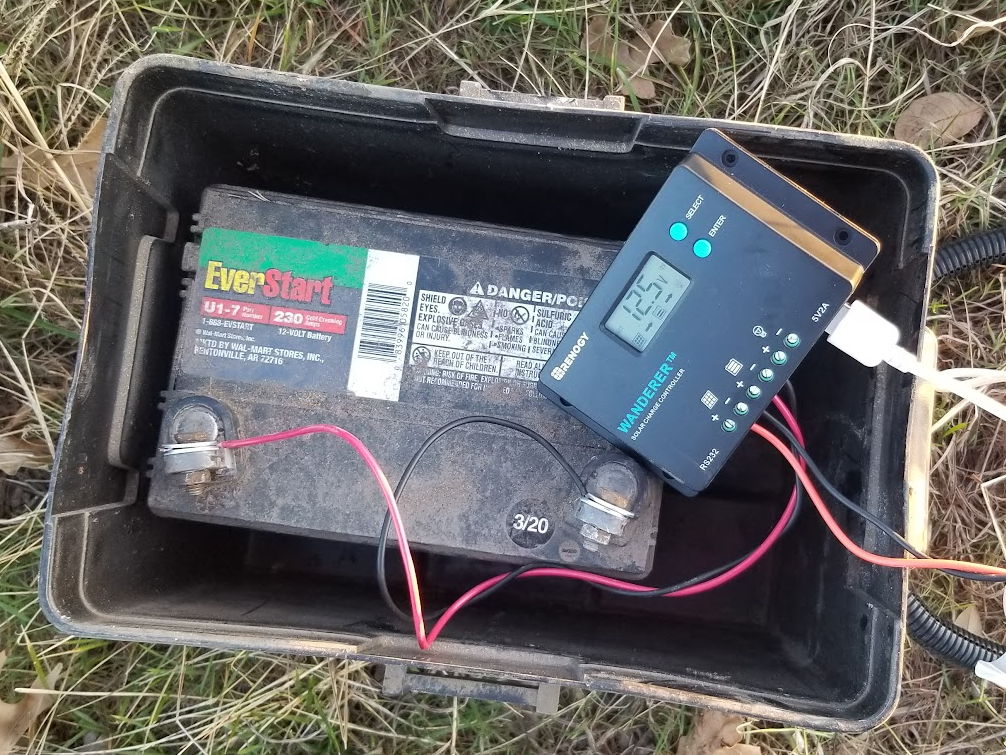
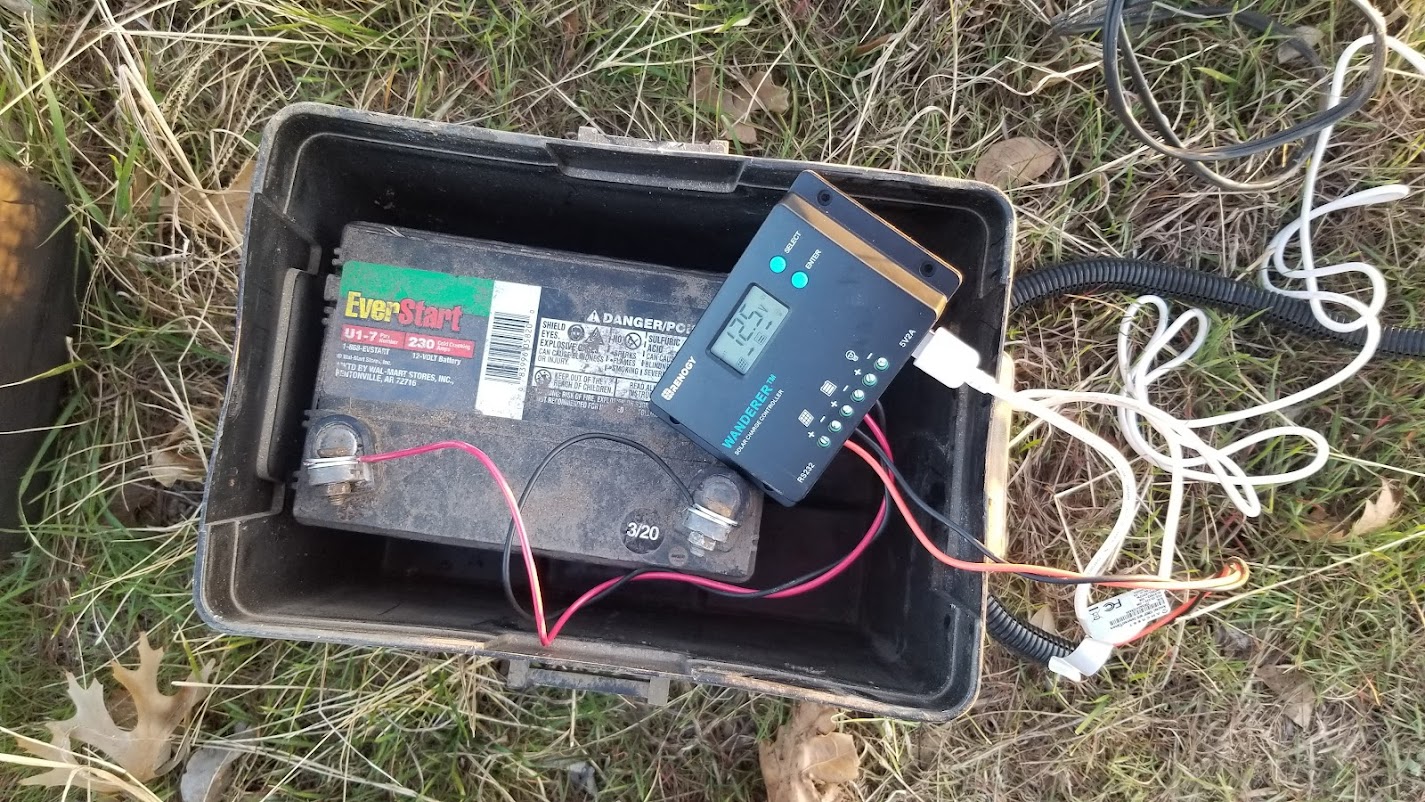
The gate camera is powered by a lawn tractor type of battery, though not directly. It is connected to a Renogy Wanderer solar charge controller. This is a nice little 10 ampere PWM charge controller with a surprisingly long list of features for about $50. The whole thing is charged by a 25 watt solar panel pointing largely south.
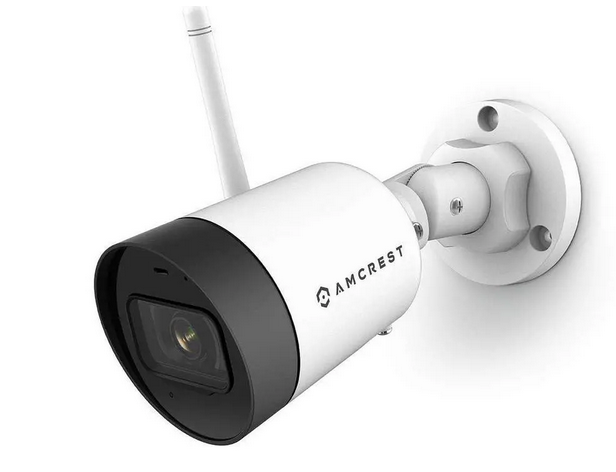
The original gate camera was powered by a USB cord and this charge controller was originally chosen because it has a pair of USB A power outlets. I don’t know exactly what happened to it, but that power outlet died after a year or two (I suspect water intrusion) and when I replaced the charge controller, I also replaced that camera because it did not have an external antenna and I hoped that a better antenna would help the connectivity issues. The new camera can be powered either directly on 12VDC or via PoE. No PoE at the gate, so 12VDC it is.
That current gate camera is an Amcrest ASH42-W.
The Renogy Wanderer shows the occasional error code, if one bothers to look at it. I have accidentally shorted the output, resulting in a code E04. Disconnecting the battery and solar panel will reset. Code E01 means that the battery voltage ran low. Apparently there is a feature where the Wandered will shed the load to protect the battery from deep discharge. It is unclear if that is concurrent with the E01 error message, but I suspect it is. There have been times when we have had several days of stormy or cloudy weather and the battery would understandably not be kept charged. The solar panel was not as securely mounted as is needed to be and wind turned it away from the sun once. On rare occasions, we have had snow or ice obscure the panel. Any of these situations will throw an E01 on the display, but when the charger brings the battery voltage back up to a safe threshold, the power output is apparently turned back on automatically. I don’t think the E01 is cleared without some kind of manual intervention. The documentation seems to indicate that a power off restart is required, but I’ve never needed to do that. The E01 just goes away when I mess with the buttons.
One thing that this camera does (badly, in my estimation) is lose it’s WiFi configuration when it loses power. [edit: just today, I have submitted a ticket with Amcrest asking if this is normal for this model camera; I have other WiFi Amcrest cameras that don’t do that] You have to use the Amcrest app on a phone to connect to the camera, authenticate to the camera (which *does* manage to save the admin password, just not the WiFi info. Argh!) and reconnect to the WLAN. One ….. lets call it a characteristic…. of the app is that it shows the available SSIDs and a little symbol indicating the signal strength, but it shows me multiple listings of the same SSID, usually with differing signal strengths. I am guessing that this is somehow picking up the same SSID from different APs. This seems to severely complicate choosing an SSID to connect to.
Still of the (probably misguided) opinion that my camera disconnection problem is caused by poor network connectivity, I finally spring for a mesh capable AP to mount by the gate so that two APs can talk to each other, but the camera will only need to reach the few feet to the nearby AP. Oh, how naive that idea turns out to be.
The Ubiquiti AC Mesh AP is interesting in that it’s only power option is 24V PoE. I had to do a little digging to find something suitable to power it. Specifically, what it needs is a 24V passive PoE injector that is powered by 12 to 48 volts DC. There are gobs of AC powered units, but not many DC powered. In any case, I found one for $20 from Amazon. As for the AP, I generally prefer to order Ubiquiti items directly from Ubiquiti, but the $99 price was the same and Amazon had it, so I got both items next day.
Then I waited two or three days to install them.
The installation of the AC Mesh went as Unifi stuff usually does, pretty pretty much without drama. I plugged it in to my switch in the house first to adopt it and configure it as a mesh child and the garage AP as the mesh parent. Then did a kinda quick and dirty installation at the gate, where it came right up and connected. My phone was able to connect to it immediately. Internet speed test was exactly as good as from inside the house. The mesh speed limit is something like 867 Mbps and my Verizon 5G is only good for about 250 Mbps at best, so plenty of headroom.
Now is when I began facing my first problems with this new setup.
The camera would not connect to the network at all. It would connect to my phone for configuration, but then would just continue to blink not connecting to any actual WLAN. This is also where the confusion borne of the multiple duplicate SSIDs makes things even worse.
If I turned the transmit power of the AP down to low, the camera might connect to the WLAN, but it would not connect to that AP. It connected to the garage AP, the one it usually connects to when there isn’t one 2 feet away. In related news, detailed below, my other WiFi cameras stubbornly don’t connect to the AP that makes the most sense for them either.
If I power down the Gate AP, connect the camera to WLAN, then power up the Gate AP, the camera still doesn’t roam to the Gate AP. By itself, this isn’t surprising because roaming is a fairly sophisticated behavior that a relatively simple network device may not exhibit.
Here is the biggie and the thing that finally put me on what is probably the actual issue here. I got the camera connected and the Gate AP on low power and left it overnight, hoping that maybe the camera would reconnect later and choose the better signal. Instead, I found the camera disconnected in the morning and when I started looking, I found the Gate AP to be offline. Hmmm
Hmmmm, indeed. When I went to feed the horses, I went by the gate and looked to verify what I now suspected. Sure enough, the camera and AP were both without power and the Renogy was displaying E01 and it finally got through to my thick head that, probably for this entire time, I have been running the battery down to load shed, the Renogy restores power when the battery is back to a reasonable level and a few days later, when I get around to resetting the camera, always after work when the battery has had all day to be charged back up, I haven’t been suspecting power, but network. So, lets “solve” the problem by adding more power draw to that marginal battery.
Armed with this new-to-me knowledge, I am taking a different approach. I still kinda want to solve the network problem wherein the camera will connect to the Gate AP and enjoy the better bandwidth that should provide, but I need to solve the power problem for sure.
I ordered a budget data logger with the intent to log the voltage on the old battery, specifically to see absolutely if it was actually running down overnight. I also got impatient waiting for the data logger to arrive and also bought a new battery, a deep cycle marine battery, which is arguably a much better match to the purpose than the lawn tractor battery.
Sidebar, kinda: The gate opener has run on a lawn tractor battery for years. The gate opener has been in service since about 2012 or so, , though the design lifetime of that class of battery has been a factor in having to replace it a couple of times during those years. However, the load from the gate opener on it’s battery is quite different. It spends the vast majority of it’s time drawing a few 10’s of milliamperes, then occasionally, a couple of amps for a minute to open and close the gate on demand. This tiny demand is completely within the charging power delivery of the 8 watt solar panel that was available from the gate opener manufacturer. The camera, on the other hand is a continuous 24 hour, 7 day load specified by the manufacturer only as “< 4.8W”, which should be read as “up to 4.8 watts”. In dark conditions, the camera turns on built in infrared illumination, so it makes sense that at night, when there is no solar charging happening, the camera is potentially drawing the most power that it can, probably about 4.8W. In new condition, the lawn tractor battery I had in place *should* be good for about 420 watt-hours, so with just the camera and allowing for some draw/loss in the charge controller, rounded to 5 watts, a freshly charged battery discharged to 50% should be good for 42 or so hours, but I’m getting more like 8 or less. It is apparently not running at full capacity and/or not getting fully recharged. The battery is no longer 420 watt hours and / or the 25 watt panel can’t replenish the watt hours used overnight and eventually battery runs dead enough that the charge controller has to shed the load. The battery gets a chance to catch up enough for the load shed to clear, but a day or two more of use, runs it dead again. Then I added up to 8 more watts of power draw for a wireless access point.
I really should put the old battery back in and log the battery for a week or two to verify this theory, which is a thought that is out of sequence here and will make more sense after the next couple of paragraphs. Sorry. Editor’s prerogative.
I installed the new battery last night. With the Gate AP operational, I could not get the camera to connect and I got fed up with trying, so I left them as is overnight.
The datalogger was delivered late last night, about 9PM (Amazon… amiright?). I was already comfy and didn’t bother fetching the box. So, of course, it started raining in the predawn hours. The box was soaked to disintegration by morning, but the logger was fine.
It’s a Triplett VDL48. Cute little thing. Kinda weird in a couple of ways. The manual is close to useless. It took some research to determine that you must use their proprietary app to set the logging parameters, apparently each time it’s used. It does nothing particularly useful right out of the box. However, once I knew that I needed the software to make it go, it was a pretty simple matter to set it up. I set it to log in 10 second increments, started it logging then braved the rain to attach it to the battery.
UGH! I bought a new battery box for the new battery, one with room for the battery and both the Renogy and the PoE injector. Battery boxes are designed to vent hydrogen and batteries themselves are largely waterproof. So the tiny vents molded into the lid of the battery box are normally not a problem, but I have electronic equipment inside my battery box and I discovered that it was getting wet in the rain from these vents. I had discovered this previously in the other battery box and had addressed them with a piece of plastic and epoxy. Today, and needed something more expedient, so I grabbed a slightly nasty towel and a roll of electrical tape from the garage and returned to the gate. I dried off the vent area and used two hastily ripped strips of tape to cover each vent area, as well as at least partly patting the Renogy dry. It was directly under one of the vents. I do have a spare, just in case.
So, as of about 4:30 or so this afternoon, the battery voltage is logging to the Triplett toy. It was 12.37 volts when connected. Also, with the rainy weather, the Renogy reported the PV voltage (photovoltaic; the solar panel input) at 10.something, so less than required to actively charge the battery. It would be awesome to have a two channel logger. I don’t care enough to buy two at this point. It’s 9:50 PM as I edit this paragraph and the Gate AP is still up, so the battery has not run down to load shed in the rainy dark.
Earlier, I mentioned an irritation that I also need to address. This is a problem that has come up with several devices in my network. In short, there are a number of WiFi devices that insist on connecting to APs that are not only not nearby but are often the least nearby AP that they could possibly select.
I have a AcuRite weather station. The sensor unit outside communicates with the indoor unit via 420-something MHz RF, but the indoor unit does WiFi and via WiFi, can connect to the Weather Underground network to post my collected weather details online. This WiFi happens to be using an Espressif ESP32 MCU, which for reasons I can only guess at, won’t connect to AP in the ceiling of the room it is *in*, a mere 10-12 feet away, but rather it will connect only to the AP in a hallway on the other side of the house, where it enjoys one of the weakest received signals in the house.
Similarly, I have another WiFi camera, a different model than than the Gate Camera, but the same Amcrest brand. It is deployed in our barn, set to monitor the water trough for the horses. It is about 30 feet from the AP that is in my workshop in the barn. Instead, it will only connect to an AP in the house, about 80 feet away and through a number of walls.
I have two EPS8266 based homebrew temperature sensors in the garage. One has a probe stuck through the wall to the outside. The other has an internal temperature sensor, but also a counter input that reads a water flow meter. Both of these are 10-20 feet from the Garage AP. On connects only the the Hallway AP in the house, which is at least arguably equal linear distance, though with several extra walls and lots of furniture for interference. The other is literally 10 feet beneath the Garage AP, but connects instead to the Kitchen AP.
All of these exasperating devices at least have one thing in common in that they are less sophisticated network devices, at least as compared to smart phones, laptop computers, etc. They may be making their choice based on the lowest numeric MAC address or some other equally arbitrary but mathematically simple calculation.
Thus far, no amount of Googling has revealed a solution to this particular problem.
Thanks to a lucky sequence of events elsewhere, I inherited a Ubiquiti Cloud Gateway Ultra router.
My Netgate 1100 running pfSense was not underperforming and didn’t need to be replaced, but I took the opportunity to replace the only major piece of network gear left in the house that wasn’t Ubiquiti.
I have a moderately sophisticated home LAN, beyond what most of the people I know need, but not as over the top as some others. I currently have one internet service provider, Starlink, though for a while I had an LTE provider as well. There is a fiber provider building out in our area and we have signed up. They have installed our ONT to a fiber stub that runs the the curb and all over our neighborhood, there are runs along the street between stubs. Still waiting for the rest of it to be completed somewhere. Whenever that does happen, we will have fiber and Starlink for long enough for me to trust the fiber.
I have the router, a switch and two WiFi access points in the house, a switch and a WiFi access point in the workshop and a wireless bridge connecting them. The main complications to this otherwise fairly straight forward deployment are: 1) My ISP is currently Starlink and to avoid all the trees around the house, the Starlink dish is physically installed at the workshop, requiring the use of an isolated VLAN to backhaul Starlink across a wireless bridge to the house where the router and all the other central gear is and 2) I have a moderate number of IoT devices, particularly inexpensive home automation devices, that should be somewhat isolated from the rest of the network.
I had set up a Unifi Network Controller running as a Docker container on my Synology NAS to administer the Ubiquiti switches and APs. No more CPU than this task takes, this has hardly been a load on the NAS at all. However, the Cloud Gateway Ultra can take over this task as well.
I read that there are ways to back up the running configurations for all of my devices and restore them to the new controller. It’s not particularly complicated, but I elected to take the opportunity to clean slate my configurations and reset each of these devices and configure them anew. This may have cost me more time than was necessary, but it definitely made me understand and address specific elements of the configurations.
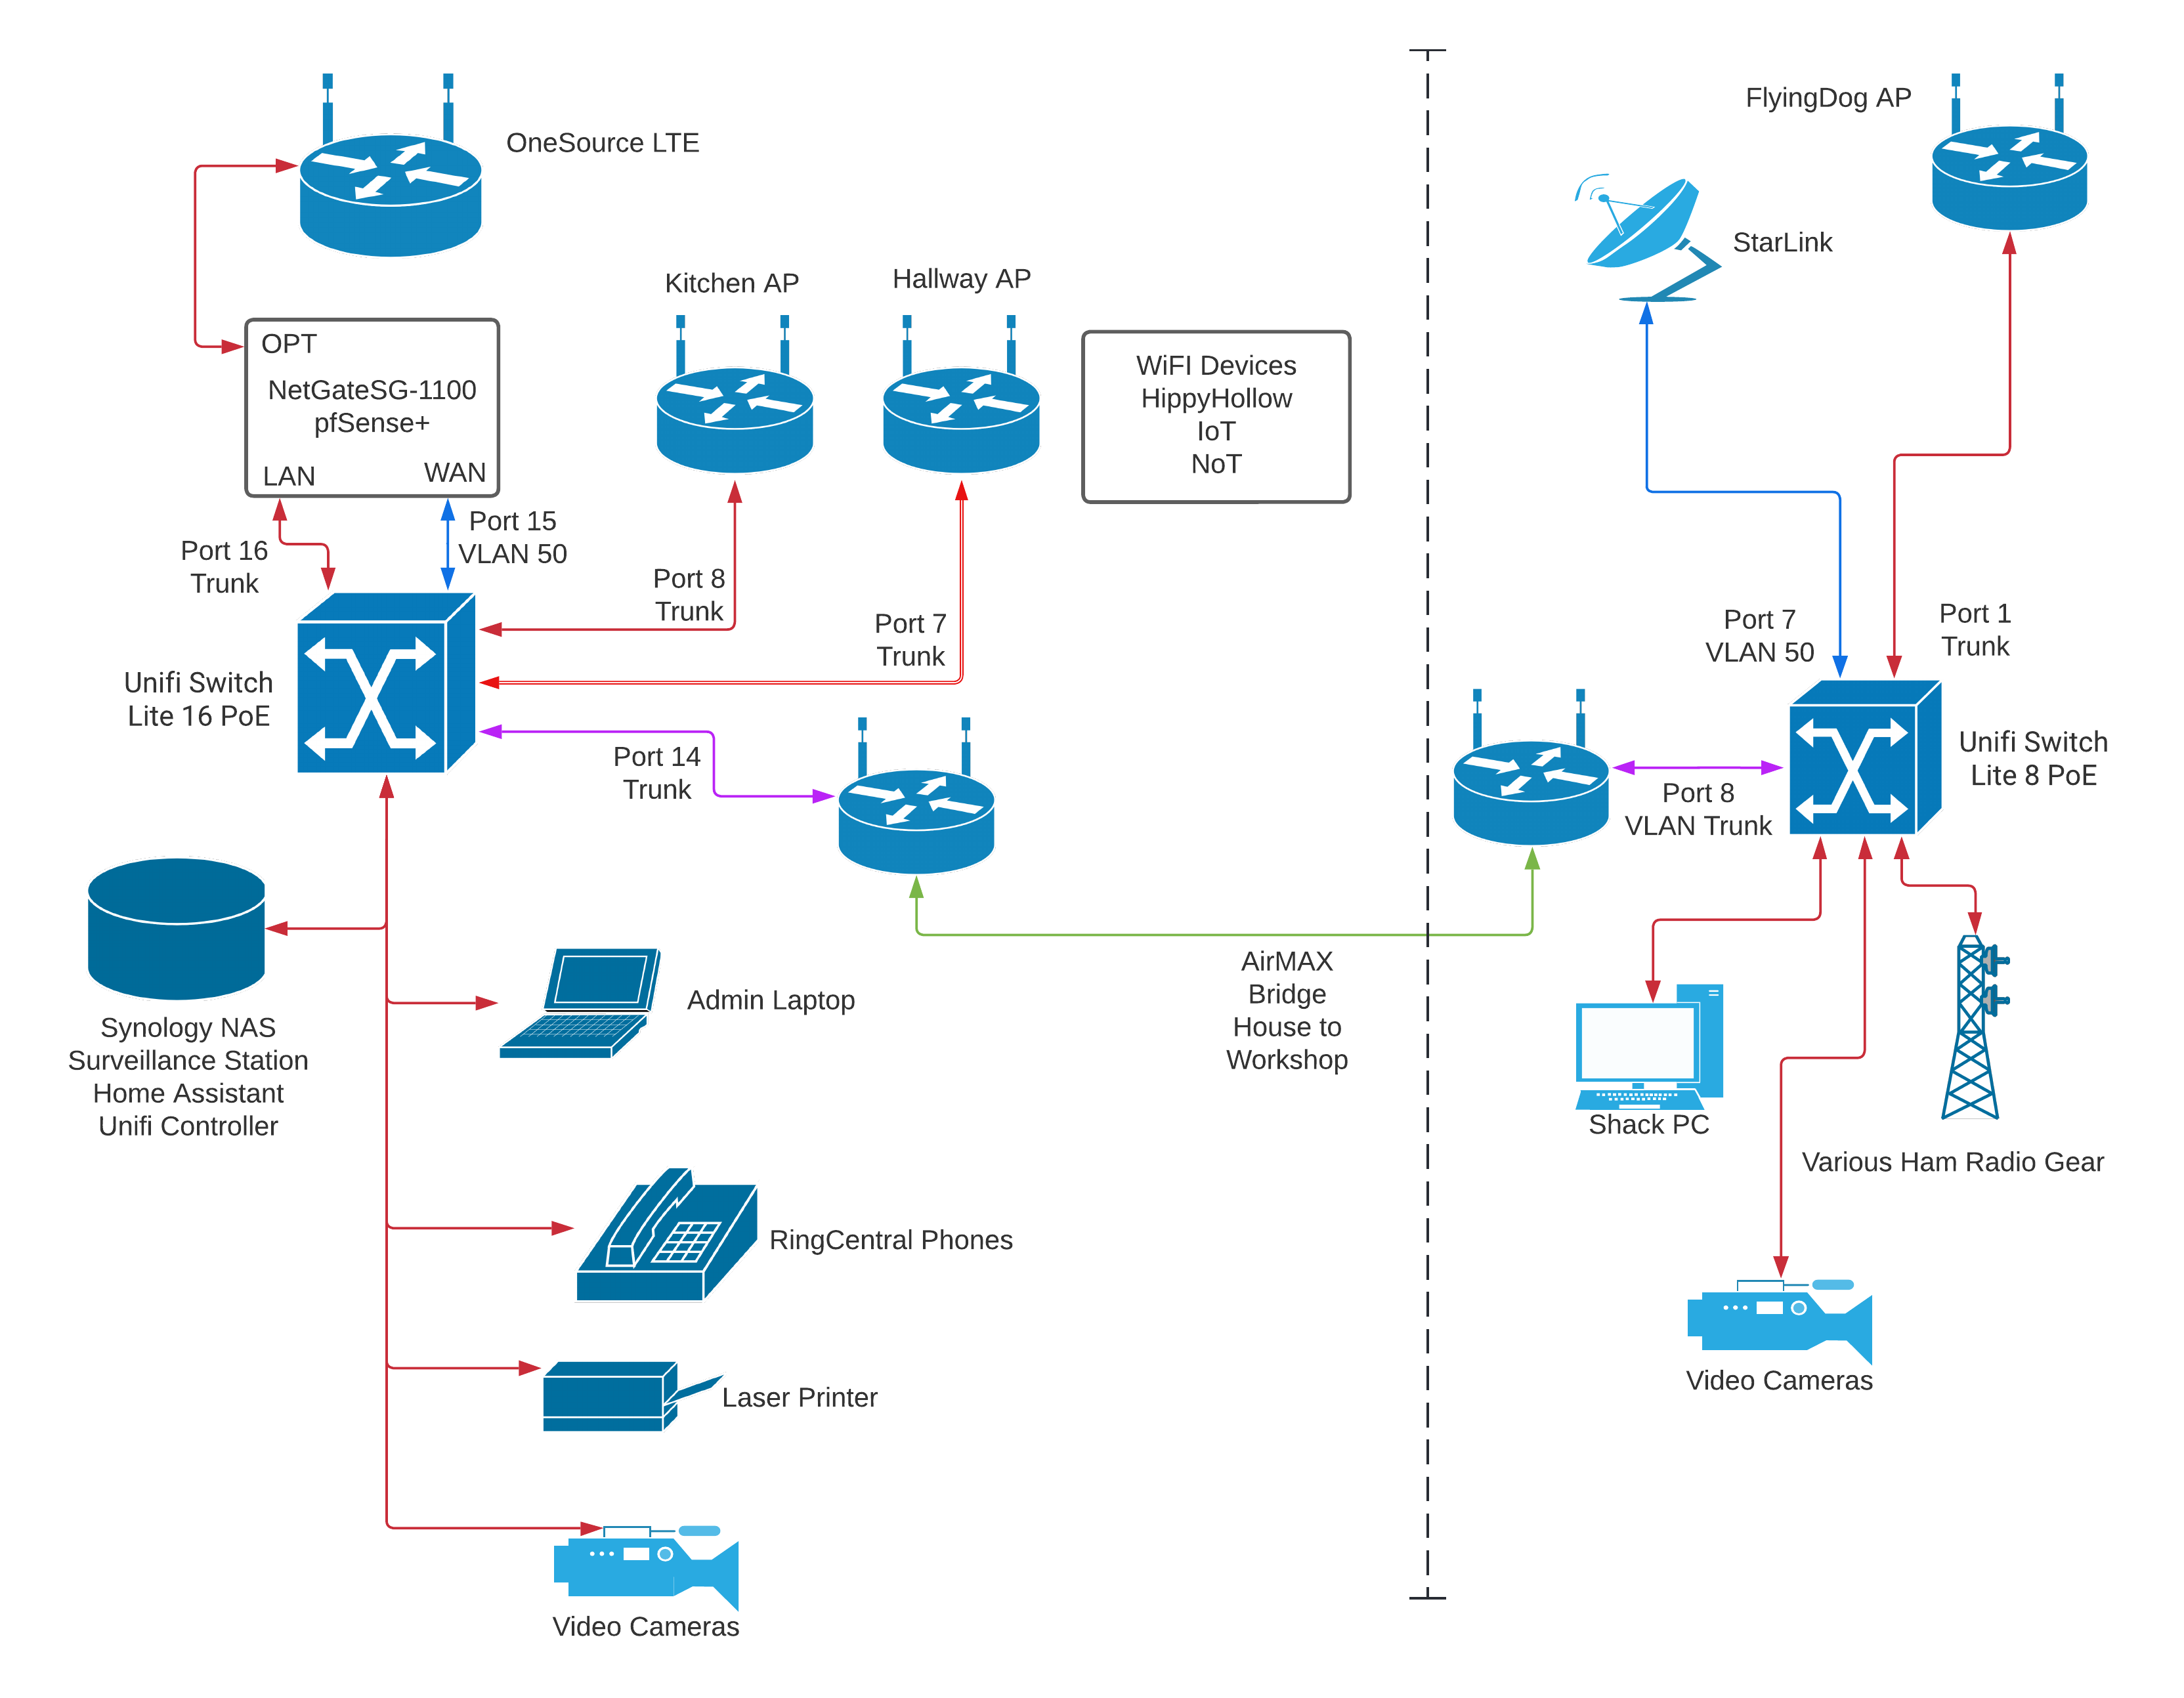
I started by locating an ‘as built’ drawing that I made after adding the Ubiquiti switches and APs.
I used this drawing and consulted the existing configurations to verify the port numbers and VLANs, particularly dealing with the Starlink backhaul.
The flow of the VLANs are better illustrated here.
The thing to realize is that VLAN 50 allows data to and from Starlink to connect directly between port 7 of Flying Dog switch and port 15 of the Hippy Hollow switch without being available to any other ports on either switch. The router then processes it as a WAN source and distributes it out it’s LAN port, connected to port 16 of Hippy Hollow switch. All other ports on both switches have all VLANs except VLAN 50 available, so nothing can connect directly to Starlink, bypassing the router.
In any case, because I was going to deploy these devices with factory resets, establishing this VLAN backhaul added a twist. I had already brought the Gateway up in the house and changed it’s network IP from the default 192.168.1.0/24 to my existing 172.29.0.0/24. I then took the Gateway over to the workshop and connected it directly to Starlink and a random switchport and importantly, I plugged the workshop AP in to one of the Gateway’s switchports. This let it come up with the Gateway easily reachable from my phone. When things settled down, I reset the switch, adopted it, configured the VLAN on port 7 and the trunk on port 8 (which has the bridge between the workshop and house) then I moved the Gateway back into the house to reconfigure that switch.
In the house, I had the advantage of a laptop in the network cabinet, so I didn’t have to necessarily worry about the AP immediately.
I was able to quickly get the VLAN backhaul for Starlink up and going. Then came everything else.
I understand there is some method of resetting APs over the ethernet cable, but I needed a ladder to reach only two of the four and adoption to the new controller went smoothly.
There were two mildly troublesome parts to all the wireless stuff. First, it took so long for me to get all the APs reset that all the open DHCP scopes assigned IPs that were previously fixed and I couldn’t conveniently reassign them to the addresses they once had. There was kind of a plan there at one time. I just sighed and left the things that needed to be fixed where they landed, mostly cameras and printers. Second, the whole idea of having a separate IoT subnet is that devices on that network can reach the internet, but not your other local networks. A simple checkbox enables this isolation, but if something *does* need access, if for example if your Home Assistant server is on the main network and a bunch of your wireless home automation devices are on the IoT network, then this simple network isolation checkbox is not the solution; you need a couple of appropriate firewall rules instead. That is why all of my WiFi Home Assistant devices were grayed out. 🙂
To get all these devices up and running, I elected to remove the network isolation checkbox and work on setting proper firewall rules later.
As is often the case, a couple of months have passed between the previous paragraph and this one. In the interim, Ubiquiti has released Zone Firewall for my router, so I need to figure that out. It’s not expected to be difficult, but I haven’t even looked at it yet 🙂
I have four APs, three in the house and one in the workshop. Two U6 Lite APs were purchased together, one in the house and one in the workshop. I needed to add one in the house later and managed to secure a used AC Pro for free, which is a significantly older unit. By itself, that didn’t matter much, but it would probably be better if both of the units in the house were at least similar in features, such as WiFi 6, so I swapped the older one to the workshop. I also have an AC Mesh AP for some outdoor connectivity.
Also, that AC Pro had complained about the wiring ever since it was installed, claiming that it was Fast Ethernet instead of Gigabit. Not surprisingly, the U6 Lite didn’t like the wiring either. I shuffled the attic wiring around so that my USW Flex in the attic now powers one of the AC Mesh and one of the U6 Lites instead of the AC Mesh and a camera. The wiring that was on the troubled AP is now going to that camera, which is only Fast Ethernet anyway. I started by just running all three on the USW Flex, but it ran too close to the max PoE power budget for the switch and kept dropping the newly added AP.
There is one more VLAN thing I’d like to solve. I’d like for all the cameras to be in either the IoT VLAN or maybe their own VLAN. It is pretty trivial to move the WiFi cameras, but for some reason, I can’t seem to get the wired camera to be happy in anything except the default VLAN. I can definitely make the switch port appear to be in the expected VLAN, but then the camera just stops communicating. It seems to refuse to get a new IP from the DHCP in the new network. Maybe the zone firewall rules will make that easier to understand and manage. 🙂
I have mentioned the WiFi camera at our front gate before. It has come up in a discussion about the power system for it and in a mysterious DHCP flooding issue that was discovered when I began looking at router logs.
As it would turn out, the DHCP issue was because the camera would not usually hear the router. The conversation would basically be:
Camera: Hey, can I have this IP?
Router: Sure, sounds good to me.
Camera: Hey, can I have this IP?
Router: Sure, sounds good to me.
Camera: Hey, can I have this IP?
Router: Sure, sounds good to me.
Happily, the camera would default to the last IP it had and since the data was largely one way from camera to NAS, I didn’t really miss anything. Neither did it occur to me that the DHCP messages were a symptom of this one-sided communication, though it seems obvious to me now.
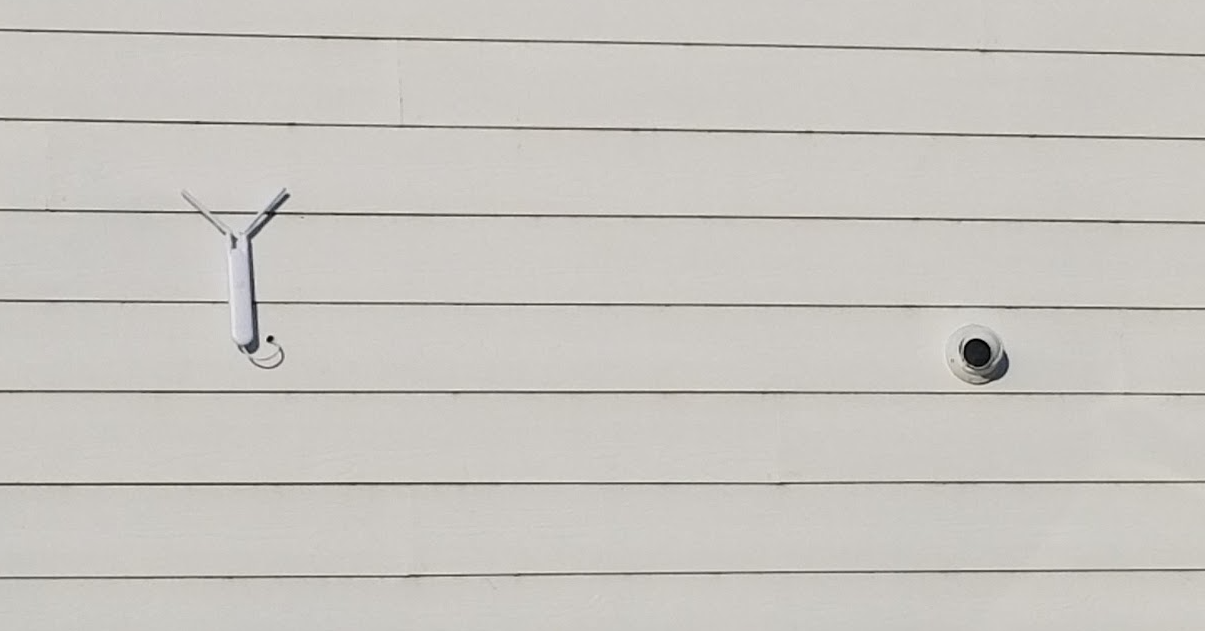
Once this occurred to me, I took some steps to address the problem. When I installed the ceiling mounted APs in the house, I had the wall mounted APs laying around. This model provides passthrough PoE, so I took it into the attic at the garage end of the house, closest to the gate camera. The driveway camera is PoE, so I reconfigured the cabling so that the cable powered the AP and the AP powered the camera. Then I reconnected the gate camera to WiFi and the attic AP was now a better signal than whichever one it had connected to before and the DHCP issue got better.
It did not go completely away, but now instead of DHCP requests several times per minute, all day, every day, it reduced to bursty, frequently everyday. I don’t know what made it work better sometimes than others, but it was definitely better.
I still wanted it to work correctly. I ordered an actual outdoor AP. I was going to quickly set it up for testing before permanently installing it and headed into the attic with it. I suddenly relized that the new AP doesn’t do the PoE passthrough as would be needed to have both the AP and the wired camera without running another CAT5 cable.
For the test, I connected the AP and even with it in the attic, the gate camera made only one DHCP request for the entire 30 minutes it was connected, which was definitely an improvement. I went ahead and drilled the hole and mounted the AP outside.
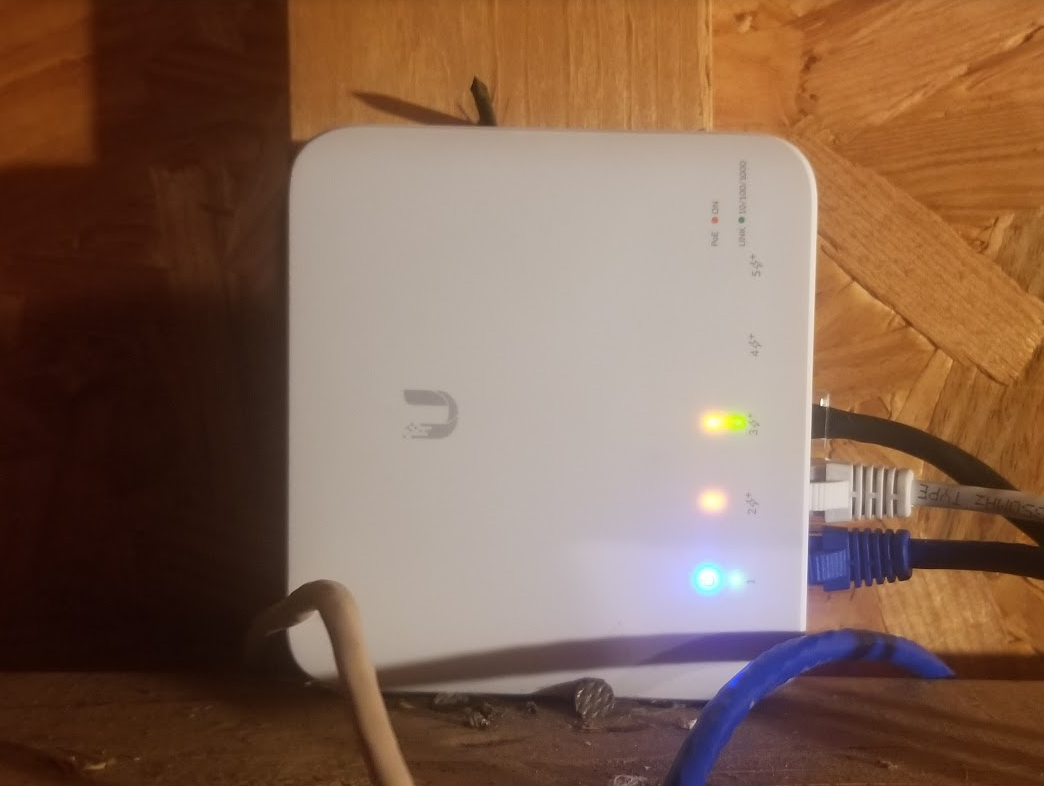
I had decided disconnect the wired camera for a day or two while I waited for the final piece of equipment to arrive, a USW-Flex switch. The USW-Flex is a 5 port switch that is both powered by PoE and provides PoE, within a reasonable power budget. As luck (and shipping) would have it, I had it the next day. It went in like a breeze.
The nails it is nestled between just happen to already be there and work perfectly to hold it in position where can see it lit up from the attic stairs.
The ports are limited to 25W max each and 46W total, at a temperature maxing out at 131F. The power ratings are reduced at higher temperatures. The high temperature range tops out at 149F and that range derates the maximum PoE power available to 25W. It seems obvious that Ubiquity expected these units to be deployed in attics where someone would use it like have to keep from running another CAT5 cable.
The AP and the camera each draw less that 5W each. I have two ports available for adding cameras as well. Assuming I stay with similar cameras, that seems likely.
Oh, and the gate camera does one DHCP renewal per hour, which is as it should be. And the frame rate increased.
Here is the home network as it currently sits, with Ubiquiti switches and APs:
That little box labeled “WiFi Devices” accounts for 50+ devices now. I have partially converted the things that should be on the IoT VLAN over, but I just haven’t done all of them yet.
I was responding to a post on a forum about pfSense and Ubiquiti and how they get along (very well, thank you) and it occurred to me that I left part of the story hanging.
When last we left our heroes, I had kinda iffy WiFi coverage in the house with the new gear, compared to the old gear, but I had all the desired VLANs working. The solution, or at least the obvious solution, was to further finance the purchase of more Bentleys for Robert Pera by upgrading my APs.
As you may (or may not) recall, one problem I had was that stationary devices in the house would suddenly feel the need to roam and managed to connect to the AP out in workshop. The workshop was so distant that shortly they would roam off it and the only other option was back to the AP in the house again. Vicious cycle ensues, cat and dogs, etc.
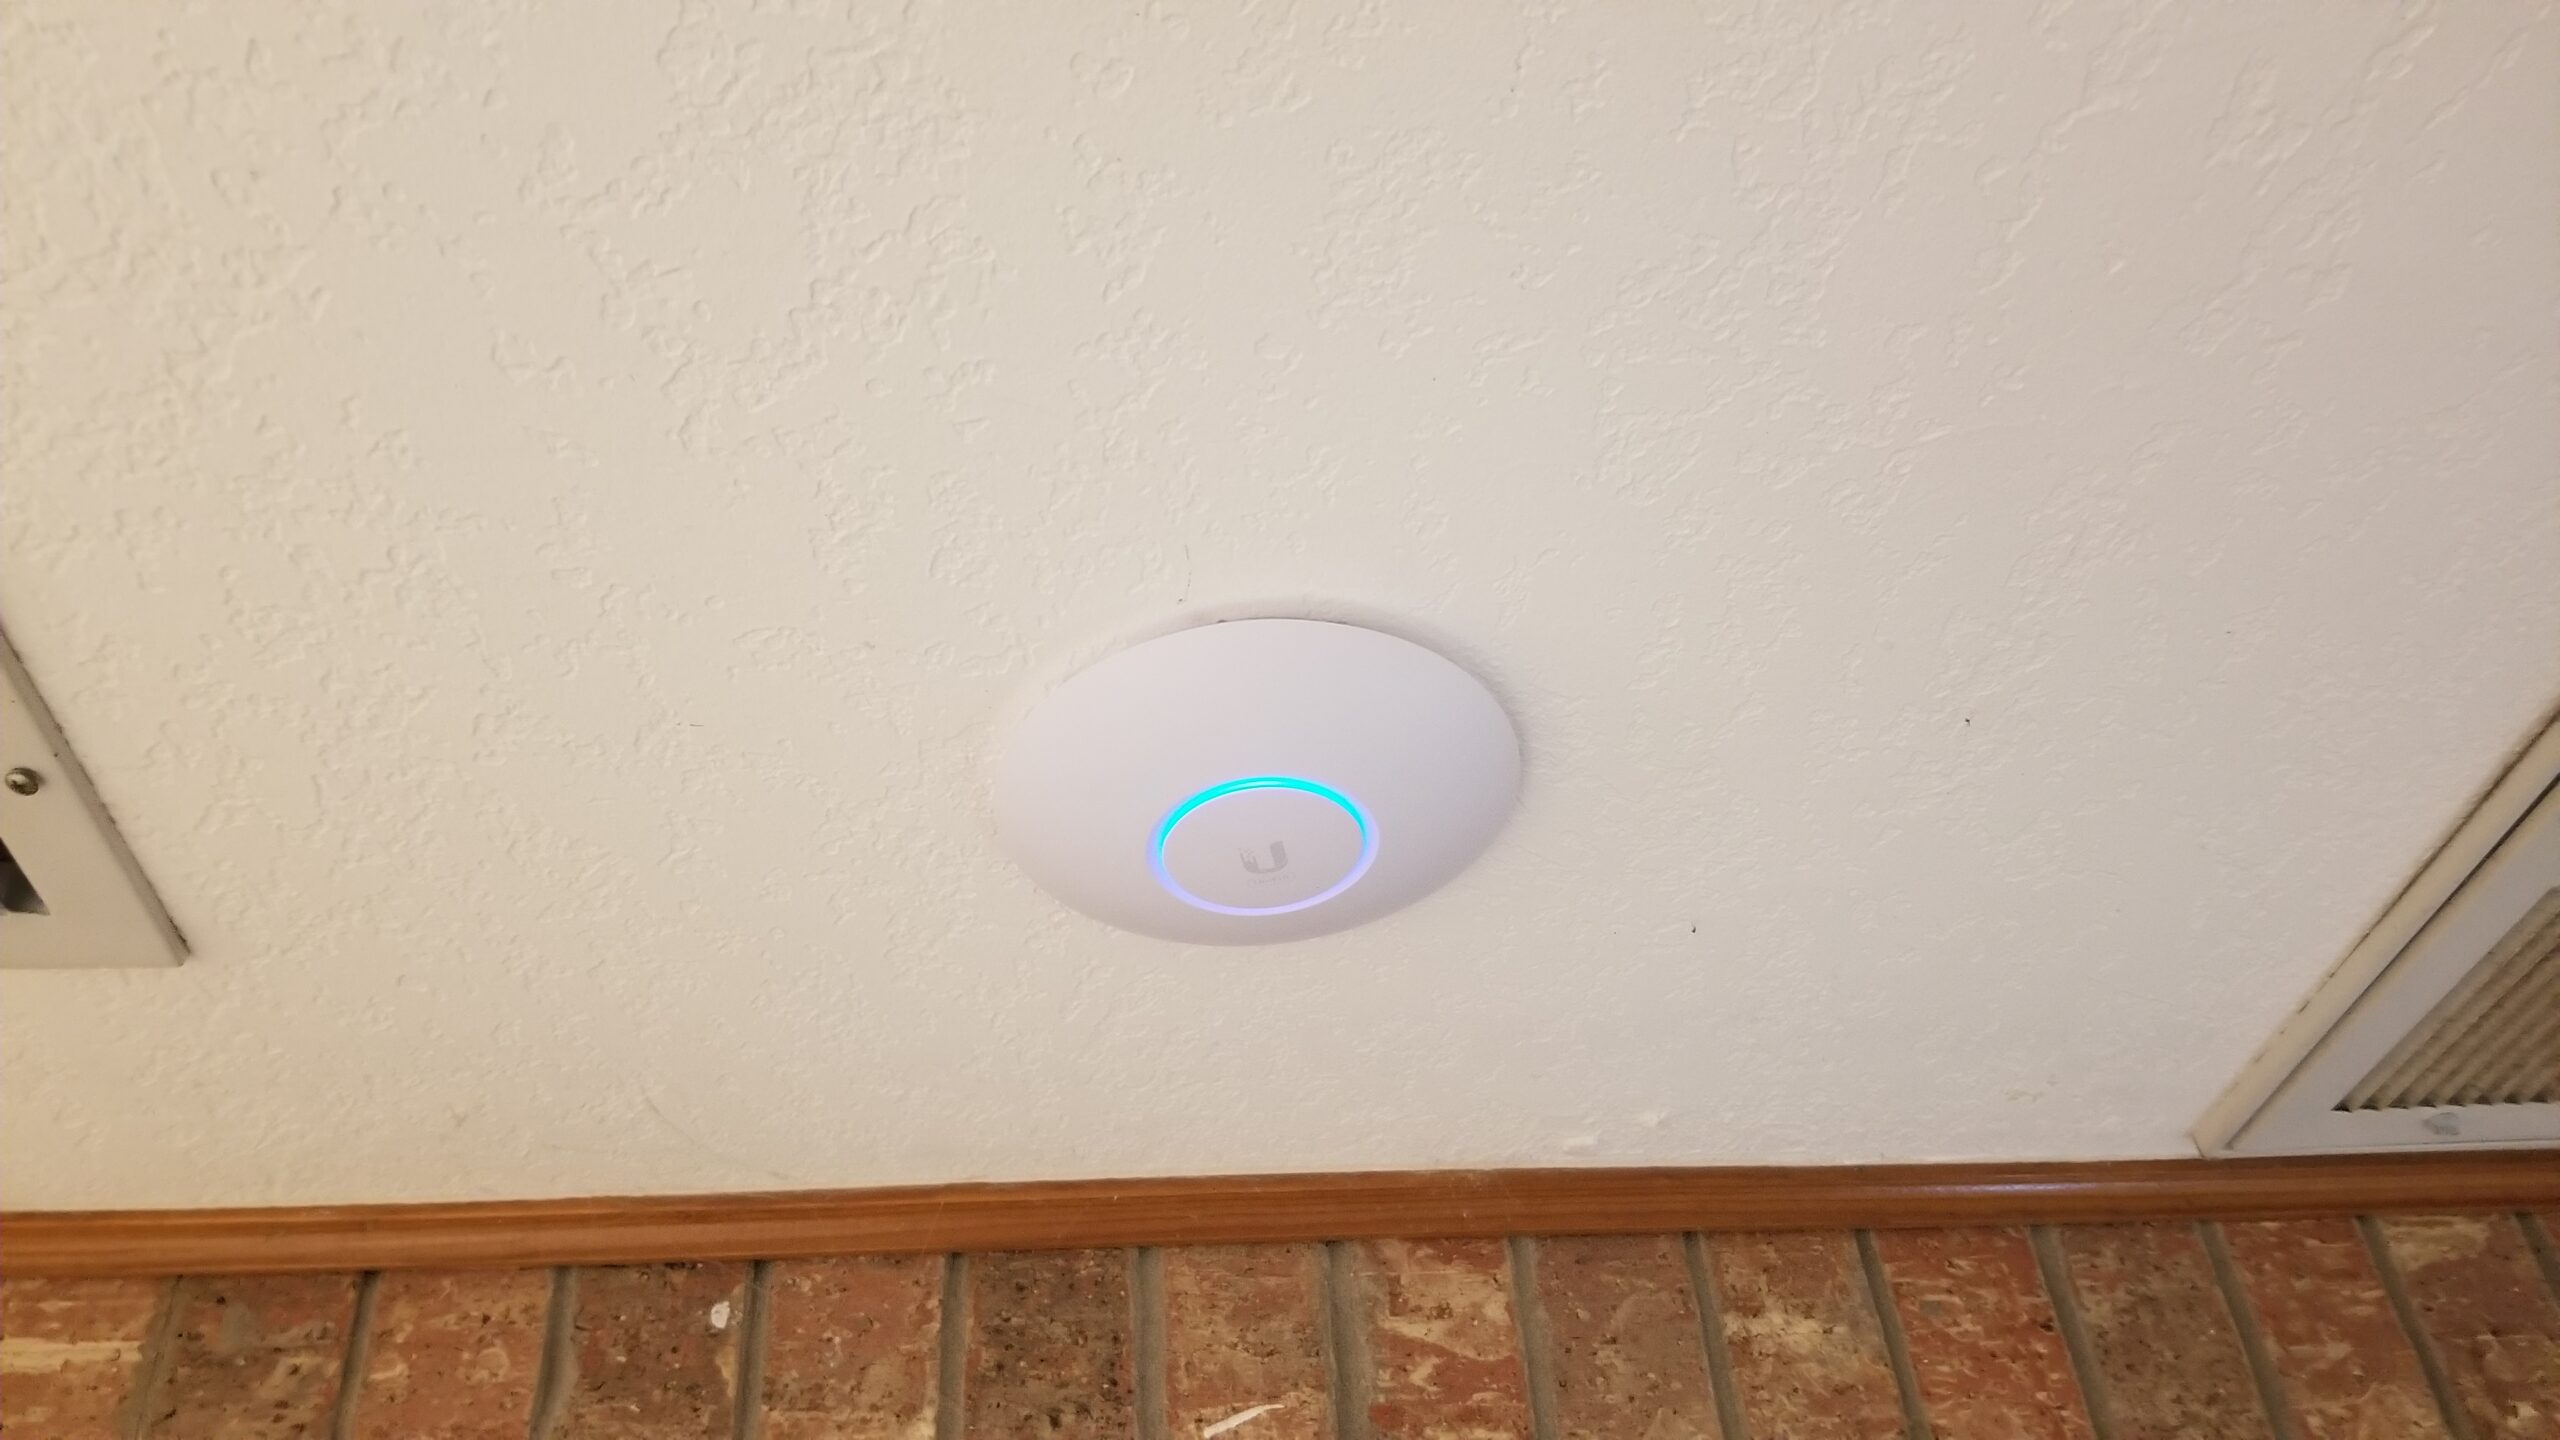
Well, the new APs arrived. I initially connected and tested by laying them about on desktops, but quickly got serious and ran wire for the main one to be deployed in the kitchen ceiling. The whole WiFi thing in the house got much better.
It is not without the occasional mystery, however. I have an apparently not terribly smart WiFi device that is the intermediate display panel for my Accurite weather station. The suite of weather sensors outside communicates via a 433MHz signal to the display panel, which in turn connects to my LAN via WiFi and kicks the data out to WeatherUnderground. This WiFi device is literally 15 feet line of sight, with no obstacles, from the kitchen AP. As I type this, the display panel is within reach of my left arm and the AP is two steps away. Consequently, this stupid display panel will connect only to the hallway AP on the other side of the house and ONLY that AP. I have tried every conceivable way to reset the display panel and the APs. The only combination that will work is if the hallway AP is online and accepting the Accurite panel. Nothing seems to make it forget the hallway AP and connect to the much closer kitchen AP.
Hard work often pays off after time, but laziness always pays off now.
I received the replacement Renogy solar charge controller. I actually ordered three of them, with visions of them doing other stuff. However, with the current camera connection to the battery working just fine, I am not in a huge hurry to change it and that laziness has paid off because the gate camera has been just fine.
Oh, I will change it out, just not while it’s still cold outside. We will have a warm day soon, I’m sure. It is winter in Texas, afterall.
I think I will put the “broken” controller on the Kawasaki Mule, to keep it’s battery charged even if we don’t use it all the time.
I have mentioned that I have a camera mounted by our front gate, powered by a dedicated solar panel, charger and battery.
I chose this Renogy Wanderer 10A solar charge controller specifically because it has USB power outlets built in, elegantly feeding the USB power cord to the camera.
The battery box lid, designed for indoor use apparently, had air vents on the top and allowed rain inside. The first controller died a wet death. I covered those air vents. It’s not as if the rest of the lid fits with a hermetic seal, so the box is still well ventilated, but now it is at least rain tight.
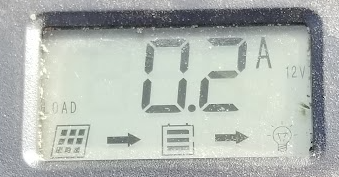
Wintertime is tough on solar stuff. So many overcast days result in less efficient charging. The camera draws 100-200mA;. The granularity of the charge controller’s output meter is 0.1A and it’s usually says 0.1A, but sometimes it’s 0.2A. Maybe when it is darker and the IR illuminator is on?
A couple of overcast days is enough for the lawn tractor battery to fall behind and drop power, especially after dark. The tractor battery is not intended for deep cycle use, although the gate controller is only on it’s 2nd battery in about 10 years. I think the constant drain of the camera, even at only 200mA, is probably the issue.
I have considered changing the battery to an actual deep cycle battery. WalMart carries an inexpensive ($80-ish) marine battery in the 24 size class. Real specifications for that specific battery were elusive, but I found several 24 size marine batteries from other sources. If they mentioned it at all, the amp-hour rating was 75-80 AH, so that seems likely for the EverStart at WalMart.
A more useful number for power service is the watt hour, literally how many watts for how long. It’s really handiest when comparing power systems that might not be running the same voltage. Conversion of AH to WH is easy enough. Voltage times amperage is wattage. For example, an off-grid solar system running 12V with 100AH of battery can be compared directly to a 48V system with 25AH of battery because they would both provide 1200 watt hours of power.
12V x 100AH == 48V x 25AH
In the case of the EverStart, 80AH x 12V = 960WH. A 12 volt battery is rarely actually 12 volts. Lead-acid batteries like to charge at 2.25 or so volts per cell, so a 12V battery’s ideal charging voltage is 13.8V. The open circuit voltage for a fully charged battery is about 2.1 volts per cell, so 12.6 is typical. Plug that number into the formula and a 12.6 volt 80AH battery should be good for 1008 watt hours.
Once you have a watt hour rating, figuring out how long a charged battery should last is pretty straight forward. In the above example, under ideal conditions, you should be able to draw one watt for 1008 hours, 2 watts for 504 hours, 50 watts for 20+ hours, and so on.
In practice, lead acid batteries can be permanently damaged if discharged too deeply. Deep cycle batteries are optimized to limit this damage, but you can’t eliminate it. It’s just how the chemsitry in there works. It is good practice to limit discharging a lead acid battery to no more than 50% charge, so derating that watt hour rating by half would be wise. One watt for 504 hours, 2 watts for 252 hours, etc.
Assuming 200mA for the camera and the specified 10mA for the charge controller itself, an 80AH battery should be able to run the camera for 192 hours to the 50% charge level, or about 8 days. That shoudl be plenty.
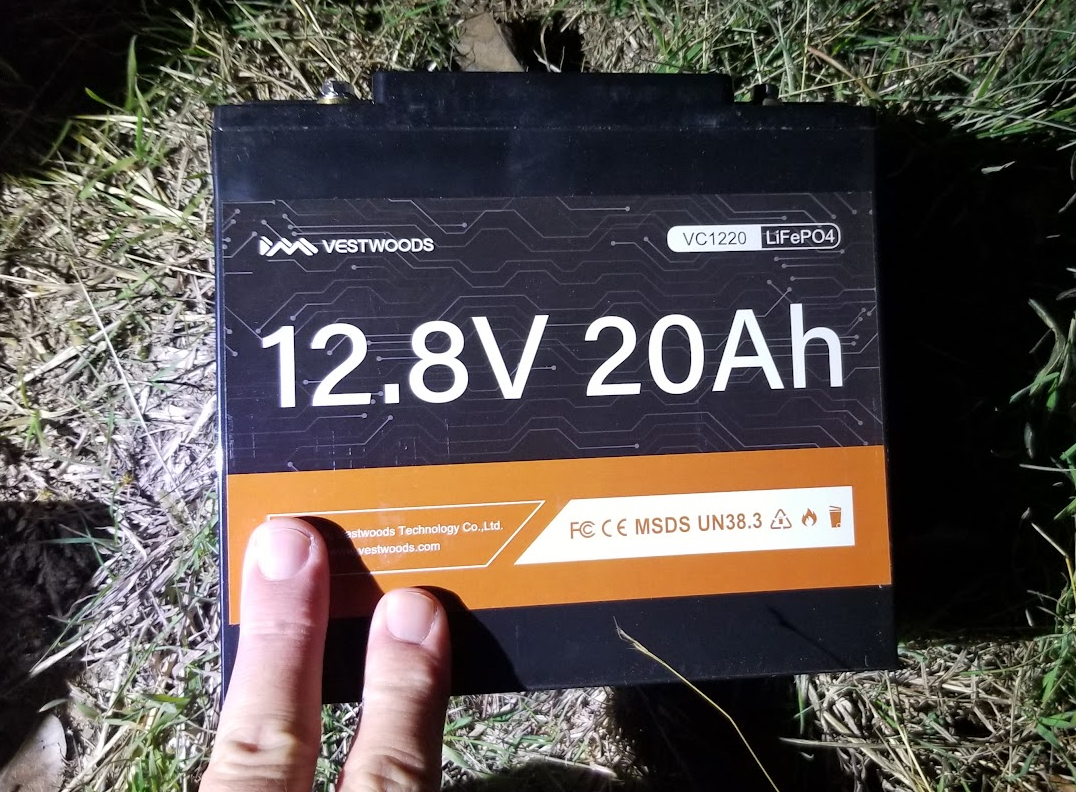
Then again, lead acid batteries need maintenance, especially during the summer months. All the cool kids are using lithium iron phosphate batteries in their solar systems, mostly because they enjoy certain efficiencies, but also because they are essentially zero maintenance, so I started looking into that.
LiFePO4 batteries can be charged and discharged faster than lead acid, are much lighter and because of smart onboard electronics, don’t really need a super smart charger. They are not particular cheap, however.
I found that 20AH LiFePO4 batteries run similar in price to 80AH lead acid batteries. 20AH works out to 96 hours and these batteries protect themselves at about 75% discharge, so 72 hours is likely.
So, roughly the same price as the big lead acid batter and only 3 days without a charge, but zero maintenance and an arguably longer service life. I decided it was worth trying one out at the very least.
Via Amazon, I chose at Vestwoods 20AH battery. The Renogy charge controller has a lithium mode. Part of setting that mode involves setting the charge voltage. The labelling on the battery indicates that it is a 12.8 volt battery, so I took that as the best guess.
It was delivered at 7:24 on December 30, ironically about a foot from where it would be installed. Here’s Amazon’s delivery photo. The battery box nearest to it is where it goes and the camera above it is what it powers.
It’s about the size of a large motorcycle battery.
I connected it almost immediately, by flashlight.
According to the recordings from that camera, it ran from 9:05PM on December 30 until 12:37 AM New Years Day.
The immediate presumption was that changing the battery type caused an issue. I didn’t have a lot of free time to troubleshoot, so it took me a few days to determine that what had actually happened was that the power output from the charge controller had failed. All indications are that it is on, but there is no power on either the USB jacks or the screw terminals.
Before I found the Renogy charge controller, I had purchased a 12V to USB adapter, assuming I would be using something like that connected directly to a battery. Using that, I was able to at least get the camera operational again, pending the arrival of a replacement charge controller.
My new WiFi is argubly worse than my old WiFi, but I think there is a reason.
I recently completed a pretty major [up|cross]grade of my home LAN. There were two main goals. First is to add some additional wireless VLANs so that I can help isolate my growing network of IoT devices and thus protect them and the rest of my devices from them. Second, and this is admittedly not a super important thing, it would also be nice if I didn’t have to connect to a different SSID between the house and workshop.
As detailed elsewhere, that was a journey of discovery, ending with the eventual replacement of two TP-Link APs and two Cisco switches with new Ubiquiti devices. Between the interopterability and easy of configuration, it was a good, though not particularly cheap, move.
Or so I thought.
A week or so later, it appears that I have a lot of connectivity issues. Once I really noticed it and started looking into it, I think I know what’s happening and at least a good bit of the solution, the full spectrum of which of course involves helping someone at Ubiquiti buy another Bentley.
I put the new APs exactly where the old ones were, but the old ones were perhaps a little more sophisticated, RF-wise. The TP-Link APs had an array of four large antennas and, sadly, physics matters. The UniFi APs look like oversized light switches and simply cannot have the same antenna performance. However, the one in the house seemed to work just fine until I had a compelling reason to move it. I wont go into those details, but it had to move from about the center of the house to one side of the house. As I am typing this post, the UniFi controller reports my WiFi experience as “Good”, rather than excellent, along with everything else here on this, the opposite side of the house from the AP.
The real issue comes about when, for reasons I have yet to determine, the experience gets enough worse that the connection is lost and the device, most noticeable to me when it is my laptop, sees the other AP, all the way out in the workshop, but with a marginally ok signal, at least compared to the one it just dropped and it roams to that AP. Now that weak signal results in a substantial slowdown and maybe it drops that connection, too. Then it sees the original AP and connects to it again. This vicious cycle continues.
Once I figured out that this seems to be what is happening, I set the workshop AP to lower power. This makes is a less viable alternative to reconnect to and at least stops the toggling. It does not, however, address the actual problem, which is that the new Ubiquiti APs I chose simply don’t have the coverage that the TP-link devices have.
So, I ordered a couple more APs, ceiling mounts this time. I think I can justify a unit in the hallway between the bedrooms and the livingroom and another in the kitchen. If those two provide dense enough coverage in the house, I can deploy the other wall mount in the workshop, to have two out there as well. If needed, however, I can find a place for a third in the house. One has seemed to be enough for the workshop thus far. Everything WiFi out there is within about 20 feet of the AP.
Update: The power setting on the workshop AP has definitely reduced the number of roaming events in the logs. [facepalm] Now they just disconnect instead. [/facepalm]