Chassis work begins

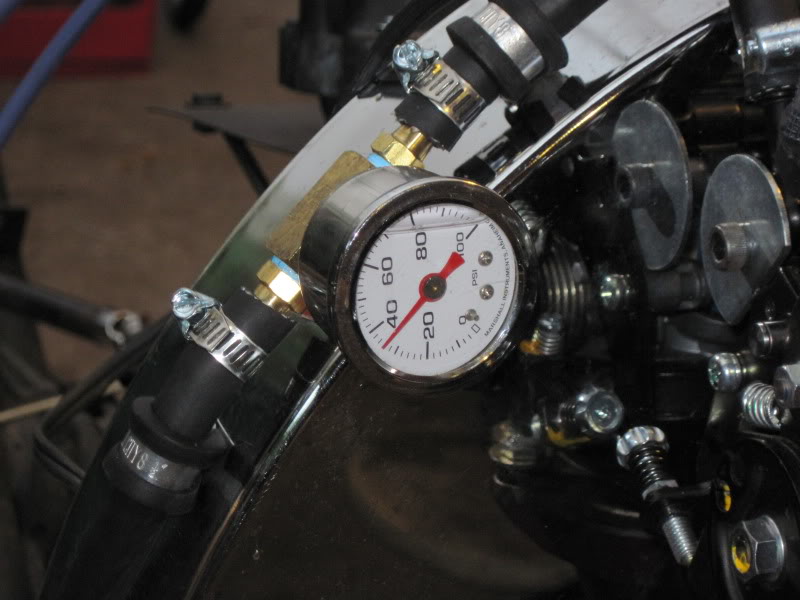
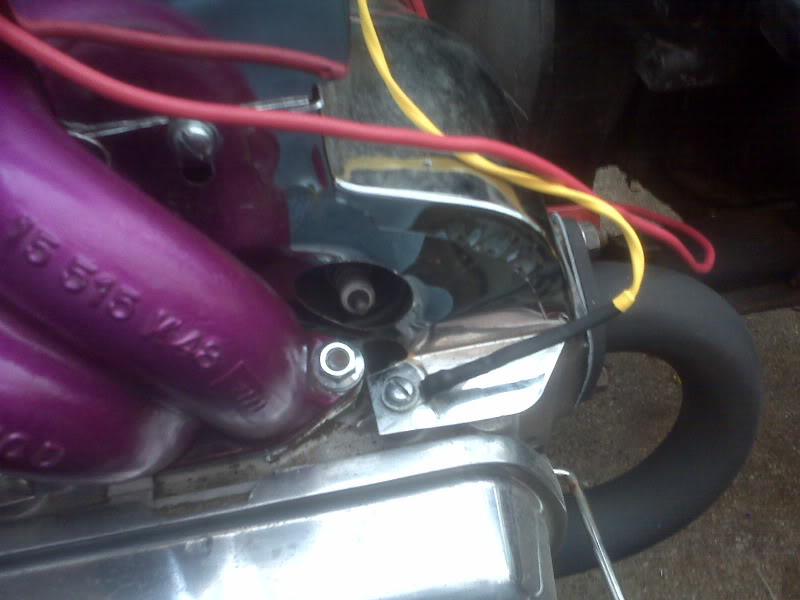
The engine is running and there’s not much tuning I can do with it until the trike is on the street. I did manage to install a fuel pressure gauge for help troubleshooting. Besides, it looks cool.

While I was typing this, the trim shop called and the upholstery is done! It will be tomorrow before I can get by there, but I’m excited about it…

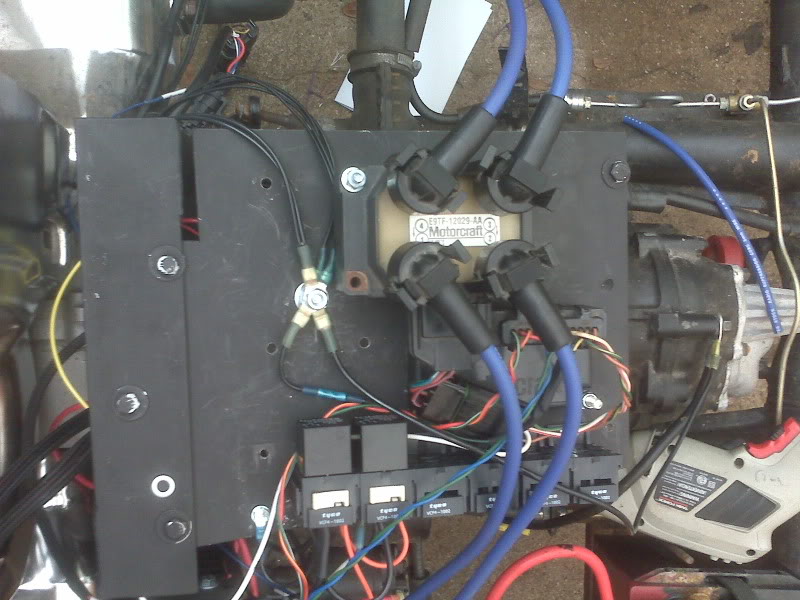
I am working on chassis tasks, including chassis wiring. The nerve center for the rest of the wiring is the speedometer and the handlebar switch. The speedometer also has odometer, tachometer, fuel gauge, clock, and six indicator lights, all of which are spoken for. The handlebar switch has switches for headlights, high beam, turn signals, horn and a momentary kill switch that I am going to use for the starter. Between these two units, there are 20-someodd wires that need to go *somewhere*. Since they both mount on the handlebar, I started there.

You may recall that the trike appears to have been in a wreck somewhere in it’s distant past. The handlebar was bent in that collision. I’m not 100% sure which, if indeed either, of the two bars is in unbent condition, but I elected to pay my attentions to the righthand and make it match the left.

I must apologize for not getting a ‘before’ picture. Using my newly acquired torch, I heated the lowest bend as evenly as I could and lifted the bar to match the left. This left the upper section slightly higher than it’s mate, so I heated the middle bend and pressed down to match the left. Then, viewed from the driver seat, the end of the grip section was pointed downward. I again heated the middle bend, but this time imparted a twist rather than a simple bend until the two match as closely as I can judge.

Please ignore that the bars are not mounted straight on the forks. That joint is not important to this particular operation. It will be important when it’s on the road, just not yet.

I then layed out the location for the speedometer and cut a piece of 1/8″ mild steel, shaped to fit at an angle between the bars and brazed in place.

While I hope to eventually re-chrome the bars, for now they just need to look better than this, so I sanded them to rough up the old chrome a bit, cleaned it with acetone and applied the same two part Krylon X-Metal treatment as I’ve used on the engine trim pieces.

Things are Afoot

Tuesday evening, I got to play rescue ranger for a friend who’s dying battery had stranded him. When I got back, I didn’t do much on the trike, not really wanting to do the 15-20 minutes of preparation I generally need to get started when I was only had an hour or so total. I did replace the throttle spring on the yellow trike with a lighter pull spring. I have not yet ridden it with the new spring, but it seems like it will work well and significantly reduce throttle hand fatigue, which is a big issue on that one. I use a cramp buster, but I rest the heel of my hand on it and still have press down to maintain highway speeds.

I digress.

[updated 5/21/2010]
Last night I took a little video of the engine running with a Canon compact digital. The sound and picture are way better than the Blackberry video, taken in the dark with sound apparently set to “extra crappy”, and the new one has no irritating narration.

I also did some work on the handlebars, needed to begin wiring the chassis and body, and I mounted a fuel pressure gauge.

Tonight I have a prior commitment, but tomorrow morning, I pick up the body with new upholstery!

With all these pieces coming together this week, I hope to be able to take it around the block sometime this weekend, at which time I can really begin to tune on the engine.

Speaking of tuning, I heard back from SpeedTek about the dyno thing. The 6-pulls-in-2-hours deal has to be scheduled well in advance. At any given time, they need 2-3 weeks lead time since the pretty much dedicate a technician for 2 hours. There is a chance I may be able to get on the schedule for the week of my vacation in June, but I will probably wait till after that.

Monday Logfile Analysis and Dyno info

I found SpeedTek, which is reasonably close to home, has several dyno pull packages, including the “Solo Power Pass”, which is basically 6 pulls in 2 hours with owner tuning time between pulls, for $100. I have sent an email asking about dyno testing a trike.

As for the log, what I know how to interpret looks good. Shrug….

The most obvious “problem” is the MAP pulsing. Standard deviation (assuming that is the right statistical tool) is 3.18 for a 15 second period of idling. The MAP needle on the MegaTune gauge jiggles, as do values tied to it, like injection pulsewidth and X-Tau correction and ignition advance. I think it might be easier to tune if this signal is smoothed out some.

At this point, the vacuum signal is taken from one throttle body, which feeds two cylinders. There appears to be only one non-ported vacuum port on the one TB. There are two other vacuum fittings, presumed to be ported, but I will T them together and see what that signal looks like to MegaSquirt.

As a testament to the cooling ability of the air blower, CLT was sitting at 180F after the engine had been sitting for a couple of minutes while I started the log. From the time the engine started until the temperature stabilized at 145F was just 60 seconds, much of it at idle or gentle reving. If water had the same drop, it would go from a cool springtime rain to ice cubes in 60 seconds, so that’s no small bit of cooling.

Tuning Results

First, O’Reilly swapped out my bum starter with no quibbles, though he did note that the starter worked fine on his testing machine. Hey, the new one worked well for me tonight, though admittedly, I used it a lot less tonight than last night. [that’s what she said]

I did a bit of reading today and have a better understanding of the tuning procedure. In my previous project, I think the throttle body was so oversized that even basic tuning was essentially unobtainable. In this setup, however, it actually responds to my commands… or at least it’s amenable to some of my suggestions, if it’s not too much trouble.

I loaded the last msq from last night and tweaked on the Injector Control, then reloaded and tweaked on the VE table, then reloaded and tweaked on the Ignition Advance, each seeing what effect I could have.

Oh, and tonight the O2 sensor seems to have regained it’s sanity. I don’t know why it went insane, nor do I know why it regained sanity. That worries me, but for now, I’m happy about it.

In the condition it’s in now, it idles pretty good, though my nose says it’s kinda rich. It revs very nicely. It was complete sputtersville last night. It was lean and massively backfiring below 4000 RPM, but now my testicles retract when the tach gauge in MegaSquirt turns yellow and I see 5400.

Of course, reving in the driveway and running down the street are largely different loads, and it will be a while before I can get on the street and start tuning for a load. I wonder how much dyno time would run?

Sunday Night Analysis

At the time of this writing, the engine idles pretty much flawlessly and tweaking some cells in the VE Table improved reving somewhat before I fumbled. Don’t ask me how, but I loaded and burned a previously saved msq file when I was switching back and forth between MegaTune and TunerStudioMS. I had done that a few times earlier, but I must have clicked ‘Yes’ to the question. At least it’s not like starting COMPLETELY over.

There are a couple of things going on that do not seem right. Most troubling is very flakey signals from the O2 sensor. It mostly stays pegged at 5 volts (or AFR 21.9, depending on which gauge you’re looking at), but will occasionally scatter like a crazy monkey. It was working well earlier in the day, at least returning believable numbers. Wiring looks good. I will try to locate or replace the programming cable and verify that the LC-1 is programmed correctly.

With essentially no O2 sensor, I’m tuning kinda blind and my nose says it’s rich at idle and my ears say that it leans out around 4000 RPM. Right before I shut down for the evening, I made a log file of a short run.

The first thing that was less obvious in MegaTune is a pulsing 5 KPa swing in Map at idle. This pulse occurs 6 or 7 times in most logged seconds, which corresponds with the expected vacuum pulses at idle. My vacuum signal is from one TB, which feeds two cylinders. (850 rpm / 2 cylinders) / 60 seconds per minute = 7 pulses per second. I recall a mention of such pulsing making tuning difficult and a damper made by restricting the vacuum signal slightly and following the restriction with some kind of accumulator, such as a clean, dry fuel filter. I will implement such an accumulator.

In the mean time, I will continue analysing the log file.

In a more entertaining note, it’s interesting to see single isolated MAP readings of 159 or so, which I presume correspond to backfires. Early in the first start process, when it was beginning to have a useful amount of fuel but was still too lean to run, I had a few spectacular backfires. One of them actually popped one side of the throttle body out of its rubber boot!

It Runs! Or at least it Starts and Idles!

The starter was definitely going. I pulled it out and found bronze colored flakes from where the motor shaft had been chewing on the bushing and an elongated center hole in the bushing to match.

For the non-VW people reading this, the aircooled VW uses a smallish starter motor with a shaft that engages a bushing in the transaxle case. I don’t personally know if any other vehicles do this, but it is unique in my limited experience.

It is also logical. The starter itself does not have to be as large as the usual starter with this shaft support built in, so the entire assembly is more compact.

So, my starter woes were just beginning because this transaxle used to be on a 6 volt Beetle. In 1967 when the line was converted to 12V, one of the major modifications was in the starter setup. The 12V flywheel has a few extra teeth, so it’s a little larger in diameter. The starter pinion gear is smaller (fewer teeth, with a side benefit of more mechanical advantage) and with the smaller pinion comes a smaller motor shaft and smaller bushing. I knew the transaxle had been from a 6V because of the other modifications needed to make room for the bigger 12V flywheel, but I did not yet know about the bushing change.

The easiest way around this problem is to use a starter from an automatic transmission, which for what I presume are other reasons, does not use the shaft support bushing at all.

However, AutoZone did not stock it and I didn’t want to wait for them to order it in (I need a starter NOW!) so I took a standard 12V starter. When I got home, I verified my concerns about the bushing, but I pulled the old one out anyway. Oh, and I discovered during the photo hunt above that they make a tool for pulling this bushing non-destructively. I don’t have one, so I use an adequately large tap threaded into the bushing. The end of the tap presses against the engine case and the threading action pulls the bushing out. Thanks to Ricky of the BTW for supplying this excellent tip. Of course, once the bushing was out, my bushing size fears were confirmed. I did a little more searching and found a starter for an automatic at an O’Reilly a little distance across town.

It is a substantially larger starter, but it fits and spins the engine WAY better than the old one, pretty much confirming my theory that the battery is probably OK.

In searching for the images of the starters above, I also discovered that there are plenty of vendors that supply a bushing properly sized to run a 12 volt starter in a 6 volt transaxle. They tend to run about $3, so it would be a good thing for me to have a couple of, maybe even zip tied to the starter in case I have to replace one on the road and cant get a starter for an automatic.

I was able to crank the engine enough to get it started and idling before the new starter (rebuilt, actually) developed a flakey solenoid. I was generally able to work around it with the following procedure:

1. Make parameter change that kills the engine.
2. Emit expletive
3. Restore parameter
4. Press and hold remote starter button.
5. Whack on starter solenoid with deadblow hammer until it cranks.
6. Repeat. A lot.

Before I shut out the lights last night, I pulled the starter out and will return it for replacement today. The deadblow hammer ensured that there are no overt signs of any starter abuse.

As for the *actual* process of getting the engine to start, I had a curious symptom. The calculator in MegaTune suggests a ReqFuel setting of 13.6, derived from plugging in 1600cc displacement, 245 cc/min injectors and a target AFR of 14, but I had to slowly step it up to 44 to get it to start and run well. I would almost expect 26 or so if I’d made a couple of improper assumptions, but the jump from 13.6 to 44 suggests I must be plugging the wrong number in somewhere.

Interesting enough, I have just discovered that the online calculator in the the MegaManual returns 44.1 for the same parameters. With some experimenting, the online calculator will return 11 if I set it for 4 squirts and 14.7 AFR (Gasoline in the pull down selection). I will need to compare this to MegaTune.

In any case, I was able to get a very decent idle and, so long as I open the throttle VERY slowly, I can rev it up and it spins nicely till about 4000 RPM, where it starts sounding very lean.

Full Weeknd of Trike Work; First Run Attempt Underway

The weather guessers were off, but to my favor, for it has been a very pretty weekend, with occasional showers widely spread. Had about a 5 minute shower about 8AM but it’s sunny now.

Friday evening, I made a replacement CLT sensor. I started it a couple weeks ago by chopping the thermistor out of a standard GM IAT sensor and soldering longer leads to it. I epoxied it inside a 10ga ring connector that had heat shrinkable sealing and protected it further with more heatshrink. The finished sensor is secured under a screw for the cooling tins by cylinder 1. It seems to work really well, giving quite believable readings.

I spent all day Saturday finishing the wiring, minus a couple of necessary interruptions (lunch, AutoZone, etc) and had the engine ready for first crank late Saturday night. In the couple of years it’s been sitting around and very rarely used, the battery on the trike appears to have, completely understandably, weakened. It will crank the engine about 4 rotations, all at about 9V. I decided to reach a stopping point and resume efforts on Sunday morning.

As of 11:45 Sunday morning, with a battery borrowed from the other trike, I have managed to get it to crank enough to putt-putt twice and backfire a few times. Amongst the little things found wrong along the way are the SAW and PIP signals to the EDIS swapped, the trigger wheel was off by one tooth and the plugs wired to what appears to be the wrong terminals. Against the advice of the MegaManual, I did indeed confuse the coil terminal numbers with the firing order. They are not necessarily related.

It’s nearly lunchtime and I’m letting the battery charge a bit between tries. It will only crank two or three times then I need to put the charger back on it. Considering how well the yellow trike cranks and how quickly the same battery runs down on this trike leads me to wonder if my starter is going bad. The yellow trike had similar symptoms and a new starter helped greatly!

Re: 70-something Stires Trike

We’re pretty much on the same thought process on that, on my bike I located the fan within a frontal air scoop that is used to direct air towards the rider from the opposite side on the fairing, and has a direction change device that keeps rain separate from the ram air. The fan sits on the floor of that plenum, and has the “mini” funnel outlet shape and adjoining 1″ ID hose leading on towards the alternator (in my case).
I used to have the ecm mounted out near the rear tire, and was in an area I had concerns about road splash etc, and the IP52 MS sealing rating in not extremely water tight. I relocated within a storage compartment under the seat, actually have the relay board, fuse panel, as well EDIS 4 module all residing in that area. Should the EDIS generate more heat that is reasonable I will relocate that up front near the coil pack (right in the air stream for cylinders).

Re: 70-something Stires Trike

R100RT wrote:a small, remote located computer fan […] feeding a 1″ ID hose that develops very slight but positive pressure into a cover fitting

I had thought of something like that, but I was primarily considering the potential need to cool the enclosed ECU. That seems an excellent way to do both, provided of course that the intake to the fan is kept completely dry. Blowing water in that wouldn’t have gone in normally would be bad. :) The fan intake situated very high under the body, blowing through an S-trap would work very well.