As I write this, Christmas, New Years and Valentine’s Day have all come and gone since the last update on the Jayco.
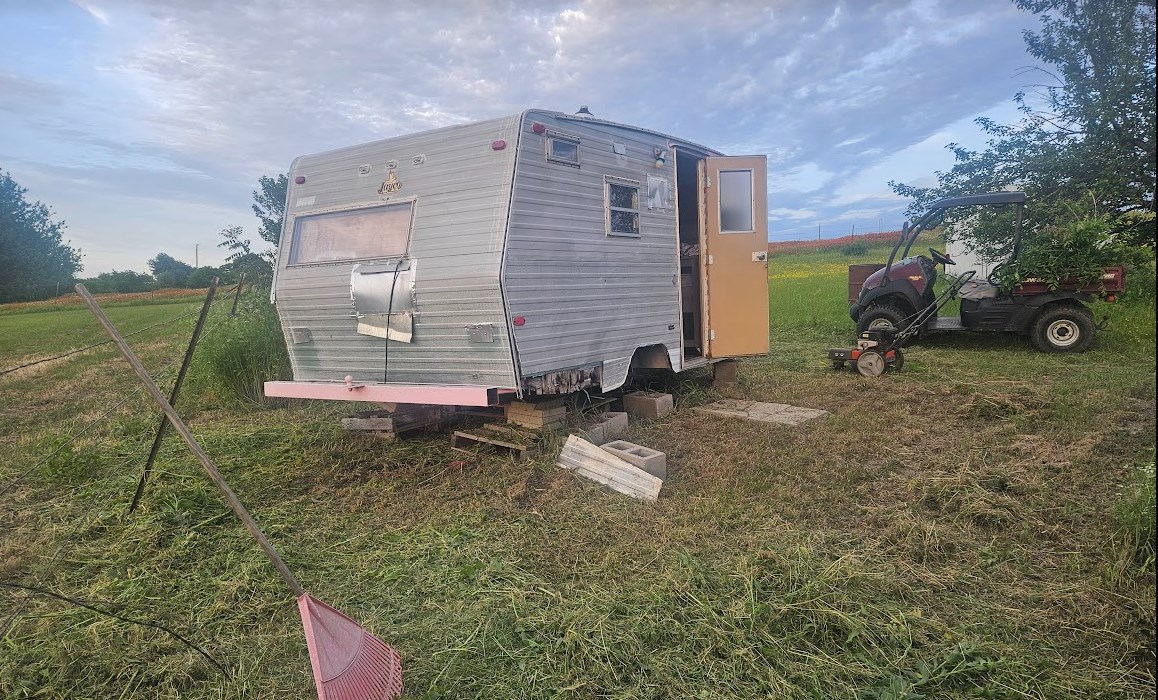
Since the Jayco is expected to be at least semi-permanently parked at the campground in Dennison, we had eyes open looking for a deal on a small camper that could be easily towed behind Wifey’s Sorento and on or about December 8, we found and acquired same.
This little guy does need a little work, but it’s not it terrible shape, especially for the cost.
The timing was interesting. We were packed up and literally on the road to Dennison in mid December when the truck overheated. We were not really even out of the neighborhood, technically. Went back home and killed an hour troubleshooting to determine that the water pump was leaking. Our choices were to stay home or pivot and do the shakedown cruise with the pop-up camper. We went for it.
We (understandably) arrived in Dennison later than planned, but the little camper stepped up and did well. It needs curtains!
We did not fully trust the untested propane furnace, so we just bundled up for bedtime. Having cuddly doggies helps.
When we woke up in the morning, we found that not only was it just cold and damp, but the door was standing fully open, so it was even colder inside than it needed to be. Since we were now awake, we went ahead and fired up the furnace. It worked perfectly and provided a stupid amount of heat. It can run you outta there if you let it.
The Palomino Pony camper will probably get it’s own blog category when we tear into it. Stay tuned.
Also, replacing the water pump in the truck was itself not a terrible task. I replaced all of the consumable cooling system components, including the upper and lower radiator hoses. They were probably fine, but they were also 20 years old.
Meanwhile, the work on the Jayco resumed. When we last left our hero, the damaged fender had been refurbished and reinstalled. The fender needed some sealing.
I used a generic flexible sealing tape in some places where caulking didn’t seem appropriate, such around cracks that formed where the frame protrudes into the cab and where the rubbing tire had worn a hole in the fender.
Hopefully that whole fender project is done!
The Lug Bolt Excursion damaged the gray water plumbing. It took a little while to gather the necessary components for the repair. The existing pipe is ABS. I’m not sure why, unless ABS is just more resistant to freeze damage. Lowes is phasing out ABS pipe, which made it slightly difficult to locate in the store, but they still had it and for the best price. They get about $12 for one 5 foot long piece of ABS pipe, which is kind of ridiculous on it’s face. That is, until you get the price from anywhere that has “RV” or “camp” in its name. From Camping World, you have to buy two 6 foot pieces in a kit for $90. That is $7.50 per foot, compared to what I thought was expensive at $2.40 per foot at Lowes. I needed only about 2 feet of pipe and two 90’s to make my repair and had I been willing to skimp, I could have done it with about a foot of pipe and a coupler.
The sheet metal bracket was pretty much trashed so I made a plywood replacement. I somehow managed to not get a picture of the completely finished outlet. It’s nice.
A surprisingly tricky task was reinstalling the original trim around the bottom edge of the camper. This was tricky because almost none of the original wood that this trim attaches to was still there; it had almost all been replaced when the original walls were rebuilt and little of it was exactly where the original had been.
Around the wheel wells was mostly close. Even so, I needed to fill in a bit in areas, some more than others.
In some areas, I chose to cut custom pieces from 1×4 lumber to fill the gap by marking first the fit to the existing bottom edge of the camper, then tracing the matching bottom edge of the siding.
I had to do this in four areas, basically in front and behind both wheels. Then I could apply the trim to hold the siding to that bottom edge.
Wifey found a lady online who makes custom awnings for vintage campers. Her work is incredible. We elected to choose from a few she had in stock, as opposed to the daunting task of choosing custom fabrics for her to make a custom one just for us, but I think we did well.
If I were better at this blogging stuff, I’d have a picture of it to post here. At some point, this paragraph will disappear and a picture will replace it. 🙂
However, the awning connects to the camper by way of sliding into a special aluminum channel. The channel on the Jayco has endured a fair bit of abuse in its 50+ years and is at least partly pinched closed, preventing a new awning from being deployed. I designed and built a custom swage tool to address this issue.
I started with a Stanley punch that was the right diameter, 5/16″ if I recall correctly. I softened the edges of it somewhat, so that it would be smooth to drive through the aluminum channel. I heated it with a torch and bent an offset into it. I then ground away material to allow the offset to fit into the slot of the channel. The pictures will probably make more sense than the description.
To use the tool, you start at one end of the channel and run it through to the other end, driving it through to widen the channel where needed. I found that it was helpful to kind of wiggle the swage though the worst spots, sometimes using a sheet metal creasing hammer on the outside for more effect.
In all, however, it was about an hour long job, including making the tool. Sometimes, I impress myself.
I finally made a set of stairs. I’d like to say that the 2 inch addition on the back is because of a material limitation. Unfortunately, however, I had spent a few hours designing the steps, scrounging up the materials and building the the stairs. I proudly showed them to Wifey and the first thing she said was, to wit, “It would be nice if the top step was wider.”
One of those little things that needed to be done for a long time was to put a latch on the rear bed so that it will not slide out of place while towing. The original latch was lost so I finally procured another. It is interesting that this little latch on one end of the bed is enough to hold the whole thing in because of the way the bed slides in place.
Fast forward about a month to January. Back when the whole lug bolt unpleasantness occurred, we had a Walmart tire mounted on that one wheel. We have not had a spare at all until now. We took the spare wheel to Discount Tire and had the same model tire mounted as the other tire on the ground. Right now, this is the tire that is the spare. At some point, I will swap it so that both tires on the ground are the same Discount Tire units and the spare is the Walmart tire. In any case, I have now mounted the spare tire carrier on the bumper, which turned out to be trickier than expected due to avoid blocking the tail lights and clearing the hitch on the bumper.
This same weekend, I did a LOT of finish trim work on the interior. I was particularly happy with the work around the ceiling vent and this celing seam.
Likewise, I think I did the best I could with what I had to work with here. That outside corner was not helping…
There were several kind of oddly shaped panels that came together on some of these walls, based somewhat on what material was on hand, as opposed to waiting and going to buy new material later. This left me with some seams to cover. These are mostly behind the refrigerator, so they are not particularly noticeable, especially now that they are covered with trim!
This one shows not only a bunch of trim, but also the switches by the front door.
Due to a slight lack of planning, this switch box is mounted a little too close to (read: under) the door frame, which made the switch plate a challenge. I managed, however, and one switch is wired to an interior light and one to an exterior light. The exterior light is kind of irritatingly bright 🙂
This gives us both 110V and 12V exterior lights.
This brings it pretty much up to date to early February. The February full moon event was Feb 8th.
We arrived early enough on Saturday to take an evening scooter ride before drum circle, though Sunday was uncomfortably damp for a daytime ride before packing up and heading home. :/
The short version: I replaced the U-bolts and springs that were damaged when the wheel fell off since I didn’t check the f*%#ing lug bolts before we left on a trip. Then I started repairing the other damage done by that event.
I did indeed go install the new springs and U-bolts as planned.
Even though it had rained during the week, the ground was dry, so I elected to work on it in the campsite. Saturday was an absolutely gorgeous day, warm and sunny.
First thing was to get the camper elevated and supported by jackstands before rolling around under there.
With the wheel off, I was also able to better document some of the other damage done by the rogue wheel.
There is a lot in this one picture. You can see two side seams of the galvanized steel fender that are pulled apart, the crunched end that would normally be stapled to the bottom side of the floor, the wrecked piece of floor itself and underneath, the damaged gray water outlet.
One reason I wanted to replace the springs as well as the U-bolts was that this spring definitely lost some dimension to the roadway.
To get on with it, I put a jackstand under the axle so that I could remove the spring.
Using an electric 1/2″ impact wrench made short work of removing the old shank bolts. The splined design of the new bolts prevented me from using my torque wrench on the front mount. The splines bite into the mount and the bolt can only go in one way. There is not room to get a socket on the nut. They are plenty tight, though.
A little natural tension in the system fought with me, but with a little convincing leverage, I was able to get the axle to pop onto the alignment pin. Then it was trivial to put on the tie plate and U-bolts and torque to specification.
The wobbling wheel quickly chewed off the dust cap, so after readjusting the castle nut and installing another new cotter pin, I gave it a new dust cap, too.
I have found that removing and installing the wheel on this side of the camper is easier if you deflate the tire first. It is a very tight fit between the hub and the inside of the wheel well. So, here is the wheel reinstalled, with new lug bolts, being reinflated.
I didn’t take pictures of the process on the other side, as it was almost identical, with the exception that I had to remove the U-bolts on that side and to get the impact wrench over the ends of those bolts, I had to dig a shallow pit under the assembly. Also, since everything was still assembled, the components were under some tension, which complicated things at first.
We are not skipping this step. 85-95 ft/lbs.
It now sits as level as the ground it’s on!
We had decided before I even left the house that if it was 3:30 or later when I finished that I would just spend the night in the camper and tow it home in the morning. Not only did I just not want to tow it at night with all the new suspension under it and no spotter, it was discovered on the way into camp last time that we had brake and turn lights, but no tail lights. It is presumed since the wiring traverses the damaged region that something may have happened to the wiring.
In any case, it was a few minutes after 4:00PM by the time I got everything wrapped up and it would have been later than that by the time I got it hitched and ready to go. Besides, I had already been invited to join the proprietor’s family for dinner, which turned out to be an early Thanksgiving dinner with wonderful smoked turkey. We caravanned a trail ride through the woods and enjoyed a short campfire.
I enjoyed my pipe and a couple of beers as well. In all, it was a relaxing evening after a successful day’s work.
The tow home the next day was uneventful, for once!
It would be the Friday after Thanksgiving before I would start on the fender repair.
From the inside, the damage is no better or worse. This is the rear of the fender from the inside. The floor covering makes the floor look better but somehow, the fender looks worse. 🙂
I jacked the camper up in similar fashion as for the spring repair, removed the wheel and crawled under there to remove the 658 staples holding the fender in place. I didn’t actually count them, but it would not surprise me if there were at least 100.
Well, almost all of them. Apparently when this thing was built, the floor, complete with fenders, was completed and then attached to the frame. There was at least one staple hidden behind each spring mount, unreachable to remove. I was already going to cut the worst part of the splintered floor away for replacement, so I just cut a little more away and addressed these hidden staples.
I removed part of the floor tile and cut away the really shredded part of the plywood floor. I applied glue liberally and clamped it overnight to refurbish it.
The fender itself surprised me. I really expected to have to get it kinda close, then grind/sand the paint off and solder/braze/weld the seams back together, but using a set of basic auto body sheet metal repair tools that I picked up years ago for an unrelated project, I was able to carress the fender back into fender shape and reuse the existing seams. It is not in original condition, but it is in it’s original shape.
I was sure this seam was a gonner.
But this is how it turned out.
I didn’t know until I sat down to write this blog entry that this particular seam is called a Pittsburgh Lock or sometimes just Pittsburgh seam.
In this case, the curved top portion carries the lock folds, shown here in blue, and the flat sides have the simple edge fold. I used the sheet metal tools to reform the curved or flat piece. I folded the edge of the blue open, reintroduced the red fold into the lock and hammered the fold back down.
The crunched up section responded well to the sheet metal tools as well.
I didn’t really notice until I was working on the sheet metal that the fender rubbed enough on the tire to heat it up and heat it up enough to discolor the paint. I suspect this was after we had a new tire on and had continued down the road, with the trailer leaning heavily with no springs on this side.
Much later during reinstallation of the fender, I would also notice that there are some spots where this area has a couple of spots where light shines through.
For the floor repair, I cut a shape to fit the void I had cut out earlier. This required a little hand fitting since the cutout was done freehand with the oscillating tool.
I could not think of any better way to securely attach it other than glue and screws. It’s plywood, so of course it wanted to split out with such a narrow piece.
I didn’t get pix of the repair of the repair 🙂 but I did get one of the fix of the smaller piece at the front of the fender cutout.
I find it amazing how many voids are just naturally in this plywood anyway. The gap in teh middle is not a split, but a void in the plywood.
Here we are getting ready for the first staples reinstalling the fender. The repair is solid, but it could have been maybe 1/4″ wider. Still, it will hold just fine.
That turns out to be the last picture I took of the fender reinstallation process. I put the requisite 100ish staples back in, especially around the wheel well opening. There will be some sealing to do from the top and I need to put the floor tile back in, but the fender job is basically done.
There is a trim piece that runs along the bottom edge of the each side of the camper. This is a good opportunity to reinstall that.
In the wake of a successful debut of the Jayco, we had a new hitlist of perhaps less urgent things to get done for the following month’s trip.
Our 2004 RAM 2500 truck has been a workhorse. Wifey commuted to work with it until we moved out in the country. It has hauled horse trailers, several RVs, utility trailers, etc. I love that it runs essentially the same 0-60 time with or without a load attached.
However, in the last few years, it has developed some troubling transmission symptoms. If it sits unused for a long time, couple of weeks at least, it wont immediately move when put into gear. One has to shuttle back and forth between Reverse and Drive a few times to get it to roll. More recently, it developed a more worrisome issue wherein it would seem to be stuck in 2nd gear, especially if you were engaged in even modestly aggressive acceleration. You could often kind of force it to shift by manipulating the throttle, but it was not reliable. This made towing the Jayco trickier than it had to be and, surely, the extra weight of towing something can’t be helping whatever is wrong with the transmission. Store this note away for a few minutes.
We returned with the Jayco on Sunday, October 20. On Wednesday, October 23, me and about 25 of my IT Infrastructure Team coworkers were all laid off work. In a Teams call.
I spent most of the week reeling from that and starting the job hunting process, something that I am WOEFULLY out of practice with. I’d been with this company for 21 years, with the previous company 18 years and literally had a weekend off between those two jobs. I haven’t had to actually hunt for a job for nearly 40 years.
By the weekend, it was time to get on with the camper.
I replaced all the rear marker lights. The new wiring does not presume that the metal skin is grounded, so I wired the ground to each light.
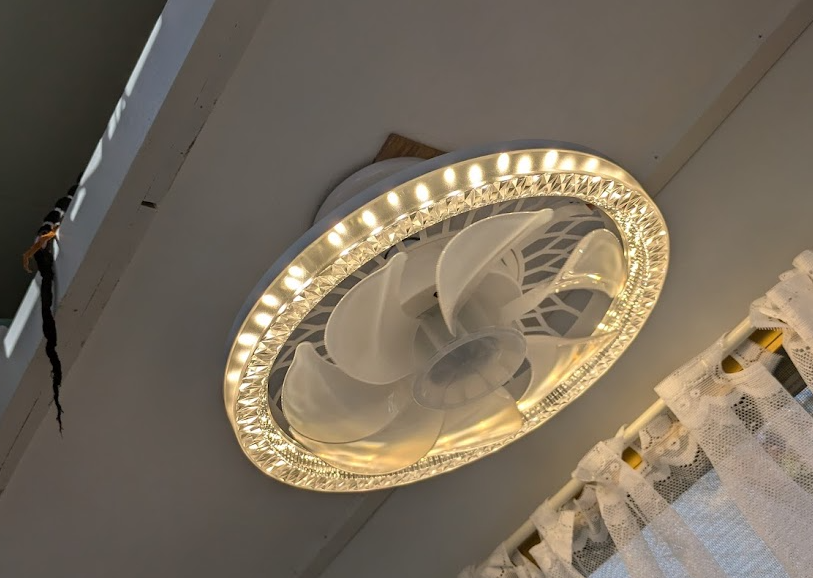
I upgraded the light over the rear bed to an LED light/fan combo. It has a remote, which is obviously intended to be used from below. It throws a LOT of light and the light’s color temperature is adjustable. The fan is nice, though on high, it vibrates a little.
Speaking of fans, I manually wired 12V to the roof vent fan and verified my fears, that as mounted, it was going to pull the screen into the blades and sound like a chainsaw. I fabricated a simple bracket and flipped the fan over. I also flipped the fan blade on the motor so that it could run in the proper direction. The red sharpie arrow no longer applies. 🙂
Since I was playing with 12VDC stuff, I mounted the DC room light.
And the outdoor light, which doesn’t look very bright in full sun, but it is on.
With all these 12 volt devices installed, it was past time to install the massively oversized 12 volt converter, starting with adding a 110V outlet in The Hole.
It will one day be slightly taxed by charging a battery, but for today, 45 amps is about 42 amps more than necessary.
November 1 & 2 was a major IDPA match. It was fun, though I didn’t place or win anything. Coolest logo and match shirt ever, though.
Wifey went to visit friends in Oklahoma on that Saturday and I had plans to continue working on the Jayco and perhaps do some work in the workshop to get ready for some winter blacksmithing.
Trouble arose on the trip home from the match on Saturday. I was only 30 minutes from the range and still an hour from home when my car developed a leak. It leaked oil and connecting rods out of a hole in the side of the engine block.
Luckily for me, this spot on the road was only 20 minutes from where we camp with the Jayco and the incredible people there came to my rescue without hesitation. They loaned me one of their cars to get the rest of the way home. The next morning, I rented a U-Haul tow dolly, returned their car to them then picked up mine and towed it home. At this point, I am still not sure exactly what I am going to do about it, junk it or attempt to repair it.
With the next Love’s Way outing rapidly approaching, we are suddenly in a rush to get a bunch of stuff done in time for the weekend.
I replaced the kitchen faucet and the shower wand and finalized the installation of the water heater, bringing the last of the plumbing to a close.
The kitchen sink was a handy place to record the video of the shower wand in operation.
I added a terminal block specifically to distribute DC power, complete with its own fuse.
I added a light in the ceiling of The Hole.
I added the switch for the roof vent fan to the 12V ceiling light.
Importantly, I installed USB charging outlets by each of the beds!
You recall we had concerns about the transmission on the truck. I had been doing research into the issue and found two solutions, either or both of which could be our problem.
One is a hydraulic pressure regulator solenoid and/or pressure transducer. These are internal parts, but they can be reached by removing the pan on the bottom of the transmission and they are generally not very difficult to replace. There are commonly available parts kits that include the pan gasket and a replacement transmission oil filter, which you have to remove to get to the solenoid anyway, so you may as well replace it. In all, a couple of hours work and 7-8 quarts of fairly expensive automatic transmission fluid. It is unclear if this will directly address the 2nd gear slippage, but it definitely addresses the lack of motion after the truck sits unused for a while.
The other is a far simpler procedure. There is an externally adjustable tension setting for one of the tension bands. It is common for transmissions with 100K or more miles to need this band adjusted. The various YouTube videos describing it’s adjustment call it a 15 minute job, but most of them have the transmission out on a bench or the vehicle up on a lift. They are not being adjusted on the ground by an old fat guy crawling around under the truck. Still, it was not a bad experience overall and the difference is like night and day. The truck shifts like it is supposed to. We can defer the solenoid replacement for now, which is good since for the foreseeable future, the truck is going to be my daily driver.
With that particular thorn out of our toe, we continue working towards the next campout.
I cut and attached a top for the cabinet. It will eventually be painted, but I kind of like the woodgrain. Its just plain old plywood.
We applied this really inexpensive backsplash stuff from the dollar store to the walls around the kitchen. It took some extra effort to stabilize the actual material and to use better glue than it’s self adhesive stuff, but it turned out nice.
We got a nice big holding tank for sewage and I plumbed it for both black and grey water, but long term, we probably wont leave it this way. Our gray water output will be a lot higher than black water and we may be able to plumb a smaller black water tank directly into that outlet.
We got everything packed up and, while we didn’t leave as early as we had planned, we still got away reasonably early.
Then a new disaster struck.
You know how they tell you to always check your lug nuts before you go on a long trip. Yeah. Do that.
On the same highway where my car threw a rod, just two weeks and eight miles west of where that happened, the last lug bolt came out of one of the Jayco’s wheels.
I failed to get a picture of it before I pulled the wheel out, but it was laying at a weird forward angle, but it had been dragged on the pavement far enough to have a thumb sized hole in the sidewall. It didn’t look like the lug threads in the hub were damaged, so there was hope. I used one of the leveling jacks to jack it up enough to extract the wheel. The spring had obviously dragged as well and we found the gray water adapter half ground, but broken off a few feet behind where we had stopped.
Shortening the story from here greatly, we were able to replace the damaged tire at Walmart and use some standard bolts in order to get the trailer back on the road well enough to make it the rest of the way to Love’s Way, arriving five hours later than planned.
We used two lug bolts and two regular bolts in each wheel. As expected, we had to deflate the tire in order to convince it to fit into the wheelwell, so I am very happy that I threw my inflator in the truck before we left.
We stopped a couple of times on rest of the trip to recheck the lug bolts, especially since they were in an extra compromised configuration. At one stop, it was easy and comfortable to look around under there and investigate the totally not unexpected lean that the trailer was displaying.
The most obvious thing is that the spring is not connected to the axle, thus the lean. The axle is resting against the frame and the dangling Ubolt will later be found to literally just be hanging there. I am surprised that it stayed there for the whole bumpy trip.
Oh, and the tail lights stopped working. Brake and turn lights work, but no tail lights. The wiring for the lights passes right along the edge of that wall and over that fender, so it may have been damaged.
I did a lot of shopping online for replacement Ubolts and tie plates and later springs. It occurred to me that not only would it be wise to replace the spring because it would be prone to break where it got ground to smithereens, but the camper has always ridden really low and some new springs might lift it up a bit and help with the sewer connections and towing into driveways and all those kinds of things. Once I had some pretty good ideas on what to get, we also checked some local(ish) places and found what turned out to be arguably the best deal. I got two new springs that are a little heavier, new Ubolts and tie plates, all for $133, no waiting, no shipping. I did have to drive into Fort Worth to pick them up, but no biggie. I also procured 10 lug bolts, so it will get all new bolts and we will have 6 spares 🙂
We are planning to go install all this on Saturday and probably haul the camper back home for the rest of the work, like replacing the broken gray water fitting and other damage done in this excursion, besides the other pending work, such as installing a battery, replacing the seals in the toilet, finishing the interior trim.
So in just about exactly 30 days, I was laid off work, had my car blow up and nearly destroyed the camper. The one shining star is that just today, I got a really good bite on a job application, something similar to what I was doing and for similar pay. With a little luck, I will ace the interview and put a lot of this negative stuff behind us!
As I often do, this first post is a massive catch-up post, covering months of work and events, intended to bring the reader up to the present day. I apologize, but such is the nature of the blogging beast, at least when I do it.
Way back in 2004 or so, we picked up a very cute 1972 Jayco Jaywren camper.
The guy we bought it from was a crop duster and among other customizations, he had painted a Texas flag on the roof so that he could find it easily from the air.
It had some minor water damage from leaks around the marker lights. After using the camper a couple of times, we tackled repairing the worst of it, where the front marker lights had leaked and damaged the front wall, mostly above the window.
There was also quite a bit of damage at the front corners, also largely from the the corner marker lights leaking.
The repair came out pretty ok, other than some difficulty matching the color. The luan plywood we used and the pecan stain looks redder in these nighttime flash pictures than it did in person, though it was obviously not the factory paneling.
We continued using that camper for a number of years, though it did go through some fairly long periods of storage.
Among other hobbies, I am a ham radio operator. There is an big annual contest in the USA called ARRL Field Day, wherein you try to contact as many unique operators as possible during a 24 hour period, preferably under simulated emergency conditions. There are points mulitpliers for teams, using emergency power, remote operations, etc. In 2014, a friend of ours had her large RV stored on our property, so I used it as a base for operating at home under generator power. It got me out of the unairconditioned workshop for the contest, which turned out extra helpful since I threw my back out during preparations.
When 2015 Field Day came around, the big RV had returned to it’s home, so I thought I can just duplicate the conditions using our little Jayco. I towed it over from the other side of the property where we store it to a spot outside the workshop. I got it roughly leveled and stabilized and I opened the door to get started setting up. This is what I saw:
That is hundreds of dead bees. They were everywhere. Long story short, turns out there was a large hive in one of the storage hutches. The beekeeper we had come to remove the hive said that these bees managed to slip out into the camper proper and were unable to find their way back home and probably perished in the heat.
In any case, I made other plans for 2015 Field Day.
It continued to be used occasionally but rarely until summer of 2019. We have a friend who is may be best described as a vagabond. He visits various friends all over the country for a while every few years and while visiting each place, he generally tackles some projects, presumably to help offset the costs of hosting him. He is a talented carpenter and really quite the pantologist. There is a catch. Ya gotta let him do it his way. This has lead to more than one clash, generally over materials and scheduling. For example, we might want to get as much material as possible to leverage a credit card discount for a large purchase, but he’s not ready for that material and doesn’t want to even think about the project that far ahead yet.
Knowing all this, we still asked him to address some water damage on the Jayco, similar to the damage I had fixed some years ago, but in the back and the ceiling. We didn’t expect it to be simple, but we didn’t expect so much of the RV’s complete intrinsic value to be destroyed in the process.
He had gutted it, far more than necessary for the areas we wanted to address. His plans for the remodel apparently involved permanently removing the shower and kitchen as well.
So, being the optimist I am, a few good things came out of this process. About half of the aluminum skin got an above average paint job. A lot (though importantly, not all) of the original water damage was addressed. Some arguably weak parts of the structure were redesigned stronger.
On the other hand…
I don’t recall the exact sequence of events, nor do I want to relive them, but long story short, the RV project was buttoned up unfinished and our friend left on somewhat tense terms, not entirely due to the RV project alone. He has not been back, but we keep in touch. His somewhat hard life may be catching up with him, as his health is not fantastic. When he one day reads this, I hope it finds him well and, even though we may have cursed his name a few times during the project that follows, he still got it started.
The main thing is that some decisions he made have had long lasting consequences, not all of them great. Sometimes, I can see where he was going with something or why he may have done this or that. Other times, I can’t help but think, what the hell was he thinking? I’ll try to not dwell on them too much, but I can’t promise to never let any irritation come through. I’ll call him Bob.
The general disgust with the whole situation caused us to let the poor thing sit untouched for about 5 years. Sure, checked inside every once in a while. It was apparently sealed up well enough to keep the wasps out, but it did accrue more unseen water damage during that time. I mowed and weeded around it since Bob took the f*%kin’ wheels off it and I couldn’t move it.
Without going too far off on a tangent, we have a place where we like to camp at least once a month. We took our little motorcycle camper up there once and due to it blowing up tires just before we arrived, we ended up leaving it there and building a permanent campsite on that property.
The little camper is a clever design, especially for setting up a place for two (plus pups) to sleep, with attached storage/closet space in a package that was small enough to tow behind a large motorcycle.
What it is not is handy. It takes at minimum an hour to get the whole thing set up with the front porch tent and the beds made up, etc. Also, it is so compact that we have to pack in just about everything. There is essentially zero storage within that camper.
So, we were inspired to assess and possibly refurbish the Jayco into appropriate condition to haul to this property to replace the clever but pain in the butt camper.
May 10, 2024
It had been a while since the last weeding around it, so that had to be task one.
Some of the worst deterioration over the last 5 years is clearly visible here, the lower panel of the skin had come loose, leaving the plywood completely exposed.
I didn’t want to work on it way out there where it was parked, but rather much closer to either the house of the workshop, where power and tool storage would be much more convenient. We decided to park it in the driveway for easy access to the garage and power. However, to move it, we were going to need to put the wheels back on first.
I will never, under any circumstances, understand why Bob felt the need to remove the wheels in order to work on water damage on the roof. Now, I know that part of what he was doing was refurbishing the rims, which is somewhat better done with the tires removed. On the other hand, it’s been 5 years now, so they need to be painted again. Sigh.
On the other hand, Bob is no idiot. As you can see, the wheel hub is covered with a plastic bucket and beneath said bucket, the axle is wrapped in a grease soaked rag. New bearings and seals were filed away in a coffee can inside the trailer. The only thing I could not find was replacement cotter pins.
The tires turned out to be a mildly nasty surprise. The date code on the existing low mileage tires made them old enough that Discount Tire would not even mount them, even though they were probably fine. We ended up buying a new pair of tires, but since we knew we were planning to tow it nearly 100 miles as soon as it was ready, we considered that the safer option anyway.
Remounting the wheels was a challenge. I recall changing a tire for some reason years ago on this RV. The driver side tire just will not fit up in there without heavy duty mechanical assistance. I ended up having to deflate it almost entirely so that I could squeeze it between the axle and the body of the trailer.
Upon close observation, I think the axle is very slightly off center towards that side, making the gap too small for the full width radial tire to fit betwen the axle and the fender.
But, perseverance won out.
I set it up in the driveway, reasonably close to the edge.
Next, I had to transform it from a box stuffed with parts and trash…..
… into a blank canvas!
The first major challenge was the floor. The plan to to put down vinyl tile. The original flooring had been linoleum. My favorite solution would have been some form of laminate flooring, but there is a 10-15 degree upsweep at the back which would have been a significant challenge with any rigid flooring.
Multiplying the challenge was that Bob had applied Thompson’s water seal to the floor. This is one of those things where I can kinda see where he was going; it’s an RV, it’s likely to get water in it sometime, so let’s help keep the floor from rotting. On the other hand, Thompson’s is an oil based product. It is not adhesive friendly. Furthermore, there were some thin remnants of linoleum still left on the floor, sealed down with Thompson’s. We killed an entire weekend doing nothing but scraping and power sanding the floor in an attempt to get through enough of the seal to give the primer and floor adhesive a chance to stick.
May 21, 2024:
The floor turned out pretty nice, though.
Later, about 10% of these tiles would need to be pulled up and reglued with Liquid Nails, but that was just mildly irritating.
The next major step was to repanel the ceiling. Although *technically*, the entire ceiling wasn’t trashed, enough of it was for it to make sense to replace it all.
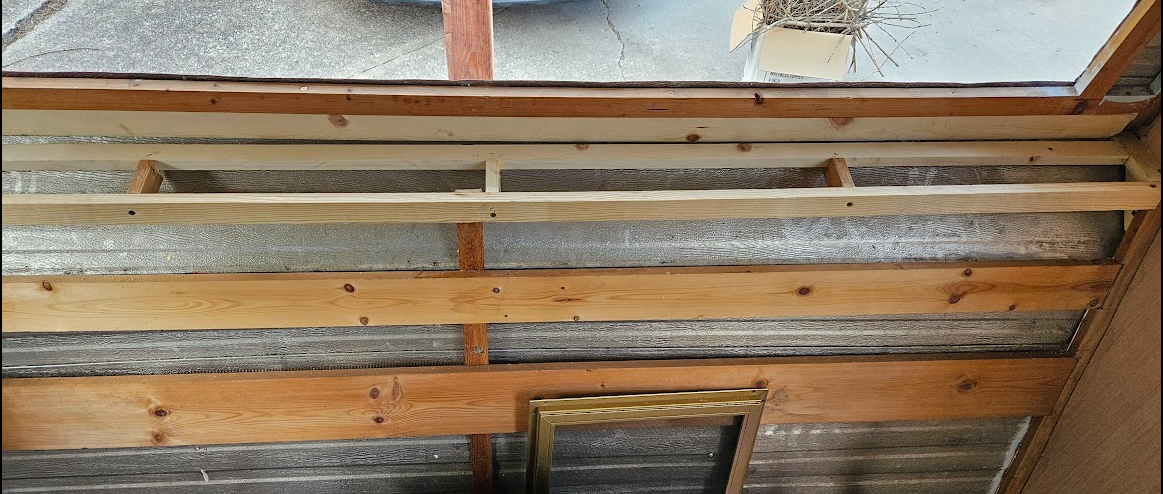
Insulation was a significant challenge. The “joists” in the ceiling are essentially flat 1×2 lumber, so there is about 3/4″ of space for insulation. What turned out to work the best was taking standard insulation batting, splitting it down really thin, about 1″ to 1-1/2″ then stapling that to the wood as one normally would. The split off pieces were saved for use in the walls, where it was easier to get by without the kraft paper.
We used a lot of 5mm plywood, from either of two sources. Lowes has a very light colored poplar plywood that runs about $26 per sheet as of this writing. Lowes has the advantage of being about 20 minutes away and since we didn’t want to store a gob of material ahead of time, it was a reasonable compromise. This stuff takes paint pretty well.
June 8, 2024:
The first sheet was essentially 7 x 4 feet with no weird cuts. We had decided on a light green color for the ceiling and eventually the cabinet doors and drawer fronts, partly because it was inexpensive and readily available from Walmart.
The next ceiling panel was decidely NOT simple to cut. I do wish that I had cut it a little closer around the roof vent, though. It would, however, be nearly four months later before I would realize that.
It is amazing that this panel fits at all, let alone on the first attempt:
One more small piece at the front of the trailer and the ceiling is nearly complete. A few months later and I would end up replacing that last piece with a wider one, having changed my mind about how I was going to finish out the corners of the ceiling at the front and back.
The next major task was to repair all the walls. Bob had done the street side wall, or at least most of it. I would need to fix either some old damage that had never been addressed or new damage that had appeared in the 5 years that the Jayco sat partially done. Considering the advanced rust in the staples and screws, I’m pretty sure most of it was really old water damage.
I digress.
I have fewer in-progress pictures of this process than I would prefer. Some of this work was fun-challenging and some of it was exasperating-challenging.
The framing in any RV is, shall we say, least effort. In the factory, they butt 1×2 lumber together and drive heavy duty staples across the joint, usually on both sides.
Then paneling is attached on the inside and the aluminum skin to the outside and the assembly is reasonably rigid.
We don’t have these monster staples available to us, short of literally hammering used staples back in. The material is too thin for most other decent joinery, so we have to innovate. I’ll give Bob full credit for starting this trend, though I’ve done enough of them to feel I’m better at them by now. 🙂 I’m not sure what this joinery is called, officially. It’s not entirely unlike dovetails, except there is no actual dovetail. We basically cut a notch in one board, closely fitted to the end of another board, then use glue and sometimes screws or crown staples to secure it. It’s dovetail adjacent.
In short, I used the CRAP outta this joint to reinforce, repair and replace lumber all over the Jayco, but especially in the walls, because they are all built like this, flat 1×2 lumber in essentially a 2D assembly.
Sometimes, I felt an existing structure needed more material. I added the center vertical bracing here to help make this particular panel more rigid. This area had the original gas powered refrigerator and gas furnace that came with the RV from the factory, but both were gone long before we got it. I have plugged those holes with 16ga sheet metal and I think the extra framework will help keep all all that together.
June 15, 2024:
I have used a 2×4 sheet of 3/4″ plywood on the bed of the Mule as a workbench for years. It is a good working height and easily adjusted. It works really well.
That makes removing an entire wall and repairing and replacing pieces from there generally the easiest.
This is the top half of the rear wall. The opening to the left of the clamp is where the window goes.
The finished wall, back in place on the camper, with poplar plywood on the inside:
The framing above the shower was a difficult repair. The parts of the curbside wall that are missing were so rotted that they crumbled, so there was nothing to get any good measurements off of. The frame pieces attached to the roof were in pretty poor shape as well. As of this writing, this area is put together, but it still needs some rework and adjustments because my best guesses as to where to cut and add framing were not great. Plus, Bob’s wall on the other side is about 3/4″ too wide.
The actual work came together pretty well, though. It’s like Hubble, nicely built to the wrong dimensions 🙂
It was about this time that I began to realize that this work is not so much carpentry as sculpture. No two dimensions are the same, every cut is custom, whether a custom length or custom angle. This is what sculpters do.
We decided to use OSB for this particular piece of wall. Unlike all the other pieces of wall, it will never be seen, so the rationale is why spend $30 on a sheet of nice plywood for that? If I had it to over, I would go for the regular plywood. The OSB is thicker, heavier and generally just harder to work with than the plywood, for not that much savings. It worked out fine, it was just more of a pain than it probably needed to be.
One reason this piece was difficult to work with was because I could not really remove this wall frame. The shower, the kitchen cabinets and the door are all attached to this frame. Furthermore, I was going to have to depend on Liquid Nail for most of the attachment because I could not get behind the sheet to drive screws or staples through the OSB into the frame. Thus fitting it was a process that involved a LOT of putting the sheet up there, supported by the jacks, mark a couple of things, pull the sheet out, make some trim cuts, repeat, until it fit reasonably well.
Though I don’t appear to have any in progress pictures, the entire bottom half of the rear wall was essentially built from scratch. Where the old window air conditioner had been cut in allowed a lot of water in and the street side rear corner had its own leaks, so the original wall was pretty much kindling. The completed new wall is in place here, though we will be back for an issue.
It is now a little after 7PM, June 17, a Monday.
I have just finished the OSB wall. My wife has gone out of town for a few days and we realize that storms are expected on Tuesday. I need to button up this whole thing that I have been able to leave open for a few weeks. I need it to be reasonably rain tight.
I have had the skin on and off the camper enough times to be good at it, but this is the first time the rear skin has gone back on with all these new walls back here. By 9PM, I have the skins back on, but if you look closely, you can see that I needed to use foil tape to fill in an area at the top corner. That is where the shower framing I mentioned earlier is no longer the same shape as the outer skin.
By 12:30 Tuesday morning, I have installed the windows that I can; the shower window is not ready to go in yet. I have the old air conditioner hole covered and taped and I have door installed.
The door was a significant challenge. At the time I was ready to put the door on, which is not really a task for one person, the wind had moved in. The wind had already made dealing with the large flat lightweight pieces of aluminum skin a massive pain. The door was just that much more of a problem child.
When putting the door in by oneself, you need to be able to grip it well enough to lift the entire assembly, often by only a fraction of an inch, but it must be done. To get a reasonable grip on the frame, I had to have the door ajar. A gust of wind ripped the open door from my grip. Though I did not drop the door, the force slammed it hard enough to spring the bottom of the door itself open and wrench the frame out of square. I suspected there was damage there anyway, this just proved that there was little holding the door together down there, and even less now.
The wind subsided enough for me to gather the door up onto the Mule worksurface and get it beaten into shape enough to close again and I managed to get it mounted.
My door breaking gust turns out to have been the peak wind of the evening, 36mph, shortly before midnight.
The sad irony is that, by the time I buttoned up the whole camper and put away all the tools, it was well after 2AM. I was exhausted for work the next day.
It never rained.
June 24, 2024:
I have a TIG welder. I am reasonably good at welding steel with it. I chose the Primeweld 225X based largely on this pretty old review. It was not old when I first saw it and a few years later when I was ready to buy my welder, the 225X is still well reviewed, so I’m pretty happy I got it. I quickly learned to weld steel with it and, especially compared to my 15 year old Harbor Freight MIG welder, it is SO clean.
One of my TIG welder’s many talents is AC TIG, which is what you need for welding aluminum. I say the welder’s talent because, at this point anyway, it is not on my list of talents. I found I can put down reasonably OK practice beads on a aluminum coupons.
That does not translate directly be being able to repair the camper door frame. Oh, I guess I can say that it’s more assembled than it used to be. This is the best one:
It was really easy to blow through.
I know now that I probably had the AC balance too far into “cleaning”, which made me crank up the amps trying to get a pool, then it was really easy to get too many amps and smoke it.
Practice.
In any case, the frame is arguably better than it was. Bad welds are at least slightly better than open cracks.
june 30, 2024:
I’m back to the kitchen wall.
Regardless of the poor condition of the plywood, the framing in this area has survived pretty well.
I didn’t realize at the time I was doing this work that the two copper lines on the left were deprecated water lines or I would have removed them. The one copper line on the right is the propane line to the range/oven.
Though I had high hopes of replacing this plywood in one piece, it was not to be. There is an upper and a lower piece, but they turned out great!
Next was to replace the 3/4″ plywood at the bottom of the wall. This is somewhat structural. In the factory, I suspect this piece was first and everything was built toward the inside from it. That is not really an option here.
Once cut to size and the wheel well is cut out….
Next comes more ersatz joinery.
Then even more joinery as I cut in and frame around the shower window. Still no way to use any fasteners, so relying heavily on Liquid Nails and clamps.
By this time, I have partially addressed the mismatch in the corner, but it still requires some special procedures to keep it rain tight.
The plan is to replace that top section of skin with material salvaged from another camper we have. It won’t match exactly, but it will look better than this bandage.
July 4, 2024:
I finally get to start playing with some of the wiring. I have run some marker lights at this point, but this is the first real work on the 110V systems.
I have neglected to mention… I picked up an oscillating multitool and it has been invaluable for the cut-in joinery and things like cutting a shallow slot for the wire to route through. It has metal cutting blades available and they make pretty short work of nails, but I have discovered that screws are significantly tougher stuff.
This particular wire goes up through the ceiling and drops out over the bed at the front of the camper. The orange wire goes to the utility box where the breaker panel will eventually be. Originally, the wiring went the other way, from the breaker, up the front wall to that light, then to here to power the refrigerator.
The utility box or closet, we usually just called The Hole, needed to built back from scratch. I don’t have any interior view pictures of what it used to look like, but I recall that it had a few cubbyhole shelves where the jacks could fit. I’m not sure if I will replicate those or not, but I definitely gotta start somewhere.
The original framing was gone, but Bob had a start on the replacement, so I was able to cut in the rest of it fairly easily. The rest would need to wait.
In the condition shown here, the key would not hold the door shut, so I felt obligated to tape it shut to keep out water.
In finishing out the back wall, I discovered a measurement error I had made on one of the braces. That brace was one 1×2 width off, making it difficult to secure that wall because that brace was floating where there was nothing to screw it to.
I pulled that piece of the wall out and joined in a sister to that brace.
Except that I missed and joined a sister to the wrong board (red arrow) and had to do it a second time (green arrow)!
July 12, 2024:
Bob had replaced some fairly complex pieces on the front of the trailer with 3/4″ plywood, but it wasn’t really well protected against the weather, so in 5 years, these plywood pieces already needed replacing.
I used similar joinery to keep it strong.
For what I am sure are reasons, the two sides are not the same.
With those plywood pieces in place, I was finally at a point where I could start installing interior paneling. The first panel would be a fitting challenge.
I didnt have a panel square, but it was pretty easy to knock out a reasonable homebrew version. I still use this on occasion, but I have had to shorten it for a task.
July 20, 2024:
There are so many angles and intersections that it takes a lot test fitting and trimming to get the piece up there, plus even though I drew it as a line on the measurement sheet, that top edge is actually a curve. In any case, success!
Next came a ton of small but important jobs replacing damaged paneling, like the bottom fo the kitchen cabinet…
…and below the shower door.
August 9, 2024:
I’m about to leave for a week for the IDPA National Championship match in Alabama, so there is a push to get some stuff done and to seal up in case it rains while I’m gone.
It is difficult to show exactly what is going on here, but I am replicating the narrow shelf that was at the front of the trailer under the window. This shelf is only about 5-6 inches wide and serves as the transition between the angle between the upper wall and the lower wall. As such, it was the first time in this project I needed to deal with a specific angle other than matching a panel.
As it turns out, the top edge of that front 1×2 is cut to 15 degrees and I will find that 15 degree angle is repeated often in the camper, so yay!
It is a long span, so it needs some braces.
In building the utility box, the 15 degree angle persists, though here it is more obvious as 15 degrees off of 90, or 75 degrees included.
One really irritating part about this entire project is how sometimes a dimension will sneak up and bite you on the ass. Throughout the construction of the rear walls, I carefully maintained the relationship between the old wall and side wall that Bob built. His was was maybe overbuilt, the lower half being made of 3/4″ pine lumber rather than the 1×2 framing that the rest of the wall was made from. Generally, I’m good with that. I am not sure exactly how it happened but somewhere in that process, the rear wall assembly ended up about 3/4″ wider than the aluminum skin, but only at the bottom. I presume that is on me. Maybe the wall I built is square and shouldn’t be. In any case, it had lead me to a janky solution wherein I have to fill a gap in the skin.
By the time the trim is in place, it’s kinda hidden.
August 24, 2024:
I’m back from Alabama and dealing with COVID 19 that I presume I picked up there. I’ve managed to avoid it for five years, but finally did not dodge it this time. Here’s a tip. Paxlovid gives you diarrhea. Don’t forget to replace your electrolytes while you rehydrate. I very nearly collapsed before it occurred to me that I simply needed Gatorade. Half an hour later, I was golden.
In the front end of the camper, the original configuration had a dinette that would convert to a bed.
We were planning for just a bed in place of the dinette. We experimented with some rollaway beds we used to use for some specialized camping we did a million years ago and one of those fits here.
They have always been pretty compromised sleeping options, however. This matress has inner springs, but it is terrible. The combination that worked best when we used them often was a piece of plywood sized to fit inside the frame’s springs, this mattress, then a four inch foam topper. Even so, we can do better and found this piece of actual furniture that is slightly bigger but still fits in the space.
It needed a little TLC, tightening joints, etc, but it is going to work great.
I continued with insulation and paneling.
We got new paneling from Plywood of Fort Worth. Had we gotten this plywood from the beginning, we would probably have gone for a stained wood finish instead of paint. It’s a pity to cover up this pretty wood with paint.
On or about July 8, there was the first mishap with the EasyUp shade. We rushed home trying to beat a storm to take down the shade and perform other storm preparations. We arrived just as a burst of wind also arrived, which pulled the shade out of our hands, flipping it up and over the camper. The roof vent was open, so the frame of the shade caught on it and bent the vent lid pretty badly. I was able to close it from the inside, but only just.
August 31, 2024:
I got a replacement vent lid and since I was in there anyway, I decided to add a fan to the vent. A 40 thousandths welding filler rod makes a decent wire fish.
Meanwhile, the paneling continues whenever possible. I REALLY wish we were staining this.
There is one occasion when the decision to paint helped hide an otherwise egregious error. This panel was almost but not quite square. After fitting, I pulled it down to cut in the hole for the outlet and managed to get it turned 90 degrees one direction or the other. Luckily, between paint covering the grain and trim covering the gap up top, I got away without having to trash the piece.
September 6, 2024:
The parts for the orginal rear bed are still around.
Under this bed is where the water heater lives. I am not sure if Bob had more in mind for this area or not, but the ledge he built on the wall that appears to be for the bed was not high enough to clear the water heater fittings, especially with the lines attached. I added a fussy cut 1×4 to add both vertical height and strength. Later, I would have to add even a little more.
The front frame for this cabinet/bed was in sad shape, but after I got started on it, I realized that I could salvage most of the actual framework and that the paneling was the worst part. There were about 1.6 million tiny staples holding the paneling on the frame.
Here is the assembly in at least good enough condition to sit on.
While I continue with more construction oriented tasks, Wifey has gotten a great start on painting. In this particular panel, note that a decision was made to use the material I had rather than wait and buy a new piece of plywood. This strip at the bottom will be obscured by the cabinet *and* by paint. Compromise is ok sometimes.
If I recall correctly, these were the last full panels to go in. Yes, those gaps are bigger than I wanted.
September 21, 2024:
By the time the back bed, the front bed and the cabinet were all in place, there was a very tight fit and I had a weird little gap to fill. To accomplish that, I needed to remove a panel’s thickness of frame from the rear bed.
Once that was completed and the top finished out, the bed platform works out pretty well.
The entire bed is in good shape, other than needing a coat of paint.
The portably air conditioner we got works well, other than drawing more power than the outlet in the garage can adequately provide. I’ve been running it on my generator when needed. The long term plan is to build a platform for it to sit on at the back and vent it out the back wall.
September 28, 2024:
I skipped a lot of photo opportunities with the electrical panel, but it is done. This is the original two circuit panel, but I have equiped it with two dual circuit breakers to let me break up the loads into four circuits.
I need to add an outlet in the utility box for the 12V converter. I will probably put it on the refrigerator circuit, which is arguably the lightest single load.
The other side of the utility box has the DC wiring, which is mostly tail lights and marker lights, but importantly, a circuit for the 12V lighting and that one fan I added for the roof vent.
October 6, 2024:
The original camper had cabinets everywhere, but as most of those are either damaged beyond reasonable use or were designed to be used with other cabinets or elements which are no longer there, we have elected to use shelves as storage. The cabinets also likely added to the rigidity of the structure, so the shelves have that in mind as well.
The front shelf went through a couple of design and build iterations until we arrived at a suitable size.
The shelves needed to integrate fairly well with the trim, so they went in and out during the process. In the end, I am pretty happy withe shelves and semi-happy with the trim
October 10, 2024:
While I was working on the shelves, we had a combination of events. I typically tie a couple of the legs of the EasyUp shade to something, but we had been moving stuff around and using those things and the shade ended up not particularly well secured when we had some gusty winds come around.
The thing landed upright with one slightly bent leg. I was able to straighten the leg and we were able to set it back up and use it. For 6 more days.
Finally having all of these pieces in at the same time revealed how little room there was for this bathroom vanity turned utility cabinet in this space.
October 13, 2024:
We knew from the time of purchase that the left drawer of the bed pedestal would be inaccessible, but now that everything is tucked in here, the cabinet is truly an interference fit in that space. You have to lift the cabinet to put the bed in.
We had contemplated it before, but now it was time to either abandon the cabinet or chop it in half. The way it is made, it was not bad to cut it in half, keeping the left side. It was easier than expected, really. The operation took about an hour.
An oddball piece of the aluminum skin that fits in front of the curbside wheelwell and under the door was misplaced for a while. Interestingly enough, the full size cabinet does not fit through the door frame, so to remove it to split it in half, I needed to remove the door frame. While the door was off, I installed the long lost piece of skin and a missing piece of wood needed for it.
There was also the end cap panel of the kitchen cabinet that I could replace while the door frame was out. It had been painted, but the paint was not adhering well. This panel also has an aftermarket switch installed for a 110V porch light. I have never liked that this switch is mounted sideways and crooked at that, so I also replaced that panel and moved the switch box at the same time. I also upgraded it to a dual switch, the ideal being that we could turn on an inside light on the way in the door as well.
However, I did not account for how far into the opening the door frame protrudes. Now I need to remove the door again in order to wire up the switches.
The platfrom/riser for the airconditioner is completed. It’s base is at, say it with me, a 15 degree angle. It also hides and protects some the plumbing.
I added rails to help keep things from rolling off of it and of course, a coat of paint. With colder weather coming soon, we have put a heater in its place for now.
With less pantry space now, every extra bit of storage is helpful. Ikea to the rescue!
Now that we are getting really close to completing the project, Wifey can really crank up the decorating skills This is the front bed; very cozy.
October 16, 2024:
As promised, 6 days later, the wind strikes again. Fate is watching and knows when you have left something unsecured.
This time, the same leg that previously was just bent is now almost completely severed. It is essentially trash now. I am just very happy (and lucky) that it did not damage the CanAm.
October 17, 2024:
We are now just a couple of days from what we hope will be the debut, towing the camper to Love’s Way for a shakedown cruise and overnight camp, then bring it back home to continue working on it. To that end, we have begun working on stuff required for that trip, like tail lights.
These are actually intended for a boat trailer, which means they are intended to bolt to an open frame. Maybe not the best design for me to use here, but I made it work.
Also, I replaced the plastic cover over the old air conditioner cutout with a sheet of aluminum that we had purchased for the purpose a couple of months ago. Weather sealing is via butyl tape.
October 18, 2024:
The tail lights need a connection to the tow vehicle. The wire I picked up at Tractor Supply or Bomgaar’s, I forget which, was cleaverly arranged for wiring a flatbed trailer, with a short white ground wire, then a yellow/brown pair for the left tail/marker lights and a green/brown pair for the right. For my wiring, I extended the white ground to my terminal strip and bonded the two browns together.
FYI, the black/white wires on the left go to the electric brakes, which are not currently in use and the red/brown wires is 12V DC to the 12V lighting and the vent fan inside the trailer. These will be connected to the converter and battery at some point soon. Not today.
I failed to take pictures of a LOT of work involved in getting the plumbing kinda working. There was a slight leak on one of the hot water pipes, easy to fix. Then the temperature pressure relief valve on the water heater itself was the next leak. To test what I could, I bypassed the water heater and got water flowing to the kitchen sink.
The greywater drain seems to be ok, too. There is something amiss with the faucet itself, though. Whenever it is open, water drips under the counter. We have a replacement for it anyway, so it’s not a big concern, just something that we were already going to do later.
Sometimes, little things are very important. This chandelier is one such thing. I added a pullchain switch to it and this was the first interior light completed.
The venthood and kitchen light were the next to complete.
At some point, this light will be connected to one of those two switches next to the door.
The vent hood suffered some rust during the 5 year storage wait. We will be repainting it, but for the debut we decided that sanded spots were much better than rusted spots. We also need to find an appliance size bulb to fit in there. A standard bulb may be too large. At this point, the vent to the outside is still sealed up, but we don’t need the ventilation just yet.
The final interior light is the one over the rear bed. You may also notice all the curtains are now in place. I don’t think I have mentioned those as yet.
There was so much that we had to finish up that I didn’t bother to take pictures of. The bathroom door got remounted, rugs put in, curtains hung, beds made and remade, cabinets secured, wires tied down, skin stapled down, the oversize cotterpins in the wheels replaced and the hubcaps installed, tire pressure adjusted, 5 months of debris cleared from the driveway. A few days earlier, we even put new tires on the truck. In all, we worked until 3AM Saturday morning….
October 19, 2024:
… which made our plan to leave by 11AM difficult to achieve.
We left about 5:30PM.
Other than arriving later than we wanted, everything worked fine and we slept like royalty.
We have a few things to work on, like the cabinet that was originally a bathroom cabinet does not know how to keep it’s drawers shut in an RV. The chandelier lost one of it’s dangly bits, but not until the trip home.
So, there you have it. 160 days of almost daily sculpting, but especially weekends. There have been some days off, even a week here or there. Weather has been remarkably cooperative, rain-wise. Then again, we haven’t really tested for leaks, have we?
The list of things remaining is still a long list, but generally none of the items are what I would call Major Items. Nothing big left to build, but a lot of things left to do regardless.