No, not that one.
We’ve all seen stunning images of deep space objects. It turns out that, at pretty basic levels, those pictures aren’t particularly hard to capture. It does take more than pointing the camera and clicking the shutter, though.
I don’t remember for sure which is was, but YouTube recommended one of Nico Carver’s videos and it captured my attention. It may have been this one.
And before I go on, let me brag on Nico Carver a bit. His videos are chock full of how-to information, not just “look what I did” like some of the other channels I found. His is not the only one, but it is largely my goto for learning how to do this stuff.
As the above video suggests, if you have a DSLR camera, you may have everything needed to capture possibly stunning pictures of deep sky astronomical objects.
Astrophotography is done in two main steps, capturing the image then postprocessing the image. If you don’t capture good data, no amount of postprocessing can’t bring out the details you hope to see. If you capture good data, you can always process it over and over until you are happy with it.
Capturing the image is really done by capturing a LOT of images then using post processing techniques and software to “stack” them. This accomplishes two important things. First, deep sky objects tend to be dim, often too dim to see with the naked eye. Taking many short exposures then “stacking” them gives you a composite exposure that is MUCH longer. Taking 300 exposures is not uncommon. If they are 20 second exposures, the final stacked image could represent as much as 6000 seconds or 100 minutes of exposure. Of course, it will take a little longer than 100 minutes to take that many 20 second exposures. More on that later.
The absolute minimum to capture data is a DSLR camera with a decent lens, a sturdy tripod, a remote shutter release and a reasonably dark sky. Just a couple of fairly inexpensive accessories will raise the ease and quality of your captures and help ensure success.
An intervalometer is basically a remote shutter release with a programmable timer built in. You can set it to hit the shutter button 300 times every 21 seconds, for example. This not only automates the picture taking but also keeps you from shaking the camera to hit the shutter button. Most intervalometers as of this writing range from $20-50 on Amazon.
Focusing on stars is more difficult than it seems and sharp focus is critical to successful astrophotography. One of the simplest focusing aids is a Bahtinov mask. A Bahtinov mask is a cleverly arranged grid of lines cut into basically a lens cap. It sets up a diffraction spikes and when those spikes are in the proper orientation, sharp focus is assured. Bahtinov masks are widely priced, $15-$50 depending on size. My favorite is the right size to kind of clip into the internal threads of a skylight filter, which can then be screwed onto the end of my lens when needed.
For my first night of astrophotography, I was armed with my Canon Rebel T6 camera, a 75-300mm zoom lens that came with it, a Koolehaoda tripod I had originally purchased for something else and an intervalometer. The Amazon link to the one I purchased goes to a simple remote shutter release, but the link above is a physically identical device, with a different brand name 🙂
I also had a camp chair, a flashlight and easy access to beverages.
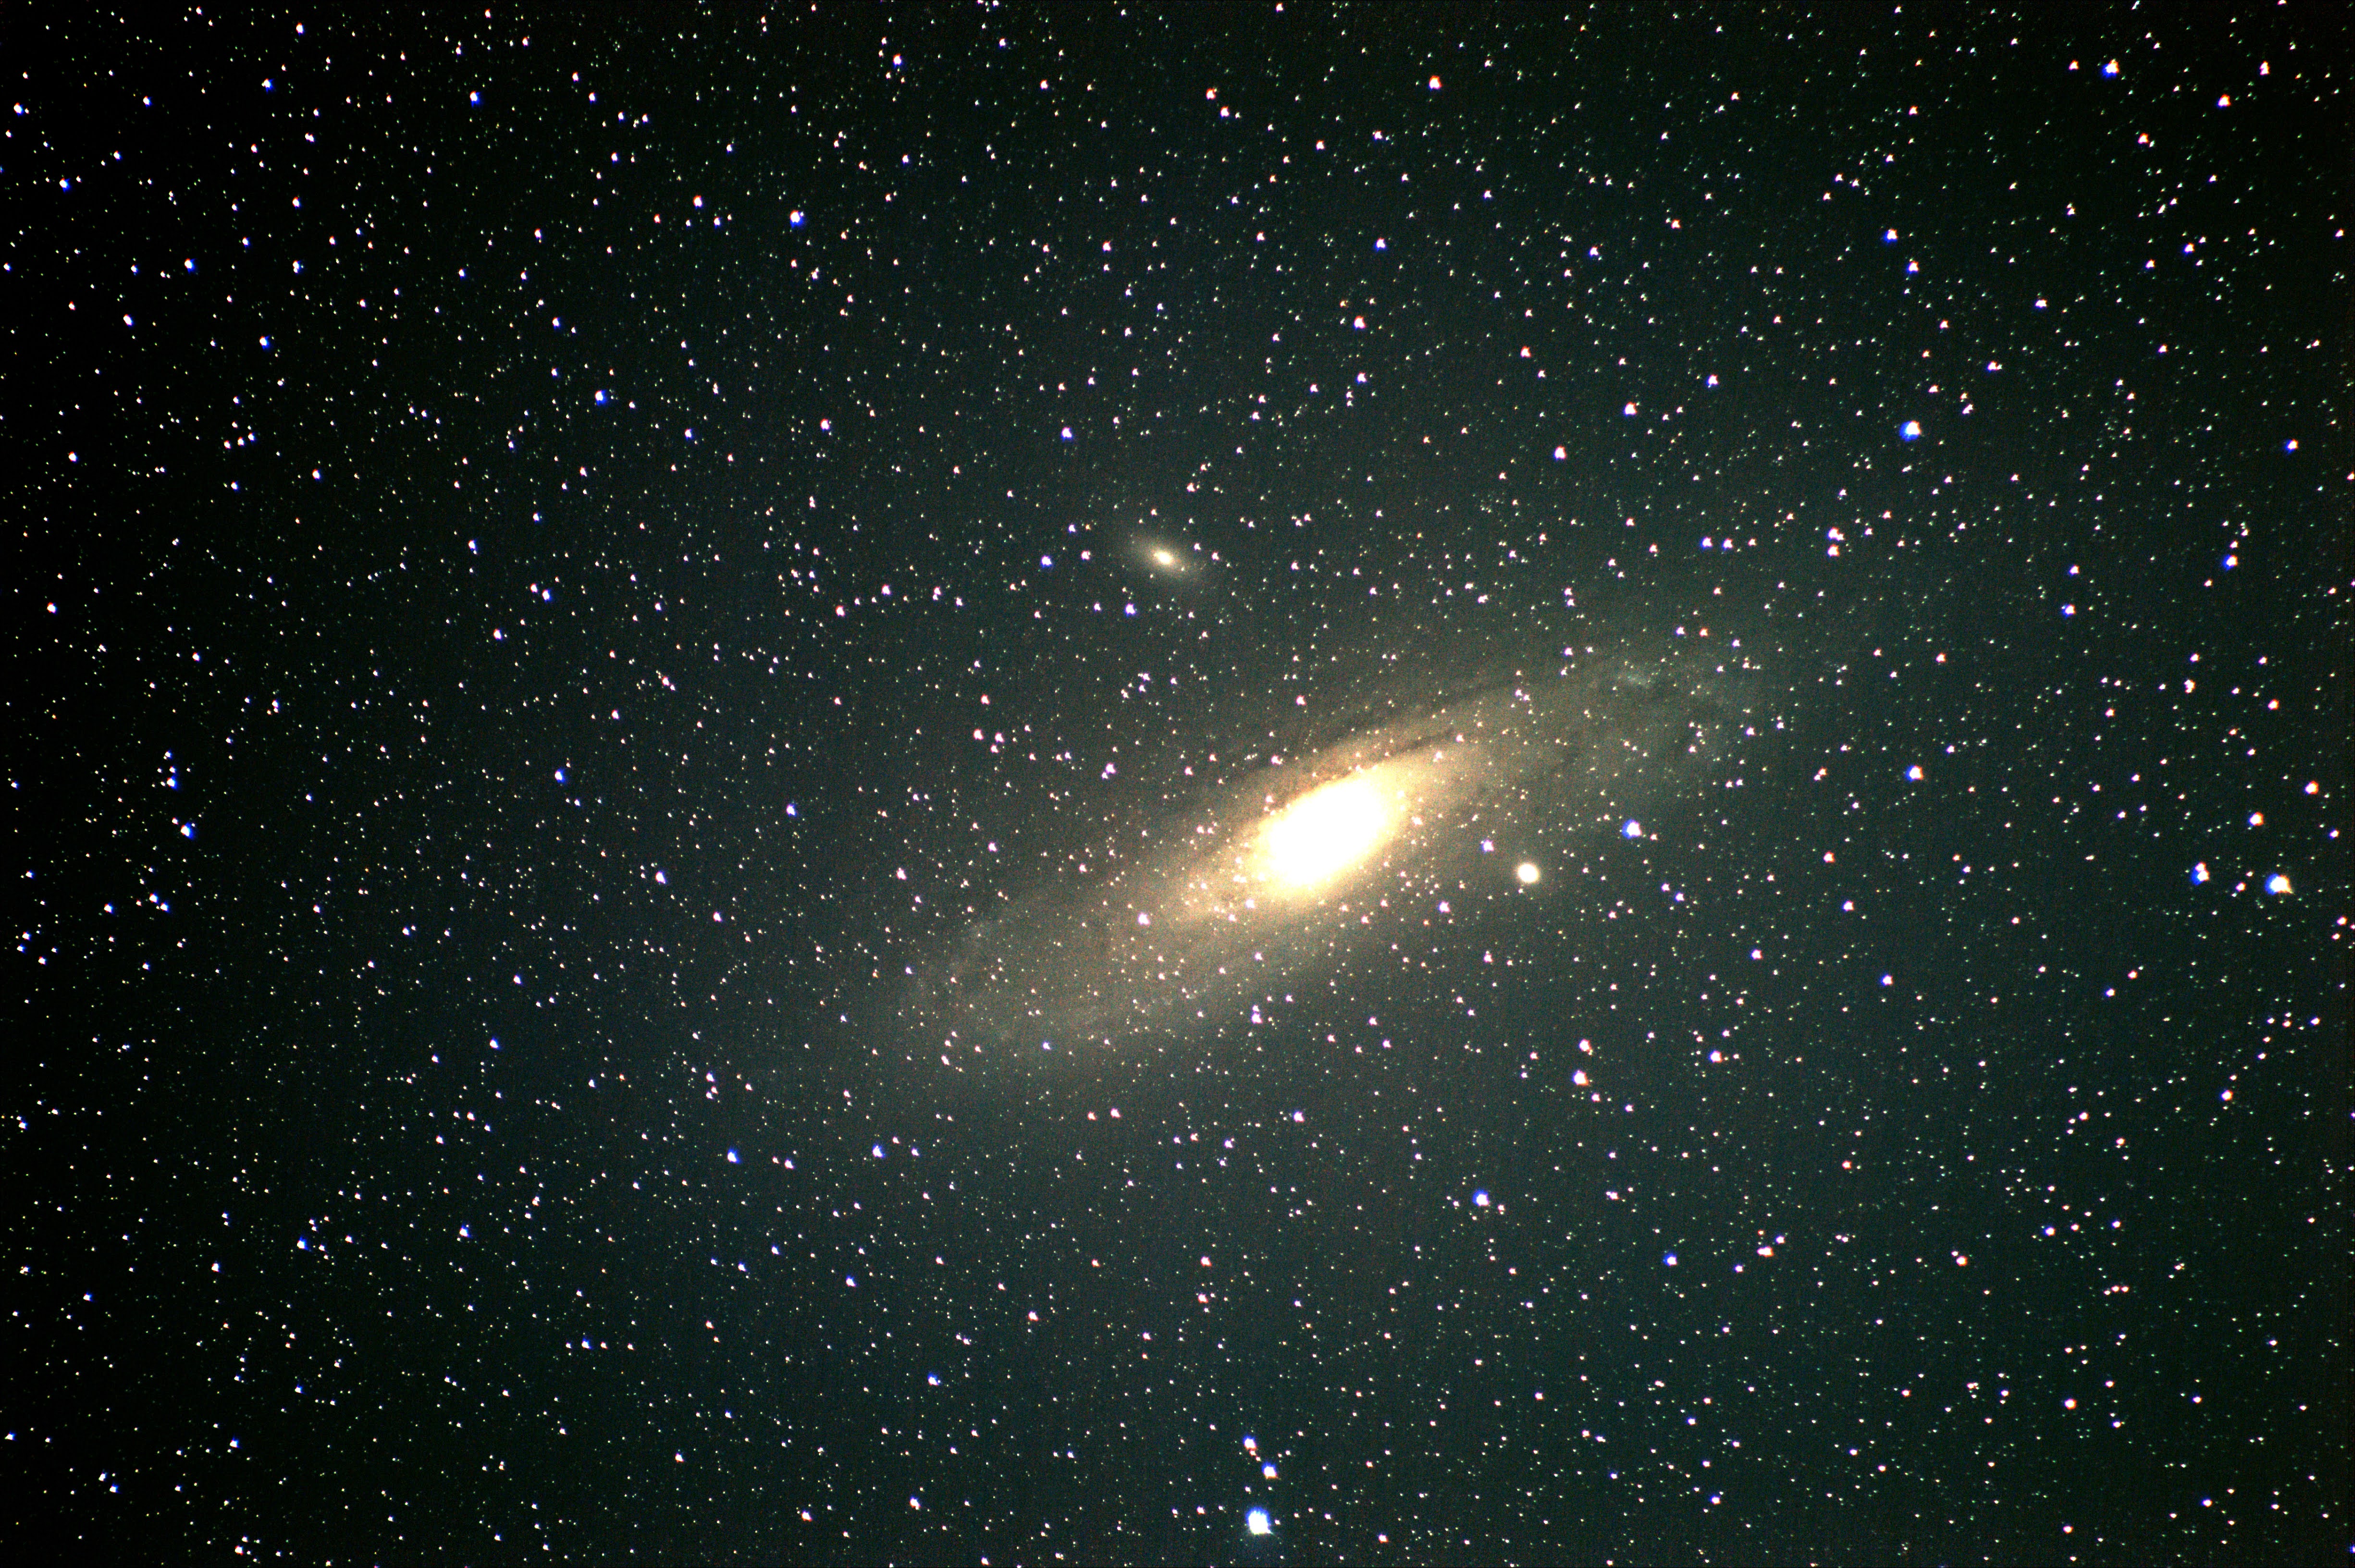
I did not have a Bahtinov mask at that time, but I did manage to get a reasonably good focus because Jupiter was very easy to find in my west southwest sky and bright enough to get a good focus on. However, my desired subject was the Andromeda galaxy to the northwest.
It took quite a while for me to find Andromeda. I used either of a couple of apps (Sky Map and Star Walk 2) but my own fairly myopic eyesight, even corrected, had trouble seeing Andromeda, which *can* be seen with the naked eye in a dark enough sky. I started taking 10 second exposures to see if the camera could see it. After about 4-5 tries, it finally showed up. Also, once I finally knew exactly where to look, I could just see one star that was fuzzy, especially with binoculars.
I was able to carefully zoom and recenter and zoom and recenter until I finally had as big an image of it was I was gonna get.
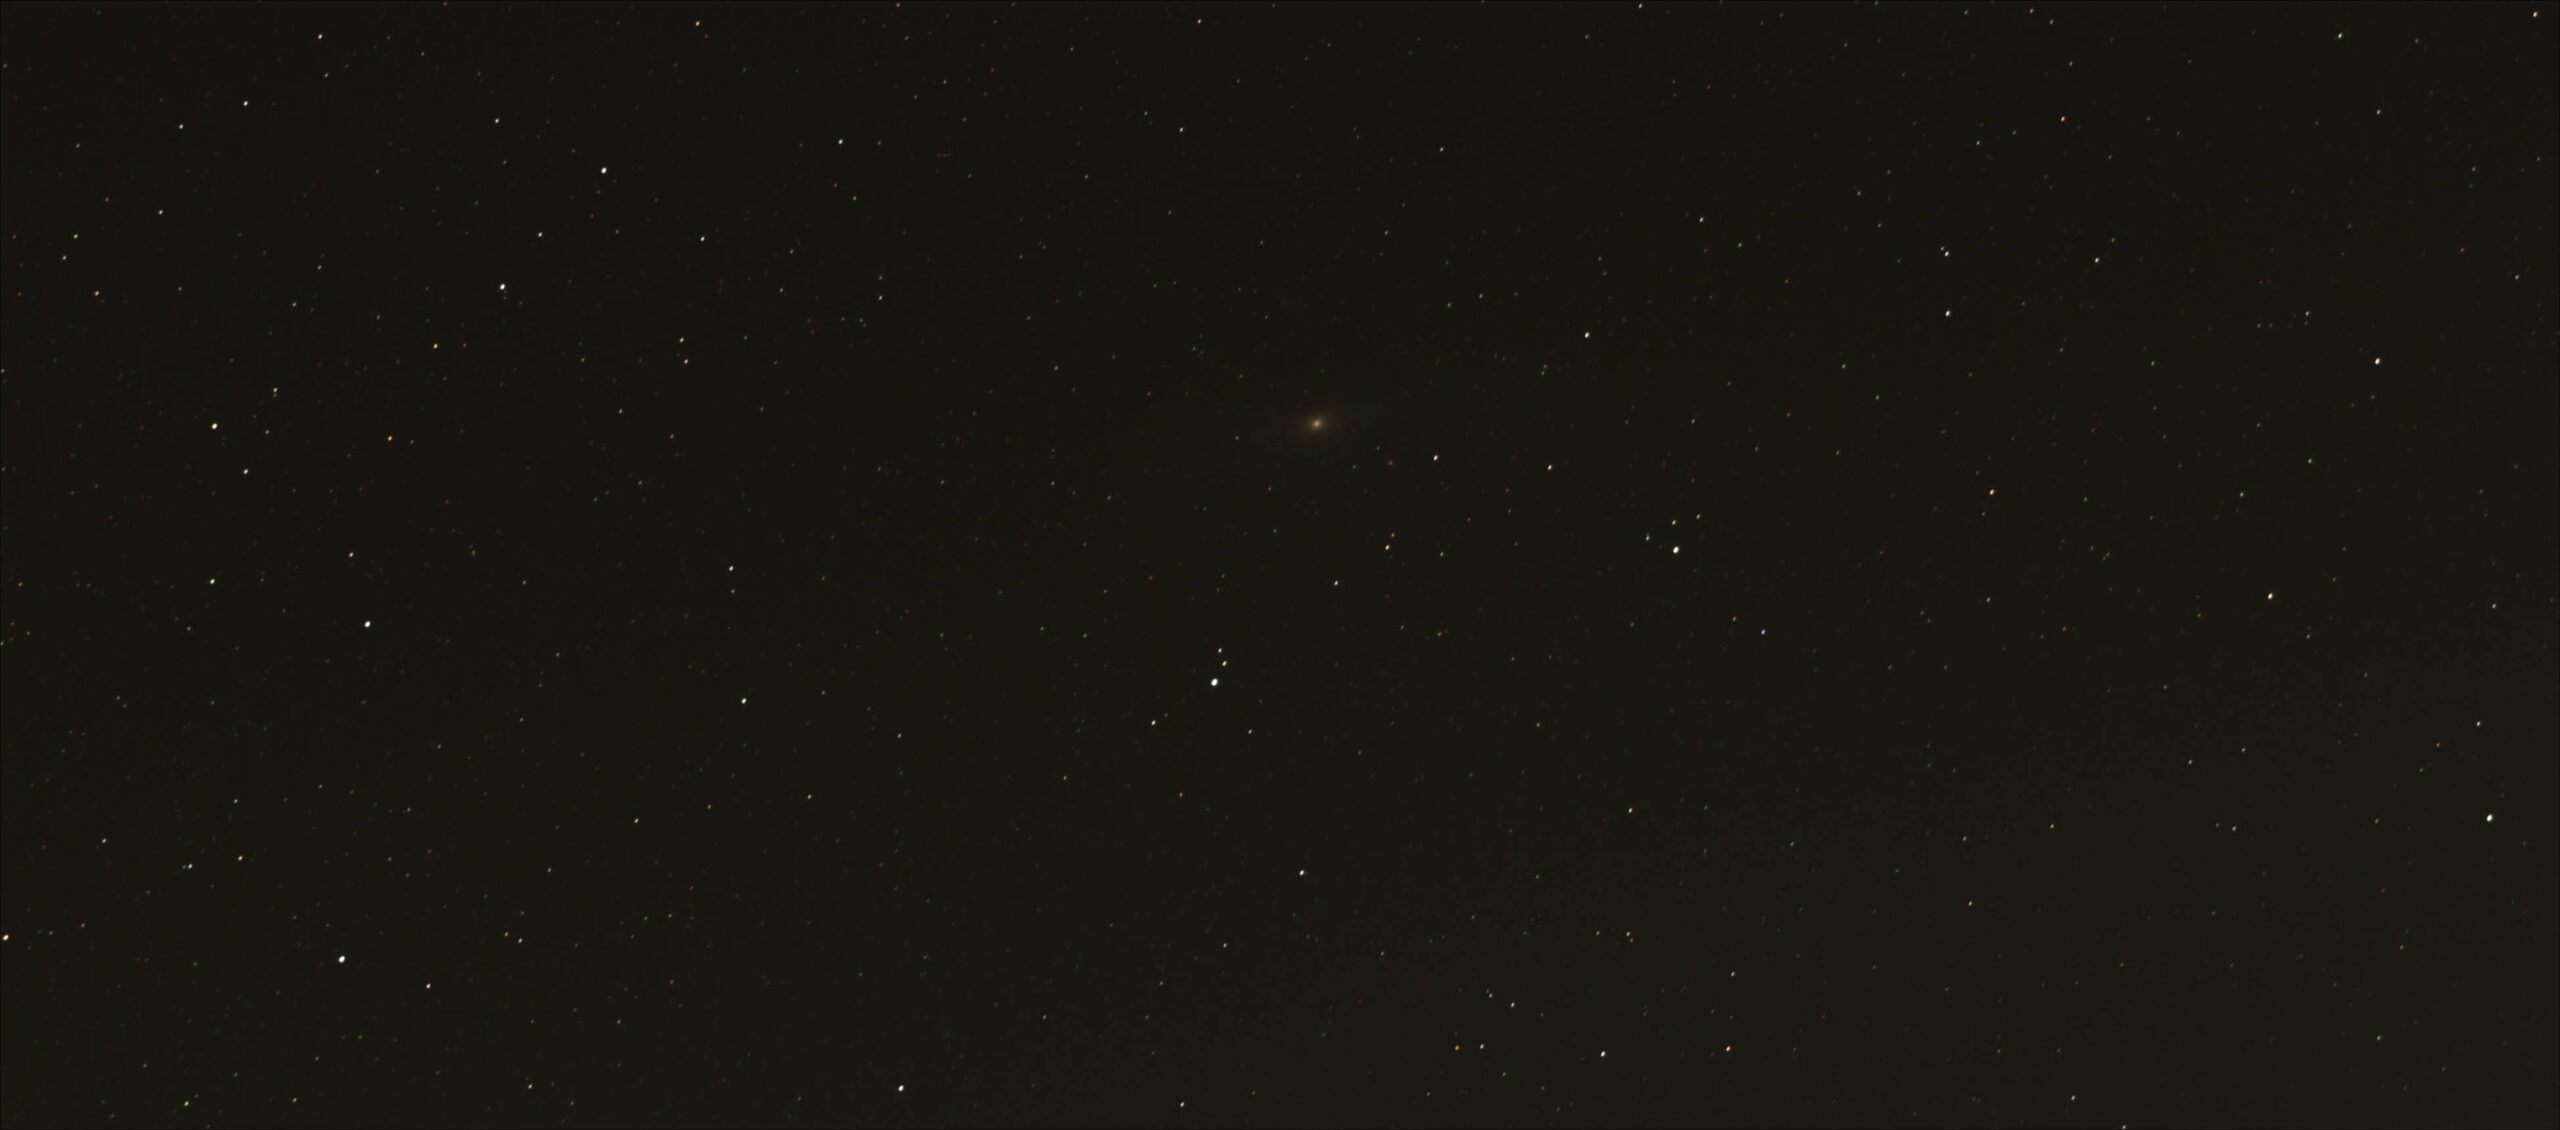
That little fuzzy blob in the middle is Andromeda. I did not know or notice at the time that there is another farther galaxy in the same shot. I am pretty sure you can’t see it here. The overall picture seems a little underwhelming at this point.
One of the things to experiment with, especially that first night, was how long of an exposure I could get. With no tracking mount at the time, I had to balance the maximum length of exposure to get the most light versus minimum exposure without the stars smearing from the earth’s rotation. You can determine this experimentally by starting with a guess, maybe 3 seconds, take an exposure and zoom in with the camera viewer to see if the stars are round. If they are, go higher, maybe 6 seconds and look again. When the stars start becoming egg shaped, back off the exposure time a little and check again. Keep at it until you get the longest exposure you can without distorting the stars.
There are also ways to calculate the exposure and several web calculators can be found to determine the exposure scientifically. However, untracked exposures will always be pretty quick, so I’m not sure it’s worth the trouble when there are only a small number of options in the less than 5 second range and it’s really easy to determine experimentally.
For me, with my particular collection of gear that night, it was 3 seconds. I decided to take 100 exposures at 3 seconds each, resulting in 5 minutes of total exposure. I didn’t realize it at the time, but that would be enough to get an ok image, but not nearly enough for the detail I had hoped for.
An important part of the capture process is to capture additional specialized images to help the processing software to do a better job at stacking all your exposures and reducing noise in the final image.
For terminology purposes, exposures are often called “frames” in astrophotography. I have not found a satisfactory explanation, but I presume it is based on frames of photographic film predating digital capture. The research continues. The exposures of your target are most often called “light frames”, meaning a collection of the light from our target object, collectively called “lights” or “subs”, for sub-exposures.
The calibration process has you capturing a number of frames under certain conditions. “Dark” frames or darks, are exposures at the same camera settings (ISO, exposure time, etc), and ideally at the same general time, as your light frames, but of complete darkness. Opinions vary, but most sources seem to recommend 30-50 or as many as 100 darks. This is super easy to accomplish. When you have finished capturing your lights, use a lens cap and perhaps an additional opaque cover over that to ensure that no light gets into the camera, then set your gear up to take another 30-50 shots with the same camera settings that was used for the lights. These frames are to capture what the noise from the camera sensor should look like so that the stacking software can account for it. If you use PhotoShop or GIMP to stretch the contrast of these darks, you will find that they are not completely dark. They have little spikes of non-dark which represents the electrical noise introduced by the current conditions in the camera.
The next calibration is with the camera set to the same ISO as your lights, but with a flat white unfocused subject and the shutter speed adjusted to a proper exposure and these are called “flat” frames or flats. The stacking software uses these frames to account for anomalies like dust or scratches on the lens or vigneting, a tendanacy for some lenses to not illuminate the sensor evenly, leaving the corners darker than the center. Your camera probably has a histogram feature to help set exposure and using it it probably the most accurate way. Accomplishing these is pretty easy. One easy way is to point the camera straight up, put a white T-shirt taught enough to not be wrinkled over the end of the lens, then put an even white light over then T-shirt, such as an iPad or a white LED tracing pad. Adjust the exposure to a reasonable setting, according to the exposure meter on the camera. Take another 30-50 or as many as 100 flat frames.
Another set of calibration frames is called “bias” frames. Similar to darks, these are captured with no light coming into the camera, but instead, they are with the camera set to it’s highest shutter speed. This shows the software another type of noise, the base noise pattern from the sensor in the camera without the averaging that happens in a longer exposure. Take another 30-50 or as many as 100 bias frames.
Postprocessing is a two step process. The first can be somewhat automated, using software like Deep Sky Stacker. It is certainly not completely automated, but DSS does the heavy lifting. It takes your lights, darks, flats and bias frames and analyzes all the details. It will align the stars in your lights so that they all stack correctly, analyze the calibration files to help eliminate noise and other anomalies and finally stack all your exposures into one low noise output image with a composite exposure time of all the (valid) light frames.
The next step is to crop the target and “stretch” the contrast with a photo editor like Photoshop or GIMP. This is not a particular difficult step, but it is kinda fiddly. I will defer the reader to Nico Carver’s videos for more and better information about that.
While the focus was good, the total exposure was pretty short, so cropping really close was a disappointing image, so this larger field is more pleasing.
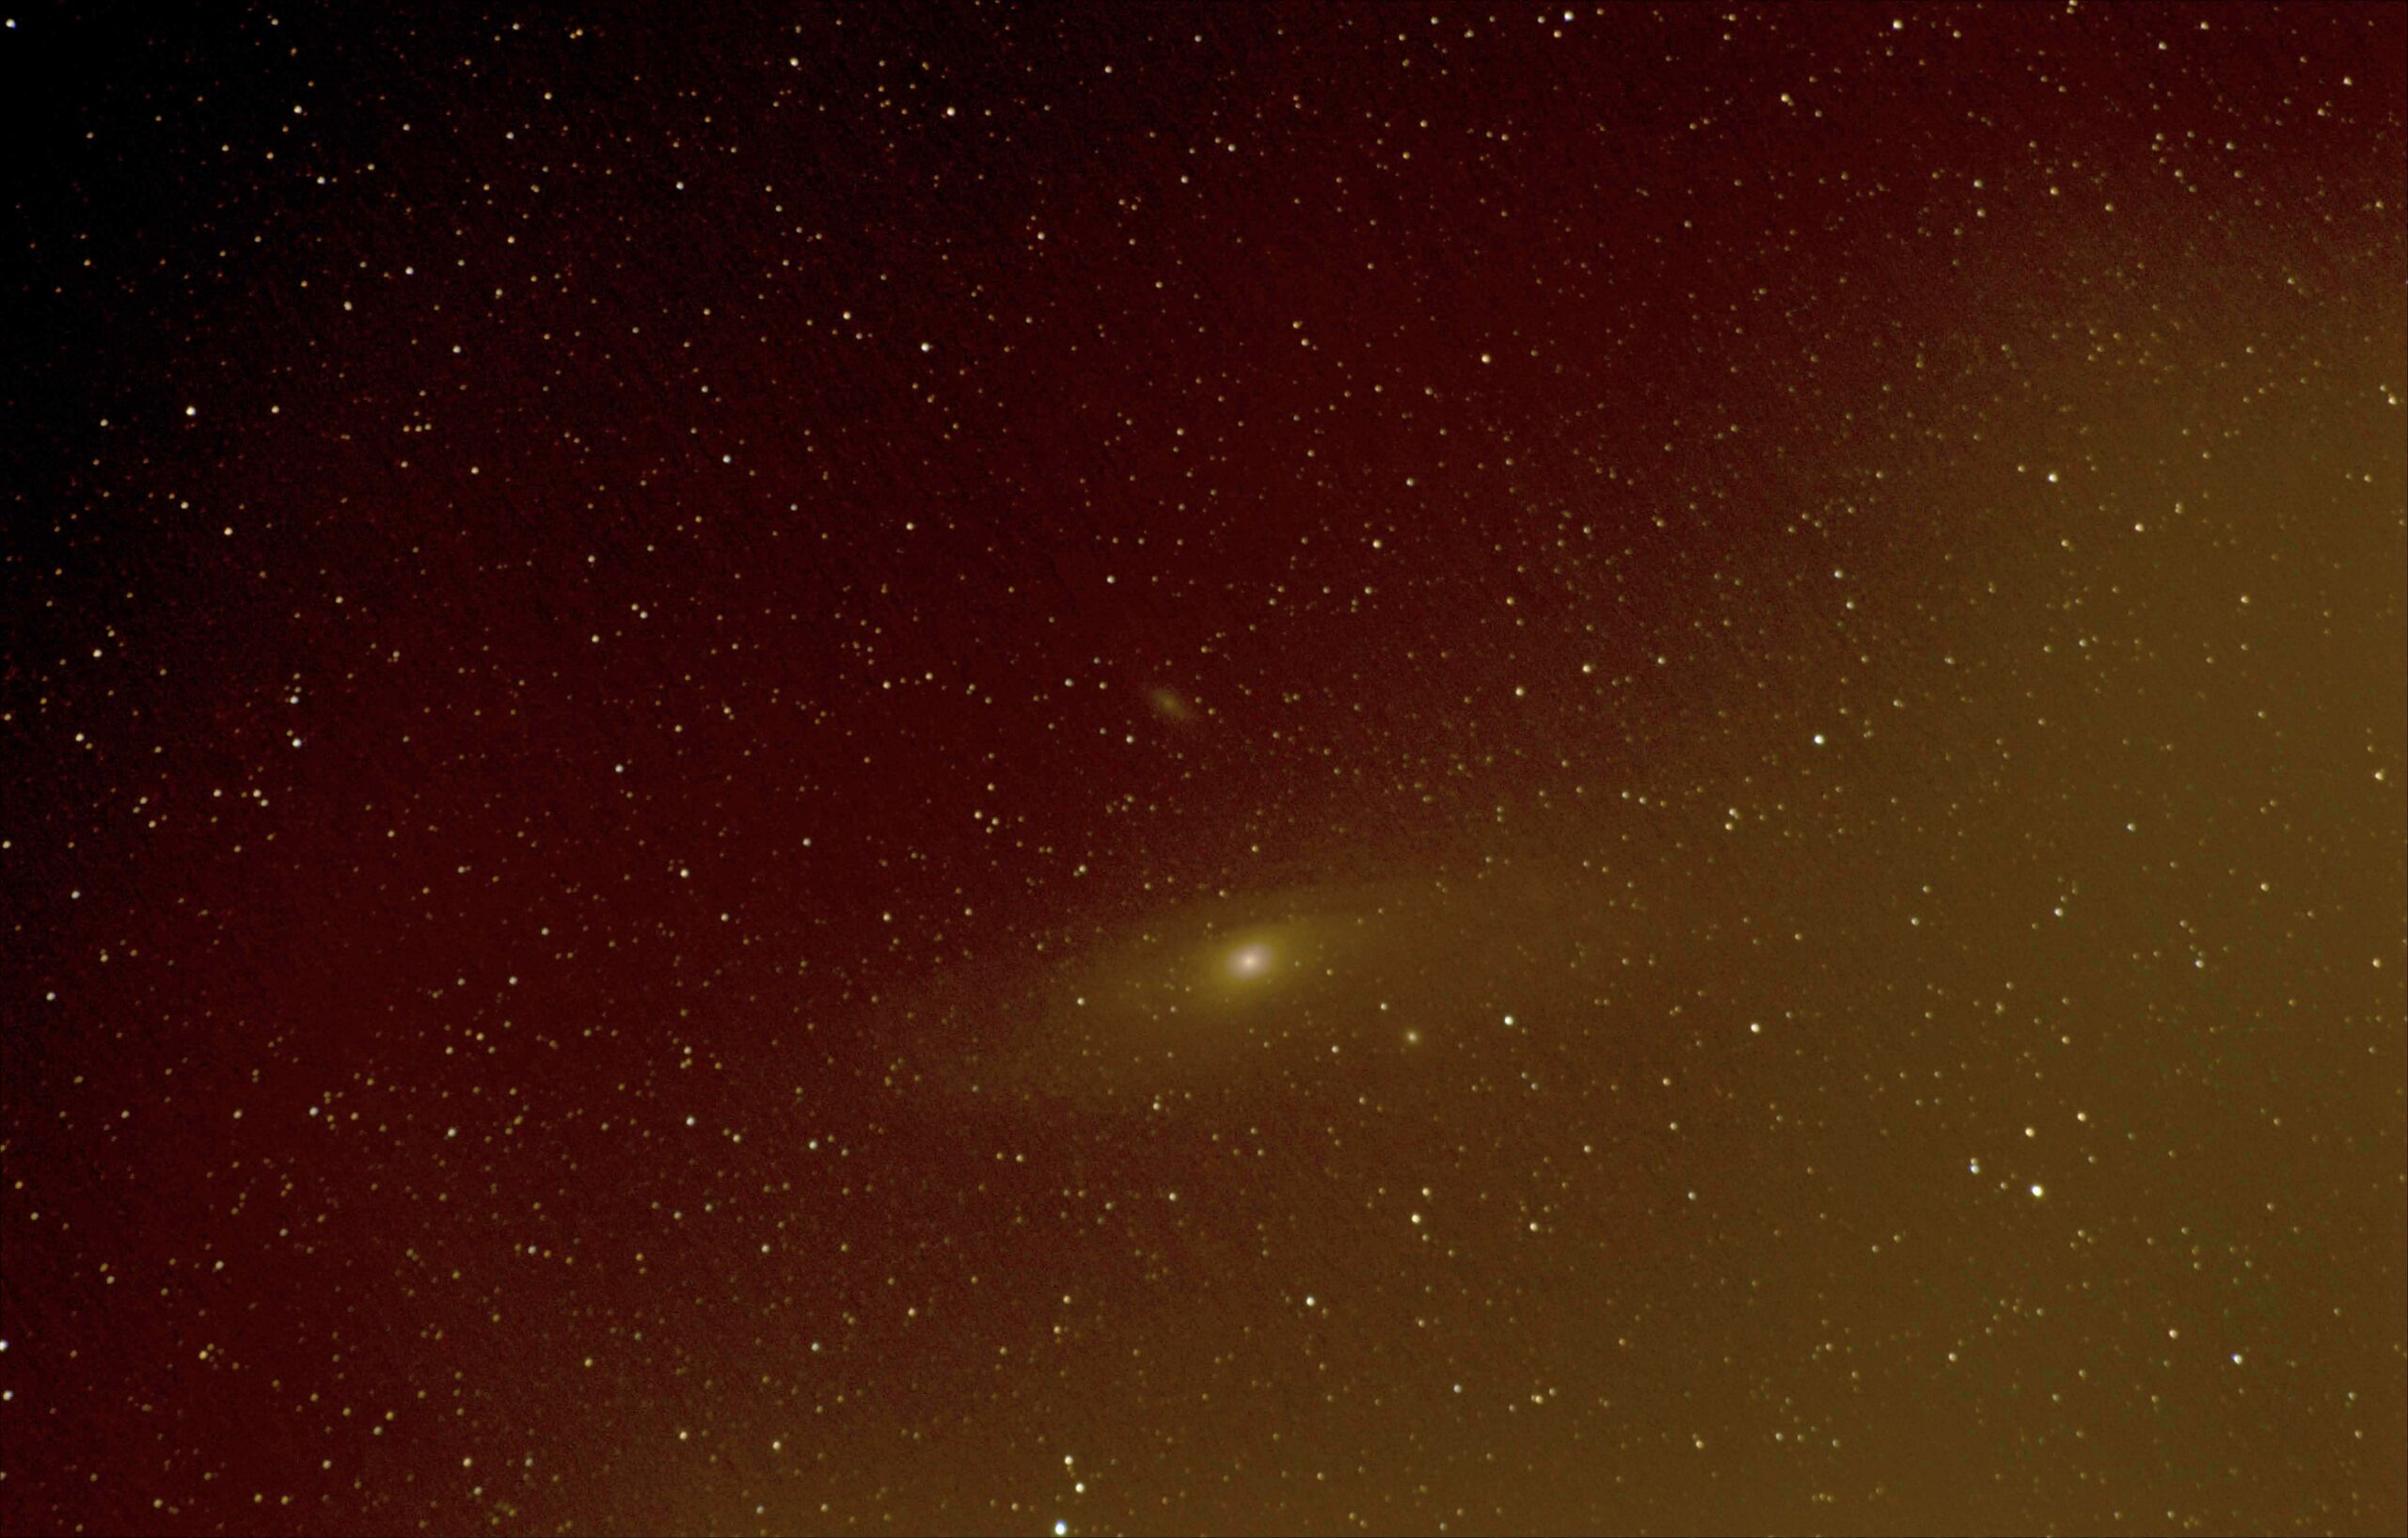
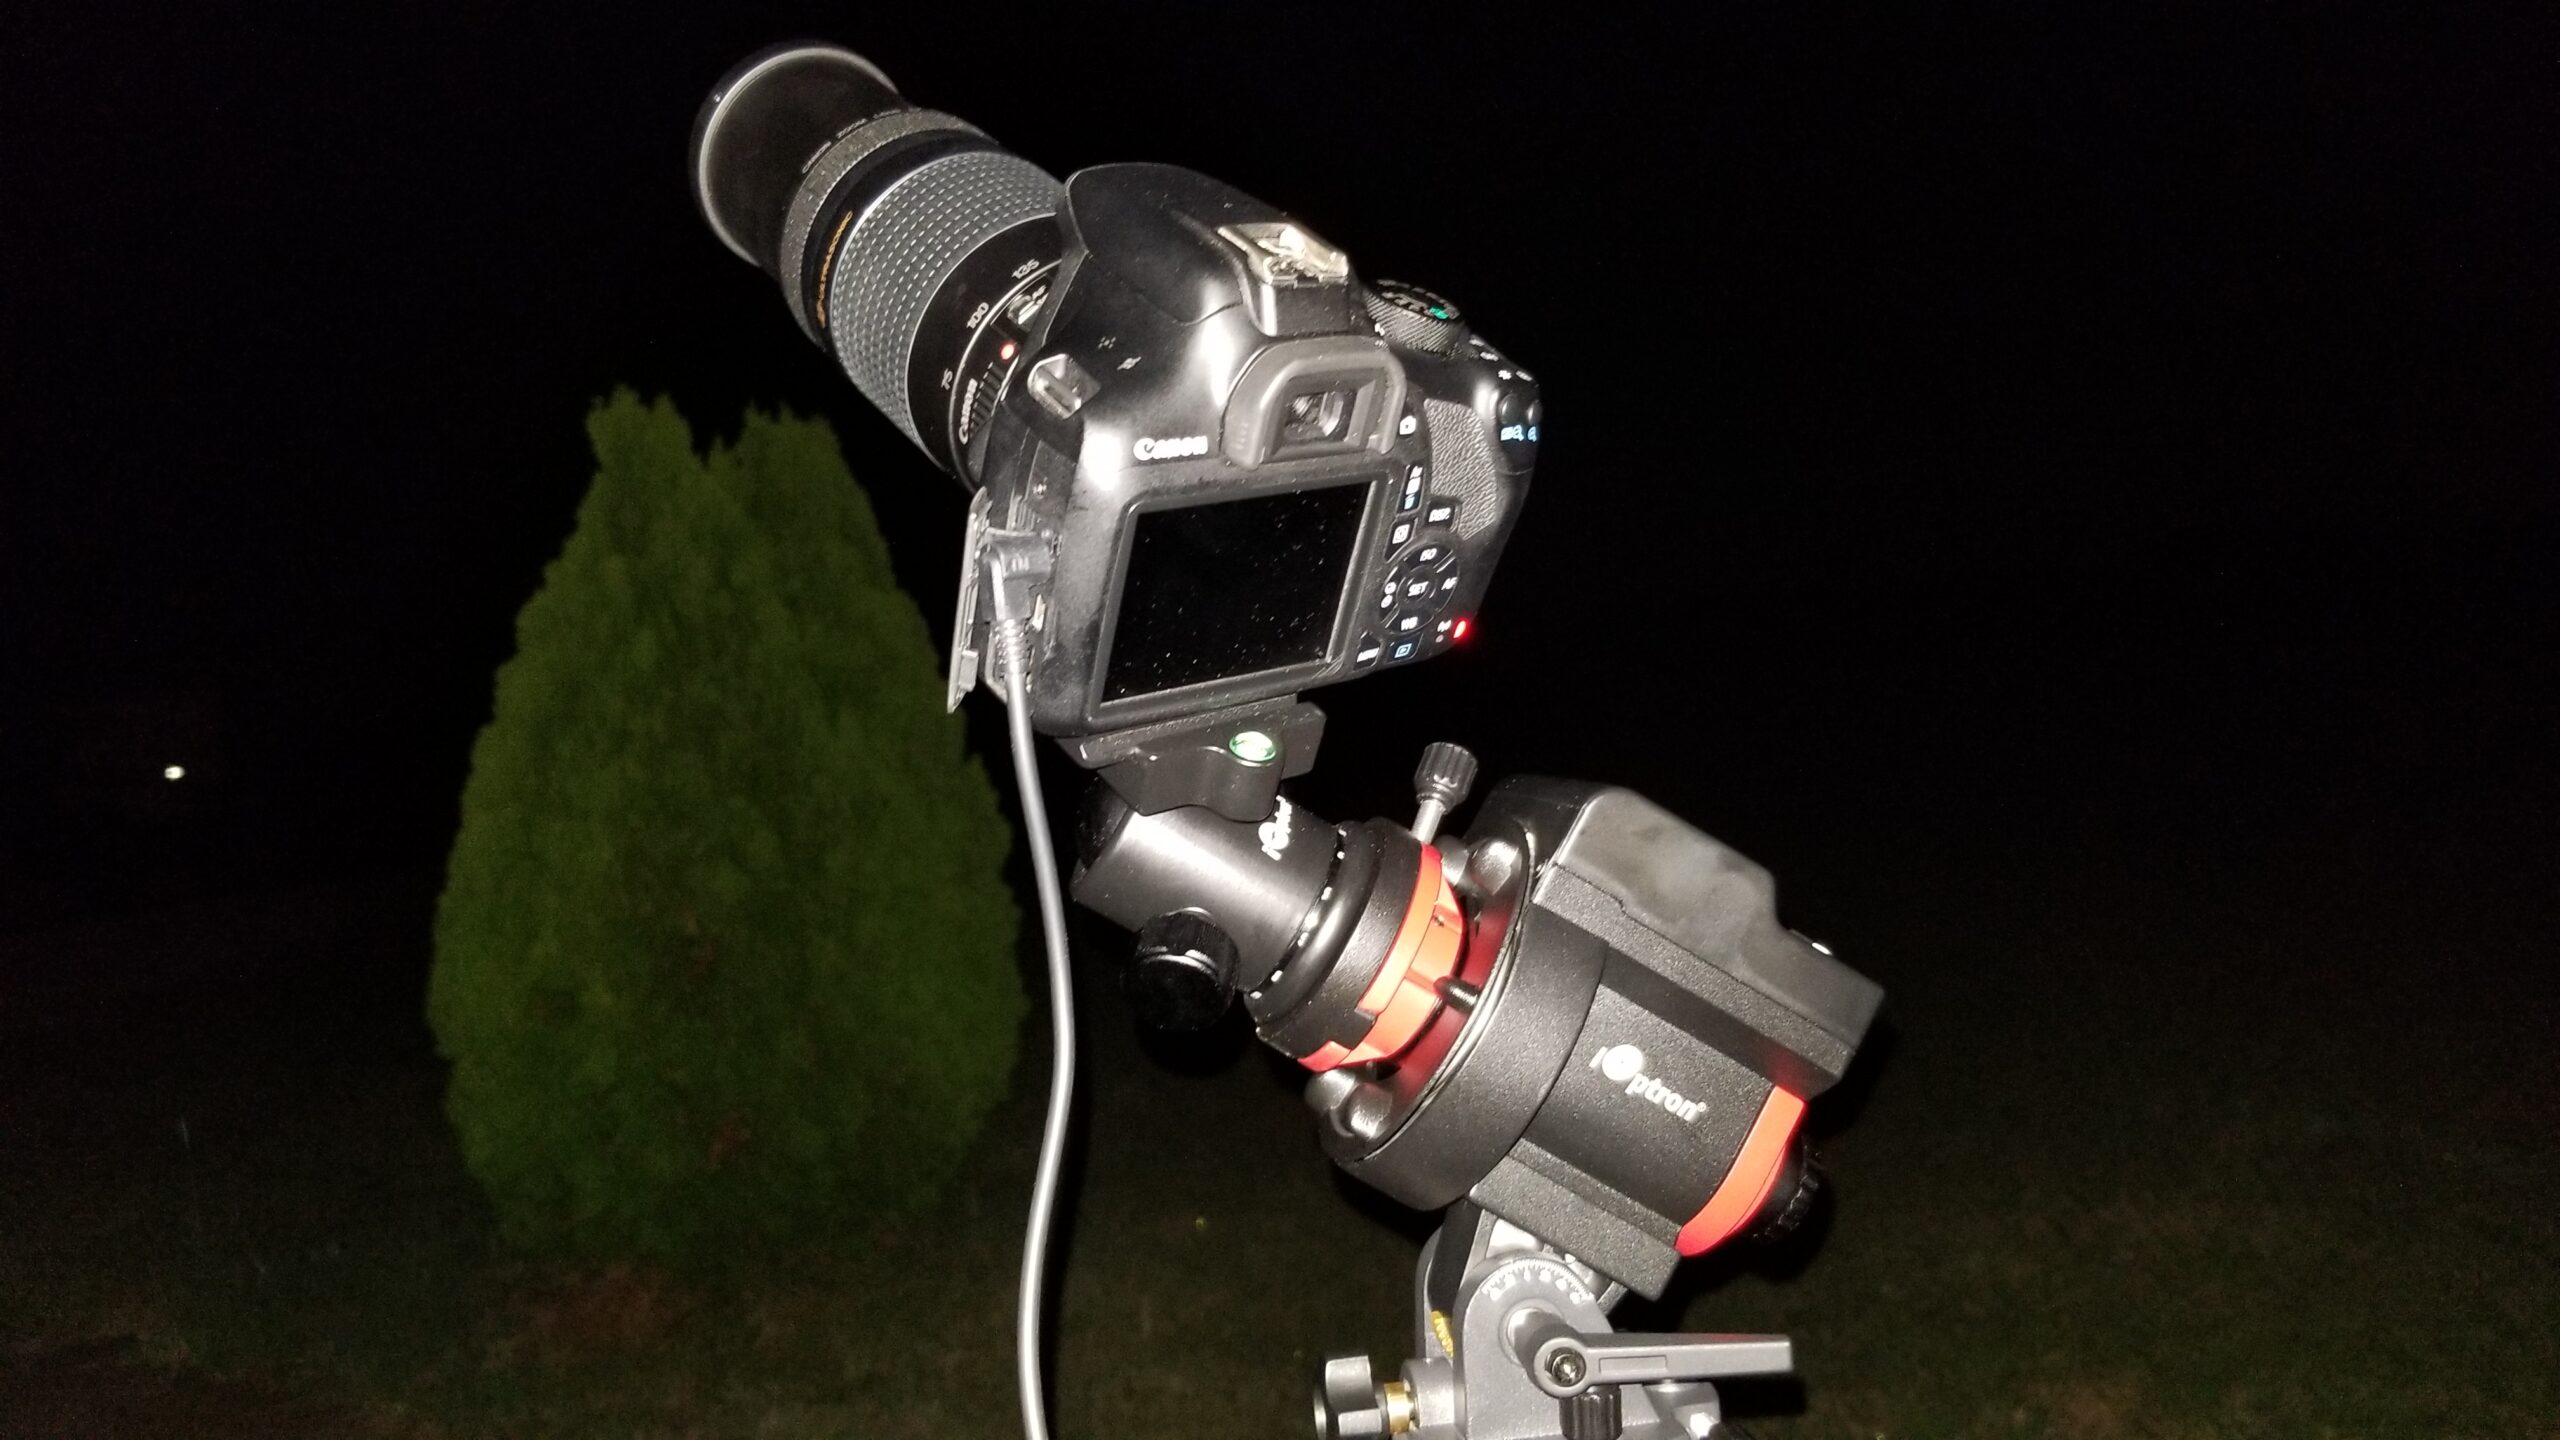
The next time, I got 300 exposures of 3 seconds each, resulting in 15 minutes of total exposure. I had an iOptron SkyGuider Pro mount by then, though I was not super familiar with it and did not lengthen the individual exposure times, though I really could have.
The postprocessed results were about the same. I think part of the issue was that I had not nailed the focus as well. However, there was more light to work with, so I got a closer crop.
For boring reasons, I did not get to do any more captures before this summer, nearly an entire year.